Remove the high-pressure rail on the left
WARNING:
Working on 12 V electrical system.
Risk of short circuits! Risk of fire!
Risk of short circuits! Risk of fire!
- Make sure that there is no charger connected to the jump start terminal in the engine compartment.
- Detach battery ground lead from battery.
- For auxiliary batteries: Detach battery minus cables from all auxiliary batteries.
WARNING:
Working on fuel system.
Risk of fire! Danger of explosion!
Risk of fire! Danger of explosion!
- When working on the fuel system, make sure the workstation has sufficient ventilation, e.g., by means of extraction.
- Tightly seal off open lines and connections; collect any leakage fuel directly at the point of exit.
- No fire, sparks, open flames or smoking.
NOTE:
TECHNICAL INFORMATION
Collect and dispose of emerging fluids. Observe country-specific waste disposal regulations.
Collect and dispose of emerging fluids. Observe country-specific waste disposal regulations.
Preliminary work
- Refer to DISCONNECTING ALL BATTERY GROUND LEADS .
- Refer to REMOVING THE ACOUSTIC COVER .
- Refer to REMOVING INTAKE SILENCER HOUSING .
- Refer to REMOVE ALL LEFT IGNITION COILS .
- Refer to REMOVING THE COVER ON LEFT AND RIGHT IN THE ENGINE COMPARTMENT AT THE TOP .
- Refer to REMOVE THE LEFT AND RIGHT FRONT-END STRUT
- Refer to REMOVE FRONT CROSS CONNECTION .
- Refer to REMOVE THE REAR TOP CROSS CONNECTION .
- Refer to REMOVING THE LEFT UNFILTERED-AIR DUCT .
- Refer to RELEASING THE LEFT CHARGE AIR LINE FROM THE EXHAUST TURBOCHARGER
- Refer to REMOVE LEFT CLEAN AIR PIPE .
- Refer to PARTLY LOOSENING THE WIRING HARNESS FROM THE CYLINDER HEAD COVER ON THE LEFT <
- Refer to REMOVING THE SOUND INSULATION FROM CYLINDER HEAD COVER ON LEFT .
Further information is available.
WARNING:
Working on fuel system.
Risk of fire! Danger of explosion!
Risk of fire! Danger of explosion!
- When working on the fuel system, make sure the workstation has sufficient ventilation, e.g., by means of extraction.
- Tightly seal off open lines and connections; collect any leakage fuel directly at the point of exit.
- No fire, sparks, open flames or smoking.
WARNING:
Working on 12 V electrical system.
Risk of short circuits! Risk of fire!
Risk of short circuits! Risk of fire!
- Make sure that there is no charger connected to the jump start terminal in the engine compartment.
- Detach battery ground lead from battery.
- For auxiliary batteries: Detach battery minus cables from all auxiliary batteries.
CAUTION:
On releasing high pressure line, fuel may emerge at high speed.
Injury hazard!
Injury hazard!
- Wear suitable personal protective equipment.
- Before performing any installation work, allow cooling system to cool down to less than 40°C.
- Note warnings on cylinder head cover.
NOTE:
RISK OF DAMAGE
Damage to the ignition coil.
The silicone hose of the ignition coil must not be contaminated by fuel as this can lead to failure of the ignition coil.
Damage to the ignition coil.
The silicone hose of the ignition coil must not be contaminated by fuel as this can lead to failure of the ignition coil.
- When working on the fuel system, cover the ignition coils with suitable materials and remove where required.
- Do not oil or grease the silicone tube of the spark plug socket. Do not use any protection or maintenance products (e.g. silicone spray, rubber care products, rust remover, etc.).
NOTE:
RISK OF DAMAGE
Contaminant or foreign body.
Contamination can result in malfunctions, loss of function or leaks.
Contaminant or foreign body.
Contamination can result in malfunctions, loss of function or leaks.
- Adhere to the utmost cleanliness.
- Protect components from contamination e.g. by covering.
- Close off line connections with seal plugs.
NOTE:
TECHNICAL INFORMATION
Collect and dispose of emerging fluids. Observe country-specific waste disposal regulations.
Collect and dispose of emerging fluids. Observe country-specific waste disposal regulations.
NOTE:
TECHNICAL INFORMATION
During dusty/sandy operating conditions, dust and sand get lodged in columns, joints and cavities on the cylinder head at area of injectors. If ignored, the result is malfunctions, damage and early wear/failure of the engine!
During dusty/sandy operating conditions, dust and sand get lodged in columns, joints and cavities on the cylinder head at area of injectors. If ignored, the result is malfunctions, damage and early wear/failure of the engine!
IMPORTANT:
There are most likely also dusty, sandy contaminations that entered into the open cavities in the cylinder head covers.
NOTE:
This affects the threaded holes in the cylinder head for the screws of the injector hold-down device. If the contaminations are not removed, the screw of the hold-down device or special tool for the removal/installation of the injector cannot be screwed in correctly, or the threads of the cylinder head become damaged like the screw!
Thoroughly clean the threaded hole with compressed air (air gun with lance) and with the additional aid of a vacuum cleaner (narrow/pointy nozzle). With the compressed air, alternately blow on the cylinder head, in area of black reference tongue (seal of cylinder head cover), and vacuum at the top on the bore in the cylinder head cover. If the screw of the hold-down device I special tool cannot be easily and fully screwed in by hand, the cleaning must be repeated until the screw can be easily and fully screwed in.
Thoroughly clean the threaded hole with compressed air (air gun with lance) and with the additional aid of a vacuum cleaner (narrow/pointy nozzle). With the compressed air, alternately blow on the cylinder head, in area of black reference tongue (seal of cylinder head cover), and vacuum at the top on the bore in the cylinder head cover. If the screw of the hold-down device I special tool cannot be easily and fully screwed in by hand, the cleaning must be repeated until the screw can be easily and fully screwed in.
NOTE:
TECHNICAL INFORMATION
When the vehicle is under dusty/sandy operating conditions, the injector shafts must be cleaned before removing the injectors.
For additional information see: 13 53... CLEANING THE CYLINDER HEAD IN AREA OF INJECTORS IF THERE IS SANDY/DUSTY CONTAMINATION
When the vehicle is under dusty/sandy operating conditions, the injector shafts must be cleaned before removing the injectors.
For additional information see: 13 53... CLEANING THE CYLINDER HEAD IN AREA OF INJECTORS IF THERE IS SANDY/DUSTY CONTAMINATION
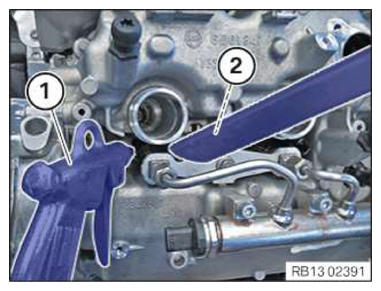
- Blow out the injector shafts with slight pressure using air gun (1) before releasing the high pressure lines. At the same time, vacuum the dirt particles with an explosion-proof vacuum cleaner (2).NOTE: TECHNICAL INFORMATION
Be sure to cover injector shafts by appropriate means and protect them from the fuel feed (e.g. with lint-free towels).
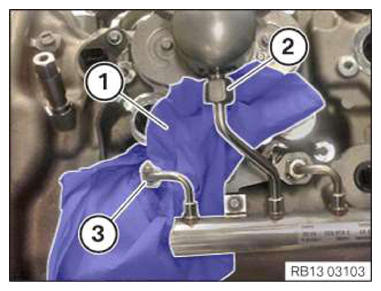
Fuel must be prevented from getting into the injector shaft. - Cover all injector shafts with a lint-free cloth (1).
- Unscrew the union nut (2) on the high pressure pump.
- Catch and dispose of escaping fuel.
- Unscrew the union nut (3) on the injector of the 5th cylinder.
- Catch and dispose of escaping fuel.
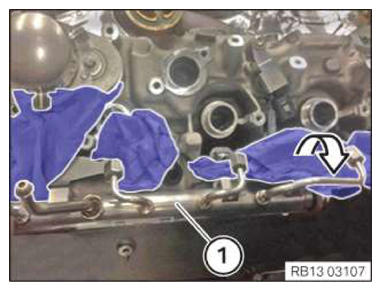
- Unscrew the union nuts (4) of the remaining injectors.
- Catch and dispose of escaping fuel.
- Loosen screws (5).
- Rotate the rail (1) upward 90° and remove it.
Make sure that no fuel gets into the injector shafts.
- Empty the rail and dispose of the fuel.