Installing the rear timing case cover
NOTE:
RISK OF DAMAGE
Damage to the surface.
The use of metal-cutting tools (e.g., emery cloths) for cleaning surfaces can damage them and lead to leaks and/or engine damage.
Damage to the surface.
The use of metal-cutting tools (e.g., emery cloths) for cleaning surfaces can damage them and lead to leaks and/or engine damage.
- Do not use any metal-cutting tools.

NOTE:
TECHNICAL INFORMATION
The sealing surfaces must be free of oil, grease and cleaning agents.
The sealing surfaces must be free of oil, grease and cleaning agents.
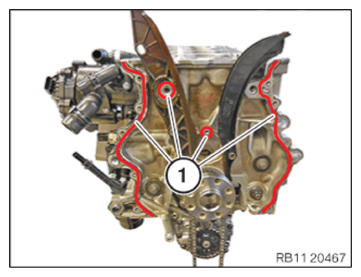
- Remove seal residue In this area (1) using special tool 0495102 (11 4 470).
- Clean the sealing surface (1) with brake cleaner.CONSUMABLE DESCRIPTION
Brake cleaner 2.0 500 ml, Spray can 83192365214 20, Canister 83192365215 NOTE: RISK OF DAMAGE
Damage to the surface.
The use of metal-cutting tools (e.g., emery cloths) for cleaning surfaces can damage them and lead to leaks and/or engine damage.- Do not use any metal-cutting tools.
NOTE: TECHNICAL INFORMATION
The sealing surfaces must be free of oil, grease and cleaning agents. - Remove seal residue In this area (1) using special tool 0495102 (11 4 470).
- Clean the sealing surface (1) with brake cleaner.CONSUMABLE DESCRIPTION
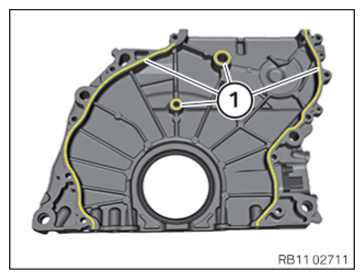
Brake cleaner 2.0 500 ml, Spray can 83192365214 20, Canister 83192365215 - Position the timing case cover (1) underneath.
- Position punch on inner side of crankshaft seal (2).
- Remove crankshaft sealing ring (2) in direction of arrow outward.
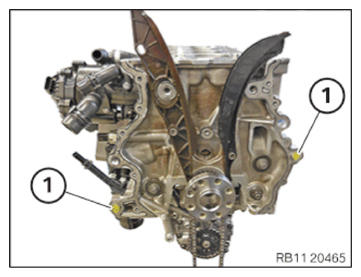
- Check the fitting sleeves (1) for damage and replace as needed.
- Check for correct fit of fitting sleeves (1).
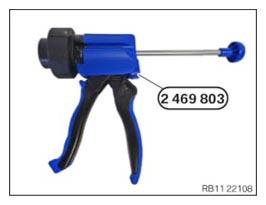
- Have the special tool 2 469 803 ready.
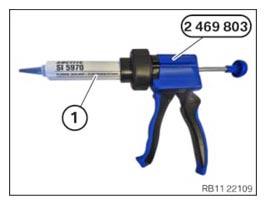
- Position the sealing compound (1) as shown on the special tool 2 469803.
Parts: Sealing compound
SEALING COMPOUND DESCRIPTIONLoctite 5970 liquid sealing compound Processing time <10 minutes at room temperature 50 ml, Cartridge 83190404517 NOTE: TECHNICAL INFORMATION
The processing time of the liquid sealing compound can be at a maximum of 10 min.
Commissioning of the assembly is not possible until 25 minutes after the processing time.
Non-observance can lead to leaks in the assembly. - Apply the sealing compound In area (1)
along the Inner edge.TECHNICAL DATA SPECIFICATION
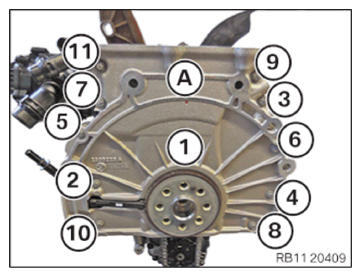
Height of the sealing bead 2.0 mm... 2.5 mm - Replace screws (1) to (11).
Parts: Screws
- Carefully mount the timing case cover (A).
- Tighten screws in the order (1) to (11).TIGHTENING TORQUES SPECIFICATION
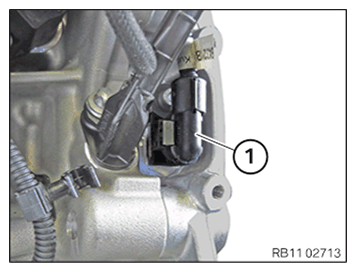
Rear timing case cover on crankcase M6x31 Replace screws. Joining torque 8 Nm Angle of rotation 90° - Connect and lock the connector (1).
- Make sure the connector (1) engages audibly.NOTE: RISK OF DAMAGE
Radial shaft seal damage.
Taping the sealing lip (inner) and applying oil to the radial shaft seal will lead to its destruction.- Do not tap the sealing lip (inner) of the radial shaft seal.
- Do not apply oil to the radial shaft seal.
- Install the radial shaft seal dry.
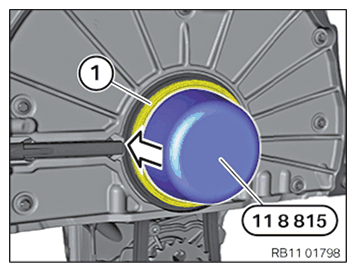
- Pre-assemble special tool 0 496 137 (11 8 815) on crankshaft.
- Carefully slide the new crankshaft sealing ring (1) straight off the special tool 0 496 137 (11 8 815) using a rotational movement until the new crankshaft sealing ring is positioned parallel on the timing case cover.
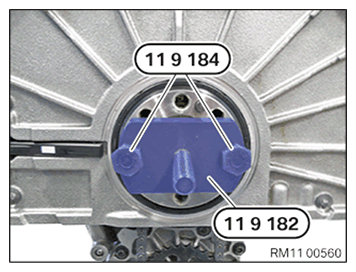
- Secure special tool 0 494 029 (11 9 182)
to the crankshaft using special tool 0 494 031 (11 9 184).
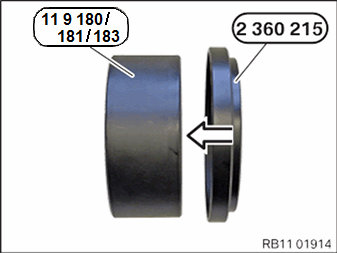
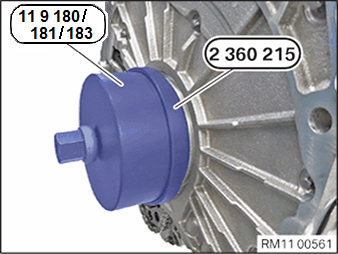
- Connect special tool 2 360 215
onto special tool 0 493881 (11 9180).
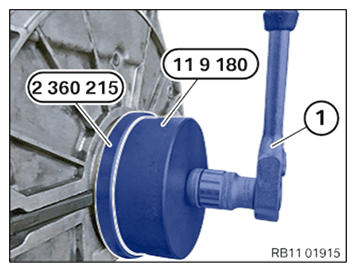
- Pull in the new crankshaft sealing ring with the special tool 0 494 028 (11 9 181)
and 2 360 215
in combination with the special tool 0 494 030 (11 9 183).
- Tighten the new crankshaft sealing ring using the tool (1) to the stop.