Securing the propeller shaft on the rear axle differential
NOTE:
RISK OF DAMAGE
Damage to the prop shaft during installation.
Non-observance of the installation guidelines for the prop shaft on the rear axle differential may cause severe damage.
Damage to the prop shaft during installation.
Non-observance of the installation guidelines for the prop shaft on the rear axle differential may cause severe damage.
- Always replace the recessed nut on the rear axle differential. Screw lock must be available.
- Strictly observe a minimum hardening time of three hours after having screwed in the recessed nut. The hardening time may be longer at lower temperatures.
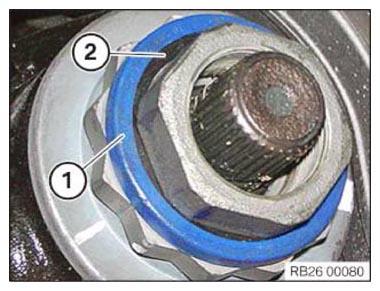
- Remove retaining ring (1) and seal (2).
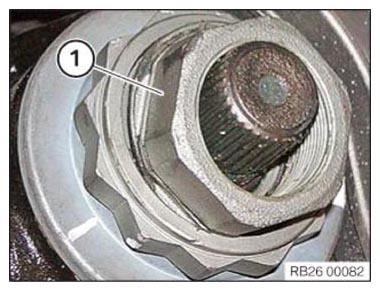
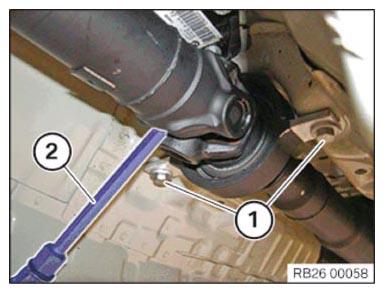
- Remove recessed nut (1).
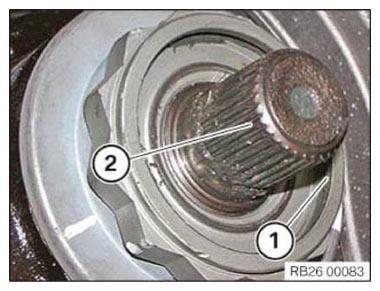
- Clean all residue from the recessed collar (1) of the twelve-edge flange nut, the gearing on the bevel drive pinion (2) and the taper (3) and de-grease them.
- Top up the collar insert (1) with grease.CONSUMABLE DESCRIPTION
Lubricating grease 50 g, 83230417754 Optitemp HT 1 LF Tube - Replace recessed nut (1), seal and retaining ring (2).
Parts: Recessed nut, seal, retaining ring
- Insert the recessed nut (1) with the seal into the recessed collar of the twelve-edge flange nut.
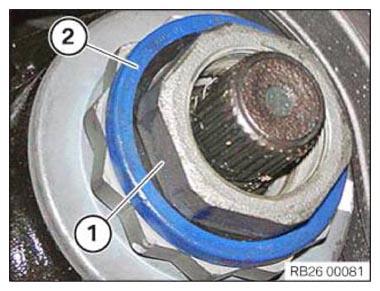
- Mount retaining ring (2).
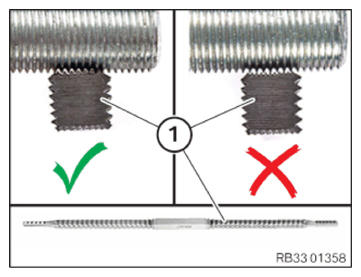
- Use thread file (1) to remove any adhesive residue on the thread.
- The thread pitch must be correct! NOTE: RISK OF DAMAGE
Damage to the output flange.
Failure to observe the greasing specifications may lead to damage on the output flange.- Do not contaminate the thread of the output flange with grease.
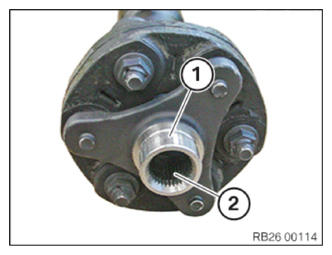
- Clear away adhesive residue from the thread (1) of the flange and clean.
- Clean gearing (2).
- Grease gearing (2).CONSUMABLE DESCRIPTION
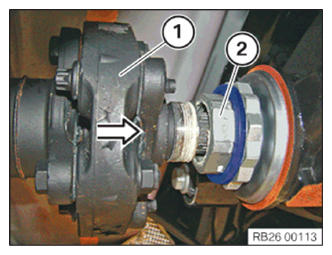
Lubricating grease 50 g, 83230417754 Optitemp HT 1 LF Tube - Loosen the luggage strap (2) from the prop shaft (1).
- Push the prop shaft (1) in arrow direction against the recessed nut (2) up to the stop.
- Manually screw the recessed nut (2) at least two threads onto the prop shaft (1) and tighten it.
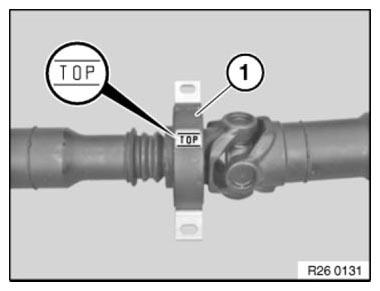
- Position central mount (1).
Position the center mount (1) with the designation TOP at the top in the transmission tunnel.
- Screw in the screws (1) by a few turns.
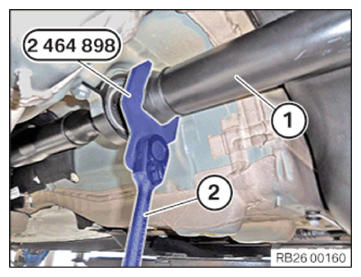
- Variant with a wide universal joint:
Secure the propeller shaft from twisting with a suitable tool (2) on the center universal joint.
- Variant with a narrow universal joint:
Secure the propeller shaft (1) from twisting with the special tool 2 464 898 and a suitable tool (2) on the center universal joint.
NOTE: RISK OF DAMAGE
Damage to the flange nut.
Failure to observe the installation specifications may lead to serious damage to the flange nut and the rear axle differential.- Do not use the twelve-edge flange nut as counter support.
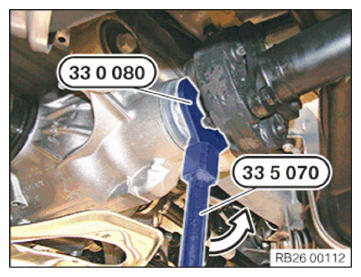
- Screw in the recessed nut within 5 minutes.
- Tighten the recessed nut counterclockwise in the arrow direction
with special tools 0 495 554 (33 5 070)
and 0 496 959 (33 0 080). TIGHTENING TORQUES SPECIFICATION
Propeller shaft to rear axle differential recessed nut Replace recessed nut. tightening torque 100 Nm - After the propeller shaft is installed and the recessed nut is screwed in, strictly observe a hardening time of minimum 3 hours.
During this time the vehicle must not be moved or pushed!
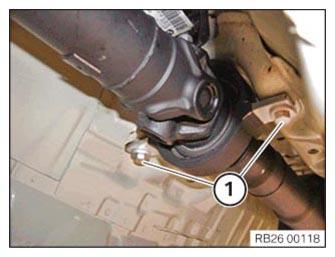
- Tighten down screws (1).TIGHTENING TORQUES SPECIFICATION
Central mount to body M8 Tightening torque 19 Nm