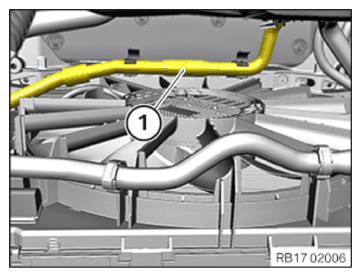
If the active stabilizer is installed: Installing fan cowl
Install fan cowl
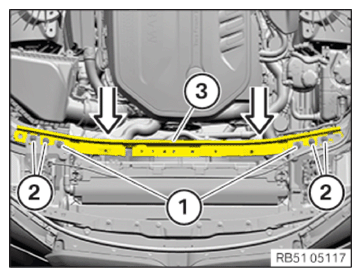
- Feed in and install the fan cowl (3) in the direction of the arrow.
- Tighten the screws (2).TIGHTENING TORQUES SPECIFICATION
Fan cowl with electric fan on radiator TS6x20 tightening torque
6.5 NmTIGHTENING TORQUES SPECIFICATIONFan cowl on radiator TS6x20 tightening torque
6 Nm - Connect and lock the connector (1).
The connector (1) must engage audibly.
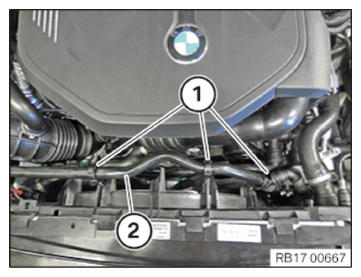
- If fitted:
Fasten the coolant line (1) below at the fan cowl with the clamps.
- Feed in and install coolant line (2).
- Lock clamps (1).
The clamps (1) must engage audibly.
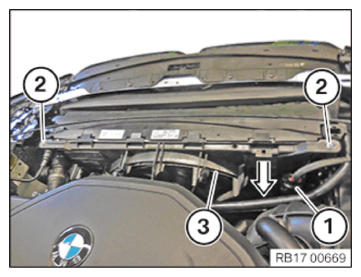
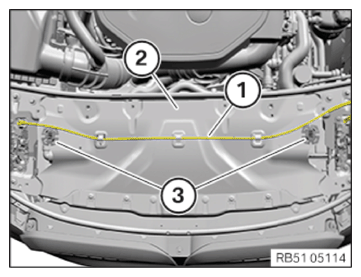
Install the rear top cross connection
- Guide the cross connection (3) in from the rear in the direction of the arrow.
- Tighten down screws (1) and (2).
TIGHTENING TORQUES SPECIFICATION
| Top rear cross connection | |
| Torx screw M8x30 |
tightening torque 19 Nm |
| Hexagon screw M8x20 |
tightening torque 19 Nm |
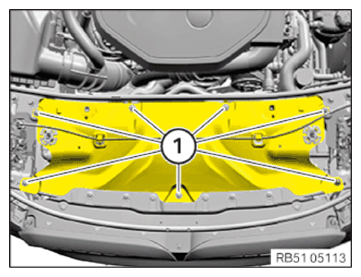
Install front cross connection
TIGHTENING TORQUES SPECIFICATION
| Front cross connection | |
| screw | Tightening torque 11.8 Nm |
Installing front-end strut on left and right
NOTE:
Description is for left component only. Procedure on the right side is identical.
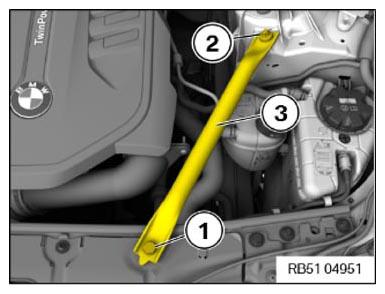
Installing the front-end strut
- Install the front-end strut (3).NOTE: RISK OF DAMAGE
Use of an incorrect tool (impact screwdriver) to release and tighten the screws.
Damaged thread.- Only use a standard tool (e.g. reversible ratchet) to release/tighten the screws.
- Clean the thread at shock tower.
- Replace the screw (1).
Parts: Screw
- Tighten down screw (1).TIGHTENING TORQUES SPECIFICATION
Front-end strut to cross connection Hexagon screw
Replace screw.Joining torque
28 Nm
Angle of rotation
90° - Replace the screw (2).
Parts: Screw
- Tighten down screw (2).TIGHTENING TORQUES SPECIFICATION
Front-end strut/strut brace Screw
Replace screw.Tightening torque
56 Nm
Angle of rotation
90° - Repair the damaged thread on the shock tower with a Helicoil insert.
CONSUMABLE DESCRIPTION
| Helicoil thread insert | M10x30 mm | 07129909659 |
Install resonator
- Make sure that the holder (6) is not damaged when installing the resonator (4).
- Insert the resonator (4) into rubber mount (5) and install.
The resonator (4) must engage audibly in the rubber mount (5).
- Tighten down screw (2).TIGHTENING TORQUES SPECIFICATION
Resonator to intake filter housing screw Tightening torque
2.8 Nm - Tighten clamp (3).TIGHTENING TORQUES SPECIFICATION
Resonator to clean air pipe cl. tightening torque
3 Nm - Secure the clamp (1).

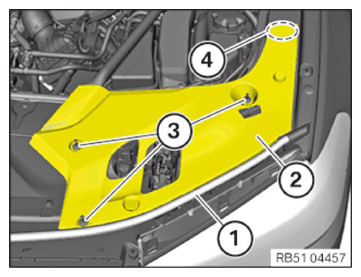
Installing the cover on the left and right in the engine compartment at the top
NOTE:
Description is for left component only. Procedure on the right side is identical.
Install the cover in the engine compartment on top
- Insert the cover (2) in the area (4).
- Secure expanding rivet (3).
- Attach the seal (1) to the cover (2).