General procedure for the disassembly and installation of bonded window glass (530i 2017-2022, 530i xDrive 2017-2022, 530e PHEV 2018-2022, 530e xDrive PHEV 2018-2022, 540i 2017-2022, 540i xDrive 2017-2022, M550i xDrive 2018-2022)
- General information
Follow general REPAIR INSTRUCTIONS on window bonding.
MATERIALS needed for window bonding.
The vehicle can be towed away or driven without a windscreen, rear window and side window.
When carrying out disassembly/installation work and during the hardening time, the vehicle must be standing on its wheels on a level surface.
The windscreen, rear window and side windows are glued to the body. This bonding will increase the torsional rigidity of the vehicle. To obtain perfect bonding, comply with the installation procedure described in the following.
- Disassembly
- 2.1) Disassembly in general
The following dismantling methods are applied, according to the version:
- OSCILLATING KNIFE (not permissible for vehicles with window bonding on carbon body components)
- Cutting wire with WIRE PULL HANDLES .
- "SPIDER" window glass removal system (unsuitable for severely damaged window glass)
NOTE: When cutting out the window glass with wire pull handles, there is a risk of damage to the window glass if the wire is pulled over the window edge.
Unless otherwise described, only use this method when replacing the window glass.Follow the vehicle-specific repair instructions!
- 2.2) Disassembly of damaged window glass
The disassembly method described in the REP may be unsuitable depending on the degree of damage.
- e.g. suction cups cannot be attached to window glass around cracks
- Damaged window glass may damage and tear the nylon string
CAUTION: Risk of damage!Use one of the other disassembly methods at your own discretion in the event of severely damaged window glass.
Make sure adjacent components are adequately protected.
- 2.1) Disassembly in general
- Installation
- 3.1) Preparation
Position the windscreen or rear window on a universal work top or secure the components on a tool trolley using suction lifters.
Attach two suction lifters to the outsides of the window glass in the event of storage on a universal work top.
According to its size, fix side and door window glass onto the tool trolley using suction lifters or special tool 51 3 220 and set down on a suitable support.
Always keep the suction faces of the window glass suction lifters dry and clean.
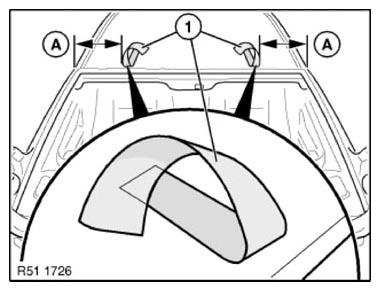
NOTE: If accessibility is restricted, insert the window glass on a trial basis.Bond two yellow plastic adhesive tapes (1) approx. 400 mm in length to the roof.
(A) = 250 mm
Only the yellow plastic adhesive tape may be used to fix the window glass.
The window glass will slip down if other adhesive tapes are used.
Window glass slippage will result in leaks and wind noises.
After completing the paint work, the paint must be fully hardened before the plastic adhesive tapes are applied.
- 3.2) Pre-treatment of bonding surfaces
- Protect the vehicle interior against contamination, cover the Head-Up Display.
- Clean window glass and body aperture (with residual adhesive bead) with cleaning agent R2CAUTION: Do not use Sika remover 208 for cleaning in the adhesive area.
- Observe an air drying time of at least 5 minutes (at least 15 minutes when applied to residual adhesive bead)
- Remove residual adhesive bead from body and window glass (see point 3.3)
- Touch up PAINTWORK DAMAGE to body aperture with BMW multibase filler (except for carbon body components)
Pretreatment on new body component (no residual adhesive beads present):
Surface Pretreatment Panel painted Wipe cleaning agent R1 dry with a paper towel or observe the air drying time of at least 1 minute Carbon Only cleaning agent R2 Carbon painted (e.g. roof outer skin M3) Wipe cleaning agent R1 dry with a paper towel or observe the air drying time of at least 1 minute Plastic (e.g. I01 A-pillar) Cleaning agent R2 and ScotchBrite Multiflex abrasive pad - 3.3) Remove adhesive residue from the body and window glass
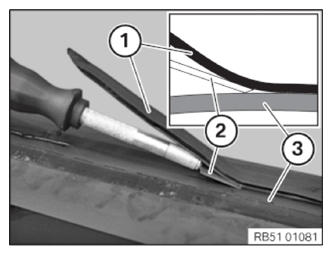
Do not remove residual adhesive bead (1) until shortly before bonding.
Use the pitchweld scraper to remove the residual adhesive bead (1) from the body aperture and window glass (3).
Position the pinchweld scraper (2) as shown and remove the residual adhesive bead (1) up to a thickness of approx. 0.5 mm.
CAUTION: Carbon body components are not to have scratches with a depth greater than 0.2 mm.Note, comply with life module check!
- 3.4) Installation of spacer (spacer buffer/dual-lock tapes)
Completely remove all residue of existing spacers before bonding new adhesive spacers.
The exact position of the spacers must be retained (see vehicle-specific repair instructions).
Incorrectly fitted spacers will result in:
- Window glass breakage due to tension
- Leakage (if the spacer is in the adhesive area)
- Wind noises
- 3.5) Add-on part
Depending on the version, attach sealing, expanding foam tape, rain sensor, etc.
Observe OVERVIEW of ADDITIONAL WORK with rain sensor when working with versions including the rain sensor!
Follow the vehicle-specific repair instructions!
- 3.6) Pre-treatment of new window glass
- Clean bonding surfaces with cleaning agent R2.
- Observe an air drying time of at least 1 minute
- Apply a thin coat of glass activator (yellow stick); a final wipe is not necessary.
- Observe an air drying time of at least 2 minutes
The glass activator is used for adhesion between glass or ceramic glass and the adhesive. Therefore, a thin, homogeneous and continuous line of glass activator must be applied. If the window glass is to be reused with a cut-back adhesive bead, glass activator is not needed.
It must be guaranteed that a 1 to 2 mm wide line of glass activator is located on the ceramic glass next to the squeezed adhesive bead.
The adhesive bead may become up to 15 mm wide in compressed condition. The width of the glass activator is therefore normally a minimum of 17 mm for windscreens and rear windows and a minimum of 9 mm for side windows.
The glass activator may not be applied in the field of view or the point grid. Fresh glass activator in the field of view must immediately be wiped off with cleaning agent R2 because hardened glass activator will leave a haze behind.
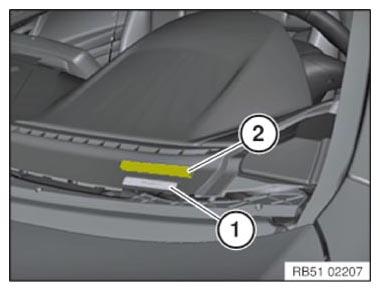
- 3.7) Version with inspection glass for vehicle identification number in windscreen
Foam tape (2) must be installed to protect the vehicle identification number (1) against tampering. If necessary, install foam tape 07 14 7 222 909.
Close off the inspection glass on the windscreen (bottom left) with Sika bonding base VP 206.
Except for:
- All US/GB models
- All models with a black dashboard cover, which means that the vehicle color cannot be seen through the inspection glass
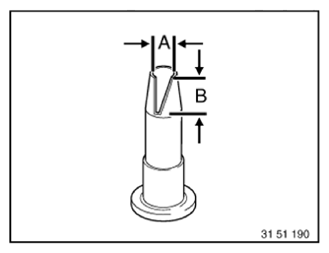
- 3.8) Nozzle preparation
Use the standard nozzle C for windscreens, rear windows, and body-specific fixed side window glass.
(A) 8 ±1 mm (B) 12 ±1 mm Prepare plastic nozzle for fixed door window glass.
(A) 8 ±1 mm (B) 15 ±1 mm Deviations are described in the vehicle-specific repair instructions.
Black ceramic glass impermeable to UV light is located on the peripheral zone of the inside of the window to protect the adhesive bead.
Ceramic glass must not be damaged.
- 3.9) Apply adhesive
Adhesive is applied to the window glass using a cartridge gun.
Glue cartridge must be vertical to window glass.
The almost vertical part of the adhesive bead must be facing the outer window glass edge.
On window glass with guidelines, the adhesive bead must be applied centrally between the guidelines.
On window glass without guidelines, the position of the adhesive bead is specified in the vehicle-specific repair instructions.
Coat bead joint.
Effect of differing adhesive quantities:
Too little adhesive: Too much adhesive: - Window glass rests too low in body aperture
- Insufficient squeezing of adhesive bead (leaking)
- Window glass rests too high in body aperture
- Wind noise may occur
- Strains/tensions may occur (window glass breakage)
- Dirt contamination of add-on parts by emerging adhesive
- Adhesive on uninsulated strainer pressure lines of aerial(s) (reception interference)
Note on bonding of windscreen:
The adhesive amount specified in the vehicle-specific repair instructions is sufficient if the specified adhesive bead size is maintained.
If too much adhesive is applied due to application-related variations (manual application), the specified adhesive amount may not be sufficient. To avoid interrupting adhesive application for longer than the permitted period, have another glue cartridge ready.
CAUTION: Once the adhesive bead has been applied, the window glass must be installed within 7 minutes (depending on air humidity, temperature).After 7 minutes the adhesive bead forms a skin which can no longer guarantee a perfect bonding.
- 3.10) Mounting the window glass
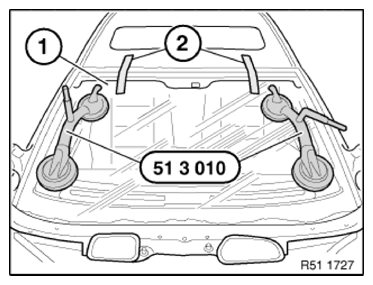
To prevent a pressure build-up in the passenger compartment when the doors are closed:
- Open a side window
Mount window glass (1) with suction lifter (51 3 010).
- 3.11) Adjusting the window glass
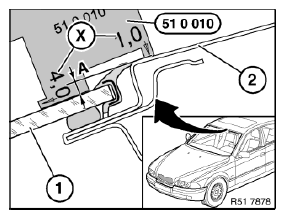
To avoid wind noise, the front and rear windows (1) must be lower than the roof outer skin (2).
Check ride height of the windscreen or rear window using special tool 51 0 010.
Dimension (A) of window glass offset, refer to vehicle specific repair instructions.
(X) = measurement stages 1... 4 mm
- 3.12) Fixing the window glass
Fix the window glass with yellow plastic adhesive tapes (2).
Immediately remove dirt contamination with adhesive residue using Sika remover 208. Do not press out the window glass again.
Hardened adhesive can only be removed mechanically.
- 3.13) Label
Depending on version, apply label.
- 3.1) Preparation