Remove rear brake pads
WARNING:
Vehicle may slip off the vehicle hoist if the vehicle hoist is handled incorrectly.
Danger! Immobilization period-threatening injuries!
Danger! Immobilization period-threatening injuries!
- Observe safety instructions on raising the vehicle using a vehicle hoist.
- For additional information see: 00... Raise the vehicle using a VEHICLE LIFT .
CAUTION:
Effects on other persons.
Injury hazard! Risk of damage!
Injury hazard! Risk of damage!
- Make sure that no other persons are in or around the vehicle.
Preliminary work
- Remove the rear left and right WHEELS .
- Remove rear brake pad WEAR SENSOR .
NOTE:
TECHNICAL INFORMATION
During work on the rear brake, it must be ensured that the button for the electromechanical parking brake cannot be pressed.
During work on the rear brake, it must be ensured that the button for the electromechanical parking brake cannot be pressed.
NOTE:
TECHNICAL INFORMATION
GENERAL INFORMATION on changing the brake pads:
For vehicles older than 48 months it is recommended to replace the retaining spring or expanding spring.
The brake pad wear sensor must be replaced once it has been removed because the brake pad wear sensor loses its retention capability in the brake pad.
A CBS reset must be done after every brake pad exchange:
A CBS reset in the vehicle is possible in the event of a partially ground down brake pad wear sensor. The CBS display in the Central Information Display (CID) is active.
In the event of a brake pad wear sensor that is not partially ground down, a CBS reset is only possible with the diagnostic system using an appropriate scan tool. No CBS display in the Central Information Display (CID).
If adhesive bonded brake pads are installed, the brake pads must be replaced after releasing the adhesive bond!
NOTE:
TECHNICAL INFORMATION
To prevent damage to the surface coating: With floating calipers on the brake caliper mounting bracket or with fixed calipers in the brake caliper housing, do not clean the contact surfaces for the brake pads to the extent that it is possible.
Clean the contact surfaces with brake cleaner (BMW part number 83 19 2 154 780). Next, apply a thin coat of brake pad paste (BMW part number 83 19 2 158 851 for 3 g) or 83 19 2 158 852 fr 100 g).
Spread brake pad paste on the marked surfaces with a brush.
For ADDITIONAL INFORMATION see: 34 00... brake pad paste
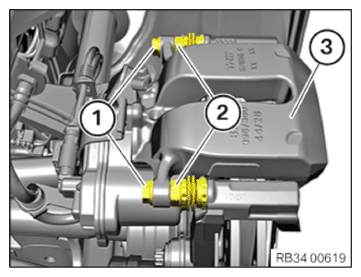
- Release the screws (1); if necessary use the hexagon head (2) for counter support.
- Remove brake caliper (3).
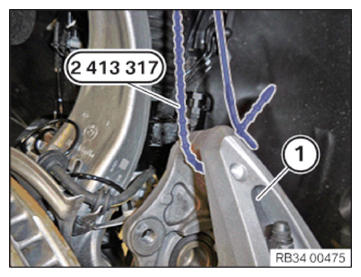
- Tie up the brake caliper (1) with the special tool (cable tie) 2 413 317.
Do not hang the brake caliper from the brake hose.
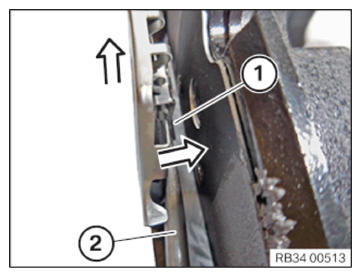
- Equipment version of the design clip:
- Lift retaining tab (1) with a screwdriver (2) and remove the design clip in the arrow direction.
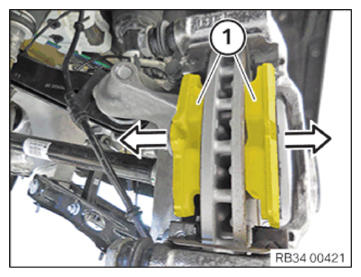
- Remove the brake pads (1) from the brake caliper in arrow direction.
- Mark any worn brake pads.
If there is brake lining backplate wear on one side, they must not be mixed up.
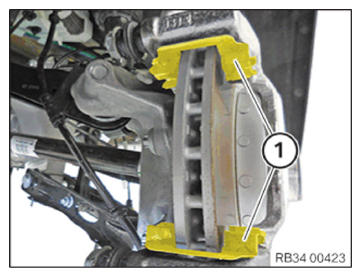
- Remove the sliding plates (1).
NOTE:
TECHNICAL INFORMATION
When pressing the brake piston back, note the brake fluid level in the expansion tank.
Overflowing brake fluid will damage the paintwork.
When pressing the brake piston back, note the brake fluid level in the expansion tank.
Overflowing brake fluid will damage the paintwork.
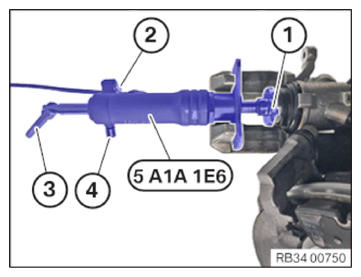
- Position brake reset 5 A1A 1E6 in the brake caliper and hook adapter plate (1) into the brake piston.
- Move brake reset 5 A1A 1E6 to the stop by pressing the trigger button (2).
- Keep trigger button (2) pressed and turn lever (3) clockwise until the brake piston is turned back fully.
- Relax brake reset 5 A1A 1E6 by pressing release button (4) and remove it from the brake caliper.