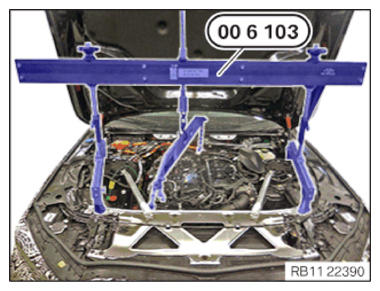
Removing the engine from the installation position
- Turn the special tool 2 361 506 (00 6 103)
to lower the combustion engine until it lies completely on the engine mounts.
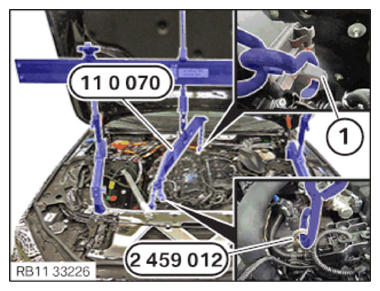
- Feed out special tool 0 490 579 (11 0 070) on special tool 2 459 012 and place to one side.
- Feed out special tool 0 490 579 (11 0 070) on engine mounting bracket (1) at the rear and place to one side.
NOTE:
TECHNICAL INFORMATION
Conduct the following operation with the assistance of a second person.
Conduct the following operation with the assistance of a second person.
- Remove the engine bridge (1) with an auxiliary person.
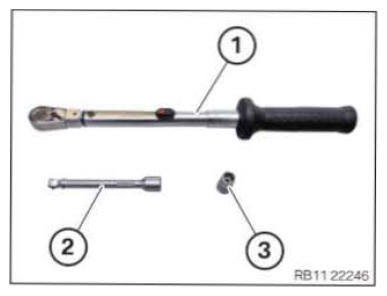
- Keep all the standard tools ready.
Number Description 1 Standard torque wrench 2 Swivelling extension 3 External Torx E14 - Position suitable tools (1).
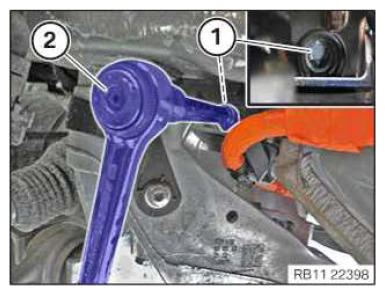
- Tighten bolt (1) of the left engine mount using a standard tool (2) sideways.

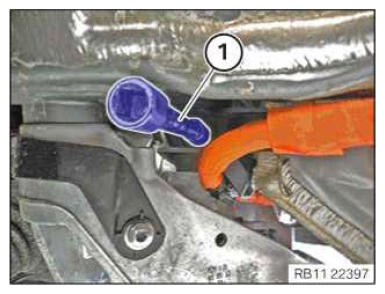
TIGHTENING TORQUES SPECIFICATION
| Engine mount to engine support bracket | |
|---|---|
| M12 | tightening torque 100 Nm |
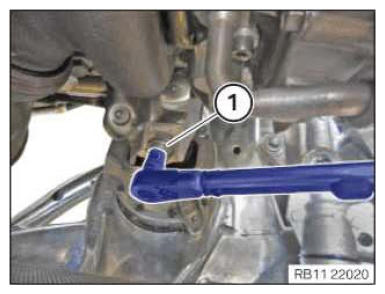
- Tighten the bolt (1) of the right engine mount using a standard tool from the top.
TIGHTENING TORQUES SPECIFICATION
| Engine mount to engine support bracket | |
|---|---|
| M12 | tightening torque 100 Nm |
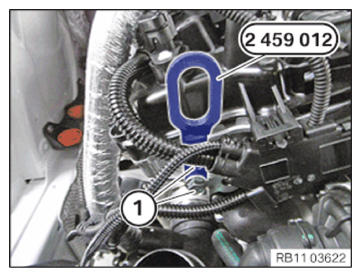
- Unscrew the bolts (1) of the special tool 2 459 012 .
- Feed out the special tool 2 459 012 at the cylinder head and remove.
Follow-up work:
- Refer to ATTACHING THE UNIVERSAL JOINT TO STEERING GEAR .
- Refer to INSTALLING THE REAR SECTION OF THE FRONT WHEEL ARCH COVER ON THE LEFT AND RIGHT .
- Refer to INSTALLING THE COVER OF THE STEERING ASSEMBLY .
- Refer to INSTALLING THE THRUST FIELD (STIFFENING PLATE) .
- Refer to INSTALLING REAR UNDERBODY PROTECTION .
- Refer to INSTALLING THE UNDERBODY PROTECTION OF THE STEERING GEAR OR THE FRONT THRUST FIELD .
- Refer to ATTACHING THE FRONT LEFT WHEEL .
- Refer to INSTALLING FUEL DELIVERY LINE .
- Refer to INSTALLING ALL IGNITION COILS .
- Refer to INSTALLING ACOUSTIC COVER AT REAR .
- Refer to INSTALLING THE CENTER COWL UPPER PART
- Refer to INSTALLING TENSION STRUT ON SHOCK TOWER .
- Refer to INSTALLING WINDSHIELD PANEL COVER .
- Refer to INSTALLING LEFT AND RIGHT WIPER ARM .
- Refer to INSTALLING THE REAR RIGHT ENGINE COMPARTMENT COVER .
- Refer to INSTALLING THE COVER OF THE ENGINE COMPARTMENT ON THE REAR LEFT .
- Refer to INSTALLING THE FRONT HOOD SEAL AT THE REAR .
- Refer to INSTALLING THE COVER ON THE LEFT AND RIGHT IN THE ENGINE COMPARTMENT AT THE TOP
- Refer to INSTALLING RESONATOR .
- Refer to INSTALLING ACOUSTIC COVER .
- Refer to CONNECTING ALL BATTERY GROUND LEADS .
- Refer to TAKING HOOD OUT OF THE SERVICE POSITION .
- Refer to RESETTING THE TIRE PRESSURE MONITOR .