Removing the vibration damper
Prerequisite
- Ignition is switched off.
Preliminary work
- Refer to REMOVING THE COVER ON LEFT AND RIGHT IN THE ENGINE COMPARTMENT AT THE TOP .
- Refer to REMOVING LEFT INTAKE FILTER HOUSING WITH LEFT FRONT-END STRUT .
- Refer to REMOVING RIGHT INTAKE FILTER HOUSING WITH RIGHT FRONT-END STRUT .
- Refer to REMOVE FRONT CROSS CONNECTION .
- Refer to REMOVE THE REAR TOP CROSS CONNECTION .
- Refer to REMOVE FAN COWL .
- Refer to PARTIALLY RELEASE THE COOLANT EXPANSION TANK FOR THE LOW-TEMPERATURE COOLANT CIRCUIT .
- Refer to REMOVE DRIVE BELT .
- Refer to REMOVING THE BELT TENSIONER .
- Refer to REMOVING THE BELT PULLEY ON THE TORSIONAL VIBRATION DAMPER .
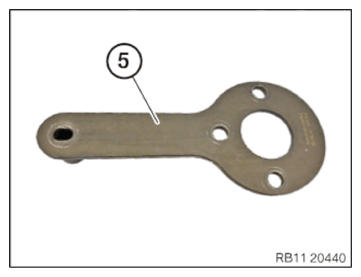
- Use counter support (5) 0 496 365 (11 8 090)
to secure the vibration damper.
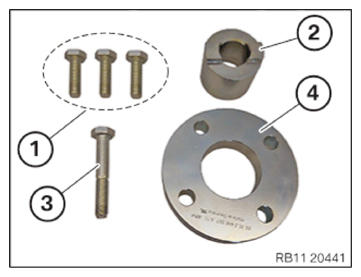
- Tool set 2 445 267
for securing the vibration damper:
screw (1)
fitting sleeve (2)
screw (3)
Shim (4)
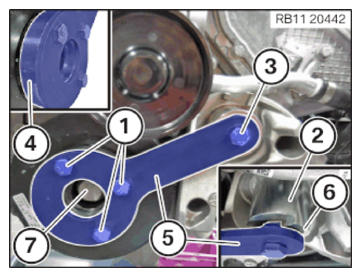
- Position the fitting sleeve (2) at the bore of the belt tensioner.
- Position the shim (4) between the vibration damper and the counter support (5).
- Position the counter support (5) on the vibration damper.
- Tighten the fitting sleeve (2) and the counter support (5) with the screw (3) hand tight.
The notches (6) of the fitting sleeve (2) must point to the counter support (5).
- Tighten the counter support (5) and shim (4) with the screws (1) hand tight.
- Unscrew the central bolt (7).
- Loosen screws (1) and (3).
- Remove the counter support (5).
- Remove the fitting sleeve (2).
- Remove the shim (4).
- Feed out the vibration damper.