Removing flywheel
WARNING:
Working on 12 V vehicle electrical system.
Risk of short circuits! Risk of fire!
Risk of short circuits! Risk of fire!
- Make sure that no charger is connected to the jump start support point in the engine compartment.
- Detach battery earth lead from battery.
- With auxiliary batteries: Detach all battery earth leads from additional batteries.
CAUTION:
Heavy component.
Heavy components can lead to injury or damage.
Heavy components can lead to injury or damage.
- Remove and install heavy components with the aid of another person/other persons.
NOTE:
RISK OF DAMAGE
Damage to battery terminal, the safety battery terminal or the intelligent battery sensor (IBS).
Damaged battery terminals can lead to malfunctions or vehicle electrical system faults.
Damage to battery terminal, the safety battery terminal or the intelligent battery sensor (IBS).
Damaged battery terminals can lead to malfunctions or vehicle electrical system faults.
- Pull off battery terminal from battery pole by carefully moving to and fro. Do not pry off using a tool.
Preliminary works
- Refer to DISCONNECTING ALL BATTERY EARTH LEADS .
- Refer to REMOVING THE ACOUSTIC COVER .
- Refer to REMOVE RESONATOR .
- Refer to REMOVING THE ACOUSTIC COVER FOR THE ENGINE AT THE FRONT .
- Refer to REMOVING THE UNDERBODY PROTECTION OF THE STEERING GEAR AND FRONT STIFFENING PLATE RESPECTIVELY .
- Refer to REMOVE REAR UNDERBODY PROTECTION .
- Refer to REMOVING THE STIFFENING PLATE .
- Refer to REMOVING THE ACOUSTIC COVER OF THE OIL SUMP .
- Refer to REMOVING STARTER MOTOR .
- Refer to REMOVE THE CONNECTING SUPPORT FROM THE TUNNEL .
- Refer to IF INSTALLED: REMOVING RIGHT AND LEFT TORSION STRUT .
- Refer to REMOVE COMPLETE EXHAUST SYSTEM .
- Refer to REMOVING THE HEAT SHIELD .
- Refer to REMOVE THE RETAINING PLATES
- Refer to PARTIALLY RELEASING PROPELLER SHAFT
- Refer to REMOVE AUTOMATIC TRANSMISSION (AWD) (GA8HP50Z, GA8HP51Z) .
CAUTION:
Heavy component.
Heavy components can lead to injury or damage.
Heavy components can lead to injury or damage.
- Remove and install heavy components with the aid of another person/other persons.
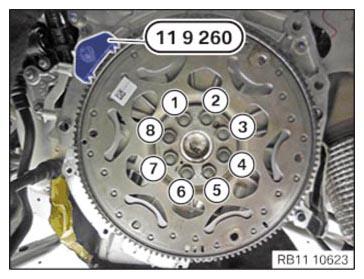
- Fasten the flywheel with the special tool 0 493 938 (11 9 260) and tighten with the special tool 0 494 130 (11 9 264) .
- Release the screws (1) to (8).
NOTE:
RISK OF DAMAGE
Electrostatic discharge.
Damage to or destruction of electrical components.
Electrostatic discharge.
Damage to or destruction of electrical components.
- Leave electrical components in original packaging until just before they are installed. Use the original packaging only for any return shipments. Always package removed components straight away.
- Read and comply with user information on using the associated special tool 12 7 060.
- Only touch the housings of electrical components. Do not touch pins or multi-pin connectors directly.
- Wear electrically conductive clothing and antistatic shoes (with ESD symbol).
- For additional information see: NOTES ON ESD (ELECTROSTATIC DISCHARGE) PROTECTION
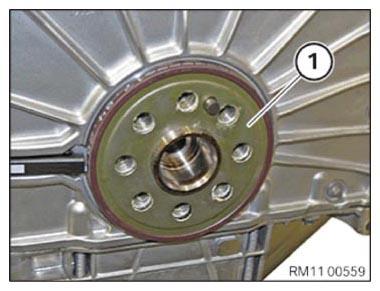
- Feed out the magnet wheel (1) and remove.
- Protect the magnet wheel (1) in a plastic bag from debris.
- The magnet wheel (1) is magnetic, place the magnet wheel (1) in correct position.