Removing the vibration damper
WARNING:
Working on 12 V electrical system.
Risk of short circuits! Risk of fire!
- Make sure that there is no charger connected to the jump start terminal in the engine compartment.
- Detach battery ground lead from battery.
- For auxiliary batteries: Detach battery minus cables from all auxiliary batteries.
WARNING:
Hot surfaces.
Risk of burning!
Risk of burning!
- Perform all work only on components that have cooled down.
Preliminary work
- Refer to DISCONNECTING ALL BATTERY GROUND LEADS .
- Refer to REMOVING THE ACOUSTIC COVER .
- Refer to REMOVE RESONATOR .
- Refer to REMOVE CHARGE AIR LINE .
- Refer to REMOVING THE ACOUSTIC COVER FOR THE ENGINE AT THE FRONT .
- Refer to REMOVING THE DRIVE BELT FOR ALTERNATOR .
- Refer to REMOVE THE FRONT UNDERBODY PROTECTION OR FRONT THRUST FIELD .
- Refer to REMOVING THE UNDERBODY PROTECTION OF THE STEERING GEAR AND THRUST FIELD RESPECTIVELY .
- Refer to REMOVING THE CENTER UNDERBODY PROTECTION .
- Refer to REMOVING STARTER MOTOR .
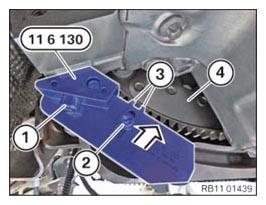
- Position the special tool 0 496 595 (11 6 130) and secure it on the timing case cover using the bolt (1).
The special tool 0 496 595 (11 6 130) must lie flat on the transmission housing.
- If necessary, turn the engine in the direction of rotation until the teeth (3) engage completely in the gearing of the flywheel (4).
- Slide the counter support with the bolt (2) up until the teeth (3) engage completely in the gearing of the flywheel.
- Tighten down screw (2).
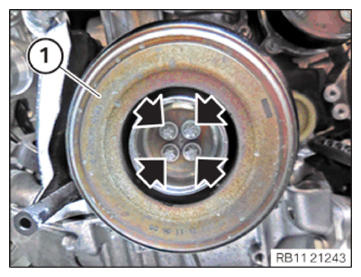
- Version A (without mild hybrid technology):
Unscrew the bolts (arrows) on the vibration damper (1).
Feed out vibration damper (1) and remove.
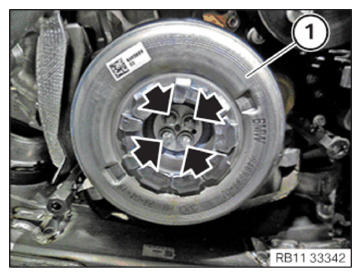
- Version B (with mild hybrid technology):
Unscrew the bolts (arrows) on the vibration damper (1).
Feed out vibration damper (1) and remove.