Install full-flow oil filter
NOTE:
RISK OF DAMAGE
Damage to the surface.
The use of metal-cutting tools (e.g., emery cloths) for cleaning surfaces can damage them and lead to leaks and/or engine damage.
Damage to the surface.
The use of metal-cutting tools (e.g., emery cloths) for cleaning surfaces can damage them and lead to leaks and/or engine damage.
- Do not use any metal-cutting tools.
- Clean the sealing surfaces on the engine block.
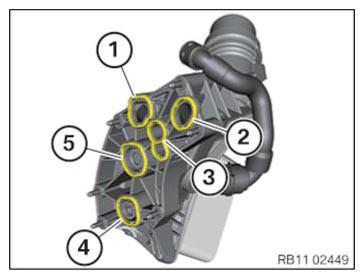
- Replace the gaskets (1),(2),(3),(4) and (5).
Parts: Seals
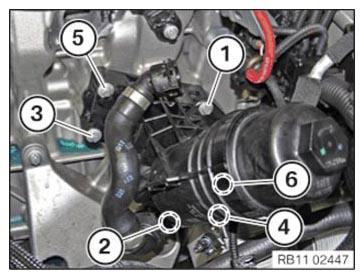
- Install the full-flow oil filter from the top.
- Tighten the screws (1), (2), (3), (4), (5) and (6).
NOTE:
Tighten the screws (4) and (6) from the bottom.
TIGHTENING TORQUES SPECIFICATION
| Full-flow oil filter to crankcase | ||
| Captive screw M6 Observe tightening sequence! |
Joining torque | 4 Nm |
| tightening torque | 10 Nm | |
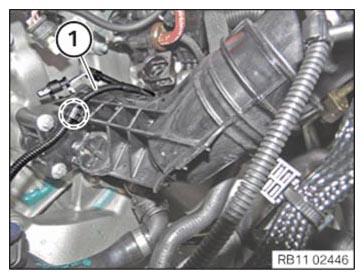
- Clip in the cables (1) in the highlighted area.
Follow-up work
- Refer to INSTALLING THE TRANSMISSION OIL COOLER .
- Refer to TIGHTENING THE OIL FILTER CAP .
- Refer to TOPPING UP THE MOTOR OIL .
- Refer to INSTALLING THE AUXILIARY COOLANT PUMP .
- Refer to CONNECTING THE COOLANT FEEDER HOSE TO THE CONNECTING BRACKET .
- Refer to INSTALLING THE INTAKE PLENUM .
- Refer to INSTALLING THE TANK VENT VALVE .
- Refer to CONNECTING THE COOLANT LINES FOR THE LOW-TEMPERATURE COOLANT CIRCUIT .
- Refer to CONNECTING THE COOLANT LINES FOR THE HIGH-TEMPERATURE COOLANT CIRCUIT .
- Refer to FILLING THE LOW-TEMPERATURE COOLING SYSTEM WITH THE VACUUM FILLING EQUIPMENT .
- Refer to FILLING THE HIGH-TEMPERATURE COOLING SYSTEM WITH THE VACUUM FILLING EQUIPMENT .
- Refer to INSTALLING CONTROL UNIT BRACKET .
- Refer to INSTALLING THE DME CONTROL UNIT .
- Refer to FASTENING CHARGE AIR LINE TO THE THROTTLE BODY .
- Refer to INSTALLING FAN COWL .
- Refer to INSTALLING THE REAR TOP CROSS CONNECTION .
- Refer to INSTALLING FRONT CROSS CONNECTION .
- Refer to INSTALLING FRONT-END STRUT ON LEFT AND RIGHT .
- Refer to INSTALLING THE COVER ON THE LEFT AND RIGHT IN THE ENGINE COMPARTMENT AT THE TOP .
- Refer to INSTALLING ACOUSTIC COVER AT REAR .
- Refer to INSTALLING THE FRONT HOOD SEAL AT THE REAR .
- Refer to INSTALLING ACOUSTIC COVER .
- Refer to CONNECTING NEGATIVE BATTERY CABLE .
- Refer to VENTING THE HIGH-TEMPERATURE COOLANT SYSTEM .
- Refer to VENTING THE LOW-TEMPERATURE COOLING SYSTEM .
- Refer to CHECKING/TOPPING UP THE OIL LEVEL IN THE AUTOMATIC TRANSMISSION .
- Refer to INSTALLING THE THRUST FIELD .
- Refer to INSTALLING REAR UNDERBODY PROTECTION .
- Refer to INSTALLING THE FRONT UNDERBODY PROTECTION OR FRONT THRUST FIELD .
- Refer to CHECKING ENGINE OIL LEVEL .