Leak detection with forming gas (530i 2017-2022, 530i xDrive 2017-2022, 530e PHEV 2018-2022, 530e xDrive PHEV 2018-2022, 540i 2017-2022, 540i xDrive 2017-2022, M550i xDrive 2018-2022)
Observe national regulations in all other countries!
Observe the NOTES on repair work on the air conditioning!.
Read and comply with the manufacturer's operating instructions provided with the special tool particularly with regard to accident prevention, health protection and environmental protection.
Only the basic procedure is described in the following!
Certain user behaviors can lead to a loss of refrigerant from the refrigerant circuit even if there is no leak. This may occur if the customer has not used the air conditioning for a period of more than six months. This may cause O-rings to harden and refrigerant may escape. In this case, it will be sufficient to fill the refrigerant circuit again and switch on the air conditioning for approximately 10 minutes while the engine is running.
Necessary preliminary work:
- If components of the refrigerant circuit are contaminated, clean the engine compartment. Otherwise, the sensor head of the leak detector will become contaminated.
Comply with NOTES on handling high pressure cleaner.
- Drain off air conditioning system
- Fill the air conditioning with forming gas
- Set pressure to 5 bar
To reach the components of the refrigerant circuit with leak detector, specific parts must be removed depending on the vehicle.
Remove the following parts first immediately before the check of the respective components
- Drive belt from air conditioning compressor
- Center fresh air grille
- Covers
- Trim panels
- Air duct
- Intake silencer
- Firewalls
- Parts of the interior equipment (automatic rear air-conditioning system)
In some vehicles it is necessary to open the air flaps of the automatic air flap control.
This is absolutely necessary to find certain leaks, such as in the area of the O-rings.
If no leak is detected, repeat the leak detection with 10 bar.
Forming gas consists of 95% nitrogen and 5% hydrogen. The leak detector will detect hydrogen. If this is leaking from the refrigerant circuit even though the pressure remains, the leak detection bears no results.
Maximum approved pressure: 10 bar
Do not start the engine during the entire procedure!
Notes for handling the leak detector:
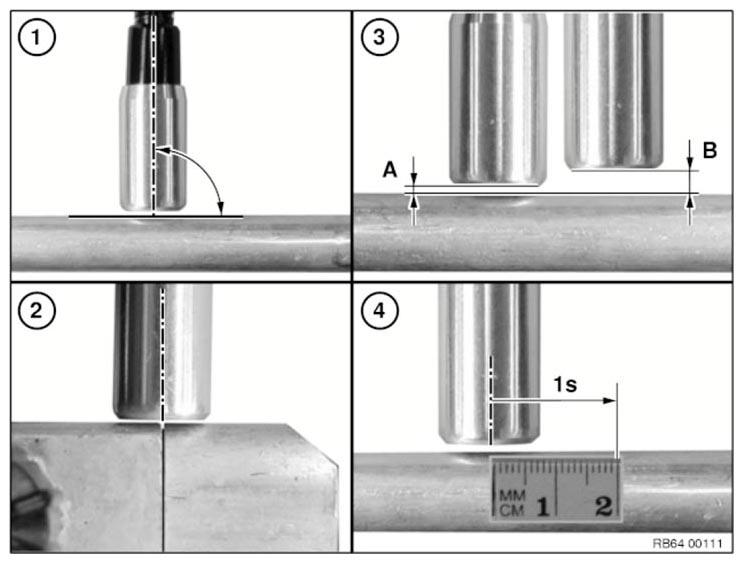
- Sensor head should always stand vertical to the surface to be checked.
- Sensor head must always be aligned to the center of the point to be checked. Slowly guide the sensor head around the point (e.g. connection point, sealing surface, etc.).
- The optimal distance (A) between sensor head and surface to be checked should permanently be approximately 1 mm.
Maximum distance (B) at points that are difficult to access approximately 5 mm.
- Checking speed may not be more than maximum 2 cm per s.
Then check if the leak is still displayed at the same point. Repeat the process up to three times, to ensure that a leak is actually present at this point.
Non-compliance will significantly reduce the efficiency of leak detection!
Refrigerant circuits on other vehicles may differ from the graphic.
Overview of positions to be checked:
- Air conditioning condenser
- Connection point between air conditioning condenser and refrigerant line
-
- Expansion valve, front (vehicles with and without automatic rear air-conditioning system)
- Expansion valve, rear (vehicles with automatic rear air-conditioning system)
- Air conditioning compressor
- Filler neck high pressure and low pressure
- Refrigerant pressure sensor
-
- Refrigerant line, front (vehicles with and without automatic rear air-conditioning system)
- Refrigerant line, rear (vehicles with automatic rear air-conditioning system)
-
- Evaporator, front (vehicles with and without automatic rear air-conditioning system)
- Evaporator, rear (vehicles with automatic rear air-conditioning system)
NOTE: Refrigerant line connection points are identified by arrows.
Checking sequence:
- Check of components 1, 2, 3a, 4, 5, 6, 7a and 8a of the automatic front air-conditioning system.
If no fault found:
- Check of components 3b, 7b, 8b and connection points of the automatic rear air-conditioning system.
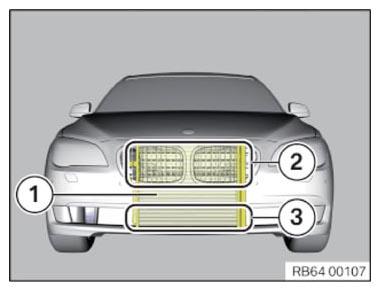
- Air conditioning condenser:
Damage caused by stone chipping, etc. is the most frequent cause of air conditioning condenser leaks (1):
- Visual inspection in the area of the radiator grille (2) and air inlet grille, center (3).
- Check damaged points first.
- Check the remainder of the air conditioning condenser.
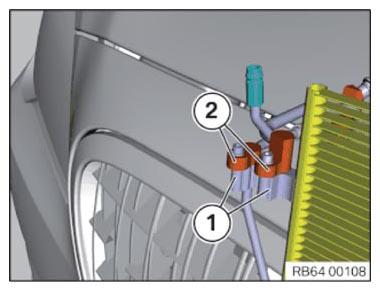
- Connection point capacitor - refrigerant line
Check the connection point between the connection at the air conditioning condenser (1) and refrigerant lines (2).
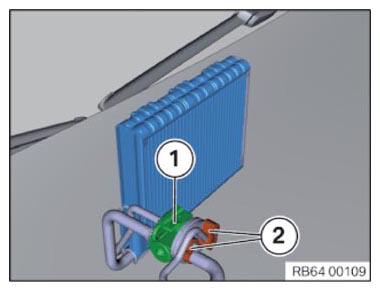
- Expansion valve:
Check the connection point between the expansion valve (1) and refrigerant lines (2).
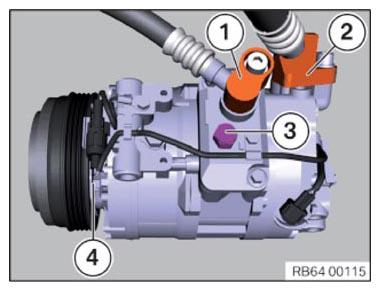
- A/C compressor:
Remove drive belt from air conditioning compressor.
Check the following components on the air conditioning compressor:
- Filler neck
Blow out the fuel filler neck (1) prior to checking.
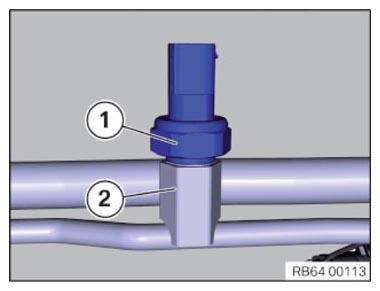
- Refrigerant pressure sensor
Check the sealing surface between the refrigerant pressure sensor (1) and the refrigerant line (2).
- Refrigerant lines:
- Evaporator:
Remove the center fresh air grille.
Compliance with the following settings is absolutely required:
- Air recirculation function On
- Lowest blower speed
- Lowest temperature
- Set the air distribution to ventilation (air may only flow out of the center fresh air grille)
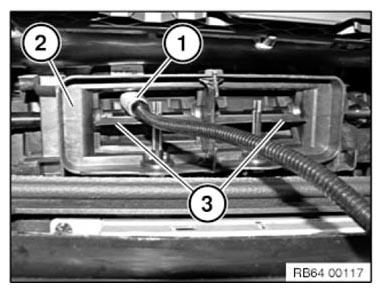
Position sensor head (1) in air duct of middle fresh air grille (2) as illustrated and move slowly from inside to outside above and below air flap (3). Carry out this operation on the left and right fresh air grilles.
IMPORTANT: Some vehicles have an expansion valve directly next to the fresh air intake for the passenger compartment.
In this case the expansion valve must be covered!Following the completed leak detection:
- EVACUATE AND FILL heating and air conditioning system