Repair instructions for bonded seals (530i 2017-2022, 530i xDrive 2017-2022, 530e PHEV 2018-2022, 530e xDrive PHEV 2018-2022, 540i 2017-2022, 540i xDrive 2017-2022, M550i xDrive 2018-2022)
Required special tools:
- 00 9 327
- General remarks on handling rubber seal profiles:
- If seals reveal partly detached protective film on delivery, they must not be bonded.
- Store seals at 5°C to 40°C.
- If, during the handling, the protective film has come off before bonding, it can still be bonded.
- Bonding at room and object temperature 25° ±5° C. Temperatures between 40 and 50°C significantly increase initial adhesion.
- Seals, which are subjected to temperatures above 80°C after bonding, will be very difficult to remove.
- Maximum storage time for replacement: see identification of the expiry date on packaging
- Damage pattern, repair and replacement
A partially released bonding (rubber part adhesive tape or adhesive tape paint) up to 120 mm may be finished. Continue with Point 2.1.
A partially released bonding (rubber part adhesive tape or adhesive tape paint) above 120 mm may not be finished. Gasket must be replaced. Continue with Point 2.2.
- 2.1) Repair of partially released bonding (adhesive tape rubber part or adhesive tape paint
- 2.1.1) Clean faulty areas
- Release adhesive area of paint side from recesses and degrease with CLEANING AGENT R2 . Stick to air drying time > of 1 minute. Never use paint thinner!
- This will usually partially destroy intact edge adhesive areas.
- When removing, it is important to wipe off the adhesive area of the adhesive tape with a lint-free disposable cloth. (e.g. blue Kimtex)
- Carefully wipe off the adhesive areas.
NOTE: Use necessary cotton- or fluff-free paper towel once only.Do not touch the adhesive area after cleaning.
- 2.1.2) Apply adhesive
- Apply PROFILE RUBBER ADHESIVE evenly as a thin layer first on the gasket and then on the painted surface.
- Stick to air drying time of 2 to 3 minutes.
Attention:
Avoid contact with skin!
Do not apply adhesive to visible painted surfaces.
- 2.1.3) Press in rubber seal
- Press down gasket using contact pressure (forced pressure not necessary) for > 1 minute.
Attention:
Load can be applied to the bonding only after a period of 2 minutes. This waiting time is absolutely essential.
- 2.1.1) Clean faulty areas
- 2.2) Replacement
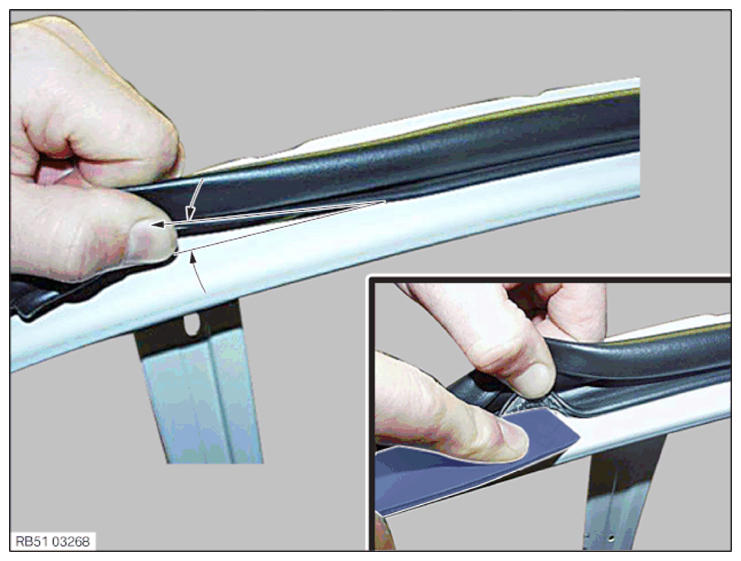
- 2.2.1) Peeling off the faulty rubber seal
- Remove bonded connection with fingers or cleaning agent liner 00 9 327.
- Overstretch gasket below an angle of maximum 20° very slowly under even tensile stress.
If the gasket is pulled off too quickly, the adhesive tape can tear off and remain on the painted surface.
The adhesive tape remaining on the painted surface must be removed with high cleaning costs.
NOTE: When the adhesive tape separates from the gasket, the adhesive tape remaining on the paint must be fully separated at one location by approx. 10 mm until it is easy to grip.Pull off the adhesive tape by pulling strongly at an angle of approx. 20°.
When existing gaskets are being peeled off with a hot air blower: Do not damage paintwork.
- 2.2.2) Clean bonding surface
- If required, remove adhesive remains with ERASER DISK or CLEANING AGENT R2 . Do not damage paint. Stick to air drying time > of 1 minute.
- Before a new bond, treat the entire adhesive area with SIKA AKTIVATOR 205 . Stick to air drying time > of 1 minute.
NOTE: Use necessary cotton- or fluff-free paper towel once only.Do not touch the adhesive area after cleaning.
- 2.2.3) Pull off protective film of the bonding surface
- Pull off the protective film off of the new gasket by approx. 15 cm using the tab.
Attention:
Once the protective film has been removed, do not under any circumstances touch the exposed bonding surface.
- 2.2.4) Apply rubber seal
- Press on the gasket by hand continuously while pulling off the liner slightly at the same time.NOTE: If positioned incorrectly, the gasket can still be pulled off, repositioned and pressed on again.
Always ensure that you do not touch the bonding surface with your fingers or contaminate it in any way.
- Press gasket while moving in a straight line without compression or over-stretching.
- Compress the gasket the corners; never stretch it. (critical area)
- Press on the gasket by hand continuously while pulling off the liner slightly at the same time.
- 2.2.5) Establish sealing joint
- Where the beginning and end meet, a mark is created from pressing the loose end onto the beginning of the gasket.
Cut off the gasket vertically along the marked line (use sharp knife or special scissors) and press in place.
- Visually check the pre-bonded gasket.NOTE: Small areas of gasket can remain stuck to adhesive tape of loose end.
- Where the beginning and end meet, a mark is created from pressing the loose end onto the beginning of the gasket.
- 2.2.6) Press gasket
- Always press gasket vertically to the bonding surface
- Press gasket by hand or hand roller
- Adhesive tape width up to 5 mm, contact pressure > 5 N/cm2
- Adhesive tape width up to 10 mm, contact pressure > 10 N/cm2NOTE: Firm thumb pressure has approx. 35 N/cm2
- 2.2.1) Peeling off the faulty rubber seal
- 2.1) Repair of partially released bonding (adhesive tape rubber part or adhesive tape paint
- Checking the rubber seal
- Check the bonded gaskets for correct positioning and perfect adhesion. The bonding can be checked by pressing back the sealing lip.
- The peel strength of the gasket must be greater than 10 N/cm2 for about 15 min after bonding.