Installing the crankshaft
NOTE:
RISK OF DAMAGE
Engine damage caused by incorrectly installed bearing shells and bearing brackets.
If the bearing shells and bearing brackets are installed incorrectly, then engine damage can occur.
Engine damage caused by incorrectly installed bearing shells and bearing brackets.
If the bearing shells and bearing brackets are installed incorrectly, then engine damage can occur.
- Always install all bearing shells and bearing brackets in the same position from which they were removed.
CAUTION:
Heavy component.
Heavy components can lead to injury or damage.
Heavy components can lead to injury or damage.
- Remove and install heavy components with the aid of another person/other persons.
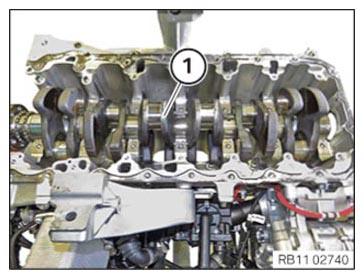
- Install the crankshaft (1).
NOTE:
TECHNICAL INFORMATION
The crankshaft bearing cap, main bearing shell and guide bearing shell are aligned with each other.
Always install the crankshaft bearing cap, main bearing shells and guide bearing shells in the cylinder from which they were removed.
The crankshaft bearing cap, main bearing shell and guide bearing shell are aligned with each other.
Always install the crankshaft bearing cap, main bearing shells and guide bearing shells in the cylinder from which they were removed.
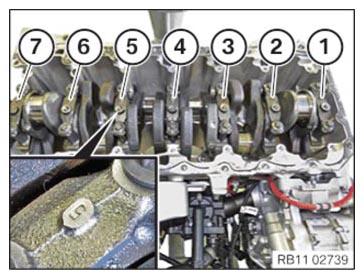
- Observe the assignment and numbering (1) to (7) of the main bearing caps.
(1) = Engine, front (vibration damper)
(7) = Clutch side
- Position the main bearing caps (1) to (7).
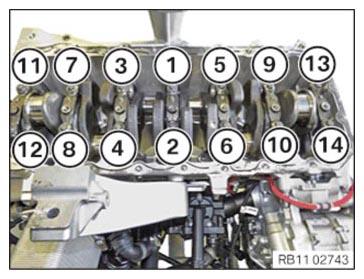
- Replace screws (1) to (14).
Parts: screw
- Tighten the screws in sequence (1) to (14) with the special tool 0 490 504 (00 9 120). TIGHTENING TORQUES SPECIFICATION
Main bearing cap to crankcase M 10x85
Replace screws.1. Tightening torque 25 Nm 2. Angle of rotation 65° 3. Angle of rotation 65° 4. Unscrew all screws. 5. tightening torque 25 Nm 6. Angle of rotation 65° 7. Angle of rotation 65°