Installing the support for the front bumper panel
NOTE:
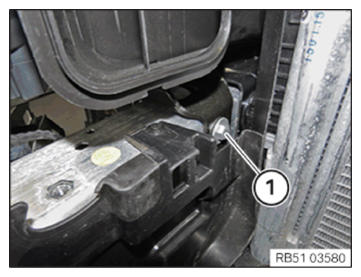
Description is for right component only.
The procedure on the left side is identical.
The procedure on the left side is identical.
- Tighten down screw (1).
TIGHTENING TORQUES SPECIFICATION
| Bonnet lock support to support for bumper panel and/or to top rear cross connection | ||
| M8x25 | Tightening torque | 19 Nm |
| Torx bolt | Tightening torque | 19 Nm |
| Hexagon screw M8 | Tightening torque | 19 Nm |
NOTE:
Description is for right component only.
The procedure on the left side is identical.
The procedure on the left side is identical.
- Feed in the support for the front bumper panel (4) together with the bottom support for the front bumper panel.
- Connect associated connector.
- Replace screws (1).
Parts: Screws
- Tighten the screws (1).
TIGHTENING TORQUES SPECIFICATION
| Front bumper support to engine support | ||
| Hexagon screw with flange Replace screw |
Tightening torques | 100 Nm |
| Angle of rotation | 180° | |
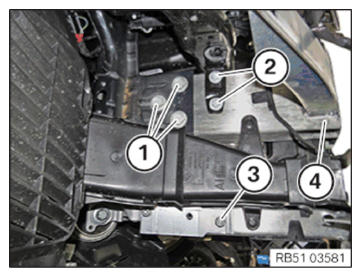
- Tighten the screws (2).
TIGHTENING TORQUES SPECIFICATION
| Bonnet lock support to support for bumper panel and/or to top rear cross connection | ||
| M8x25 | Tightening torque | 100 Nm |
| Torx bolt | Tightening torque | 19 Nm |
| Hexagon screw M8 | Tightening torque | 19 Nm |
- Tighten the screws (3).
TIGHTENING TORQUE SPECIFICATION
| Bottom support on front axle support adapter | ||
| M8x75 screw | Tightening torque | 19 Nm |
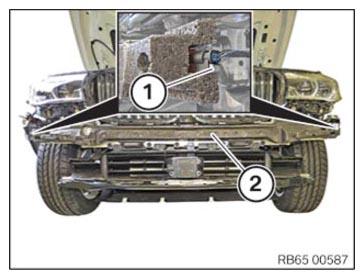
- Check the impact absorber (2) for damage.
Replace the damaged impact absorber (2).
- First attach the impact absorber (2) at the bottom, then press it in at the top.
- Connect connectors (1) and lock.
Follow-up Work
- Install the bracing strut front top CROSS CONNECTION
- Insert top automatic AIR FLAP CONTROL .
- Install front CROSS CONNECTION .
- Install front BUMPER PANEL .
- Install FRONT GRILLE .
- Install (partially removed) front section of front wheel ARCH COVER
- Install the left and right top engine compartment COVER
- Connect all battery EARTH LEADS .
- ACTIVATE the 48 v electrical system.