Installing the rear wheel arch trim
NOTE:
TECHNICAL INFORMATION
For reasons of optimal adhesion, painting of bonding surfaces on the inside of the wheel arch trim is prohibited!
The adhesive pad (double-sided adhesive tape) must be applied to the wheel arch trim prior to painting the wheel arch trim.
For reasons of optimal adhesion, painting of bonding surfaces on the inside of the wheel arch trim is prohibited!
The adhesive pad (double-sided adhesive tape) must be applied to the wheel arch trim prior to painting the wheel arch trim.
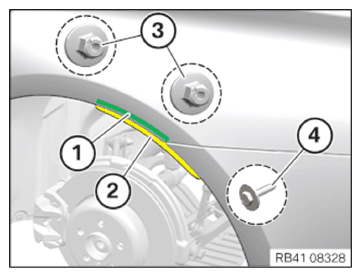
- Remove adhesive residue from the bonding surface (1).
- Clean the bonding surface (1) with solvent cleaner R2.
EXPENDABLE MATERIALS - CLEANING AGENT DESCRIPTION
| Cleaning agent R2 | 500 ml | 83190417324 |
- Adhere to the air drying time of 2 minutes.
- Pull protective film off the adhesive pad (double sided adhesive tape).
- Position the wheel arch trim (2) as shown and firmly press in the area of the bonding surface (1).
- Tighten the nuts (3) and the screw (4).
TIGHTENING TORQUES SPECIFICATION
| Wheel arch cover | ||
| Screw | Tightening torque | 3 Nm |
| Plastic nut | Tightening torque | 2.6 Nm |
Follow-up Work
- Install rear left or right WHEEL .