Installing The Left Side Panel
Further information is available .
- Open the front door.
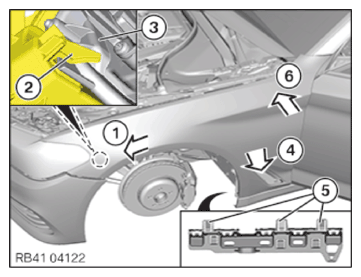
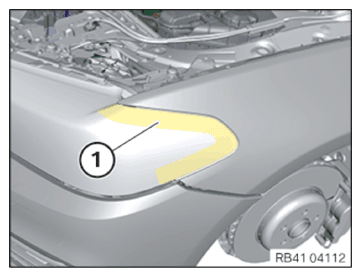
- With a second person, install the side panel towards the vehicle at an angle, shifting from the rear to the front (1).
- Position guide (2) of the side panel on the headlight (3).
- Clip in side panel in the area of the A-pillar downwards (4) into the detents (5).
- Position side panel in the area of the A-pillar (6).
- Screw in all screws on the side panel until it is just about still possible to shift the side panel.
NOTE:
TECHNICAL INFORMATION
The gap dimensions form the basis for these repair instructions and must be observed without fail.
For additional information see: BODY DIMENSIONS .
The gap dimensions form the basis for these repair instructions and must be observed without fail.
For additional information see: BODY DIMENSIONS .
- Adjust gap dimensions.
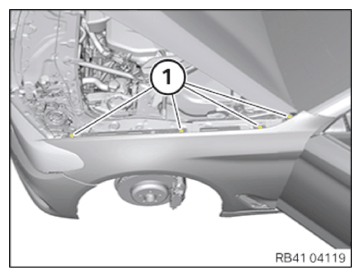
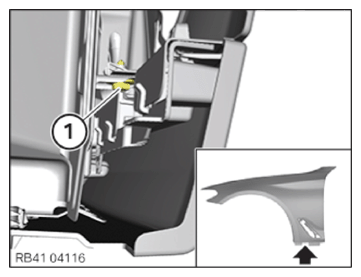
- Renew screws (1).
Parts: screw
- Tighten the screws (1).
Tightening torques
| Side panel to bracket | |
| M6 screw Renew screw. | tightening torque 8 Nm |
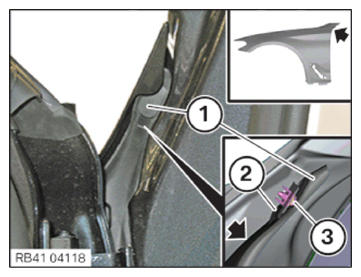
- Renew the screw (3).
Parts: screw
- Tighten down screw (3).
TIGHTENING TORQUES SPECIFICATION
| Side panel to bracket | |
| M6 screw Renew screw. | tightening torque 8 Nm |
- Hook seal (1) onto the holder of the side panel with the retaining lug (2).
- Engage seal (1) on all detents.
- Close front door.
- Renew screws (1).
Parts: screw
- Tighten the screws (1).
TIGHTENING TORQUES SPECIFICATION
| Side panel to bracket | |
| M6 screw Renew screw. | tightening torque 8 Nm |
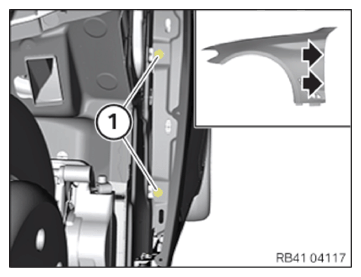
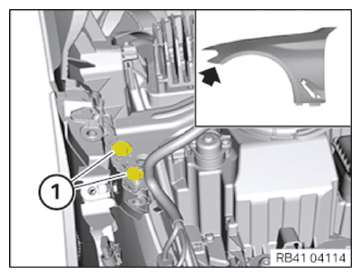
- Renew the screw (1).
Parts: screw
- Tighten down screw (1).
TIGHTENING TORQUES SPECIFICATION
| Side panel to bracket | |
| M6 screw Renew screw. | tightening torque 8 Nm |
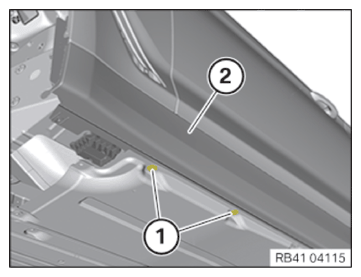
- Tighten screws (1) for the door sill trim panel (2).
TIGHTENING TORQUES SPECIFICATION
| Undershield | |
| screw | Tightening torque 2.6 Nm |
| Plastic nut | Tightening torque 2.6 Nm |
- Renew screws (1).
Parts: screw
- Tighten the screws (1).
TIGHTENING TORQUES SPECIFICATION
| Side panel to bracket | |
| M6 screw Renew screw. | tightening torque 8 Nm |

Follow-up work
- Refer to INSTALLING THE FRONT BUMPER COVER ON THE SIDE PANEL .
- Refer to INSTALL THE AIR DUCT ON THE INNER SIDE PANEL .
- Refer to INSTALL THE REAR SECTION OF THE FRONT WHEEL ARCH COVER .
- Refer to INSTALLING THE FRONT SECTION OF THE FRONT WHEEL ARCH COVER .
- Refer to MOUNTING THE WHEEL .
- Refer to INSTALL THE TRIM ON THE SIDE PANEL .
- Refer to INSTALLING THE MOUNT OF THE HOOD SEAL .
- Refer to INSTALL THE COVER OF THE ENGINE COMPARTMENT ON THE REAR LEFT .
- Refer to INSTALL THE COVER IN THE ENGINE COMPARTMENT ON TOP .
- Refer to RESETTING THE TIRE PRESSURE MONITOR .