Removing The Front Left Side Panel
NOTE:
DANGER
High-voltage system.
The high-voltage system operates on the basis of hazardous, electrical voltage and high currents. Mortal hazard through electric shock!
High-voltage system.
The high-voltage system operates on the basis of hazardous, electrical voltage and high currents. Mortal hazard through electric shock!
- All work on the high-voltage system may only be carried out by specially trained and technically experienced personnel.
- For additional information see:
- For additional information see:
WARNING:
Vehicle may slip off the vehicle hoist if the vehicle hoist is handled incorrectly.
Danger! Immobilization period-threatening injuries!
Danger! Immobilization period-threatening injuries!
- Observe safety instructions on raising the vehicle using a vehicle hoist.
- For additional information see: 00 02 001 RAISING THE VEHICLE WITH A VEHICLE LIFT (530I 2017-2022, 530I XDRIVE 2017-2022, 530E PHEV 2018-2022, 530E XDRIVE PHEV 2018-2022, 540I 2017-2022, 540I XDRIVE 2017-2022, M550I XDRIVE 2018-2022) .
Preliminary work
- Refer to REMOVE FLAP IN LUGGAGE COMPARTMENT TRIM PANEL ON RIGHT .
- Refer to DE-ENERGIZE THE HIGH-VOLTAGE SYSTEM .
- Refer to CHECK THAT NO VOLTAGE IS APPLIED .
- Refer to REMOVE THE COVER IN THE ENGINE COMPARTMENT ON TOP .
- Refer to REMOVE THE COVER OF THE ENGINE COMPARTMENT AT THE REAR LEFT
- Refer to REMOVING THE MOUNT OF THE HOOD SEAL .
- Refer to REMOVING THE CHARGING SOCKET FLAP .
- Refer to REMOVE THE TRIM FROM THE SIDE PANEL .
- Refer to REMOVING THE WHEEL .
- Refer to REMOVE THE FRONT SECTION OF THE FRONT WHEEL ARCH COVER .
- Refer to REMOVE THE REAR SECTION OF THE FRONT WHEEL ARCH COVER FRONT .
- Refer to REMOVE THE AIR DUCT ON THE INNER SIDE PANEL .
- Refer to REMOVING COVER HOUSING FOR THE HIGH-VOLTAGE CHARGING SOCKET .
- Refer to PARTIALLY DETACHING BUMPER COVER, FRONT, AT SIDE PANEL .
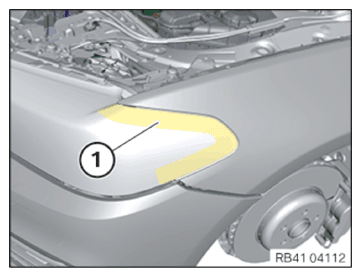
- Mask area (1) on the headlight with a plastic adhesive tape.
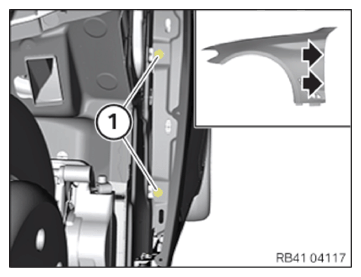
- Mask area (1) of the door with plastic adhesive tape.
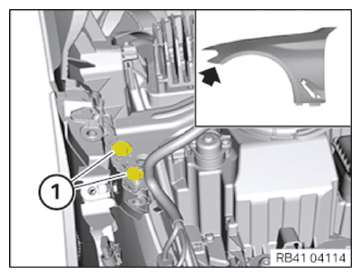
- Release screws (1) (arrow).
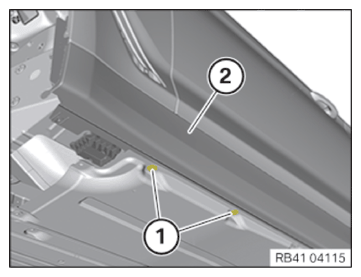
- Release screws (1) at the door sill trim panel.
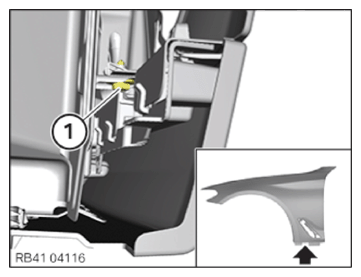
- Release screw (1) (arrow).
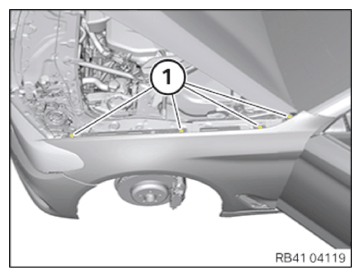
- Release screws (1) (arrows).
- Open the front door.
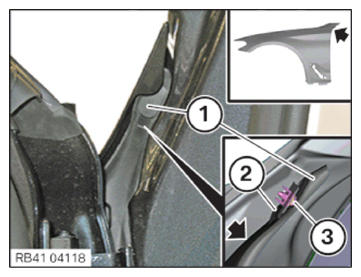
- Press on marked point (arrows) from above and unclip the retaining lug (2).
- Release the seal (1) at the top.
- Loosen screw (3).
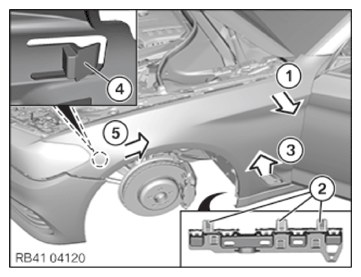
- Loosen screws (1).NOTE: TECHNICAL INFORMATION
Conduct the following operation with the assistance of a second person. - Pull side panel in upper area of A-pillar (1) in direction of arrow.
- Release detents (2) on the holder of the door sill trim panel.
- Pull lower side panel in area of door sill trim panel (3) in direction of arrow in upward direction.
- Loosen detent (4) on the headlight (5).
- Pull side panel on headlight (5) in direction of arrow towards rear and remove.