Install Rear Quarter Panel On Right
Further information is available.
- Preclean all bonding surfaces with solvent cleaner R2.CONSUMABLE - CLEANING AGENT DESCRIPTION
Cleaning agent R2 500 ml 83190417324 - Clean all bonding surfaces with solvent cleaner R1.CONSUMABLE - CLEANING AGENT DESCRIPTION
Cleaning agent R1 100 ml, Bottle 83192211217 - Apply adhesive K5 to the reinforcement plates.ADHESIVE DESCRIPTION
Body adhesive K5 50 ml 83192158654 ADHESIVE DESCRIPTIONBody adhesive K5 195 ml 83195A59935 - Install reinforcement plates.NOTE: TECHNICAL INFORMATION
For additional information see: INSTALLING CAVITY SEALING (EXPANDED) - (530I 2017-2022, 530I XDRIVE 2017-2022, 530E PHEV 2018-2022, 530E XDRIVE PHEV 2018-2022, 540I 2017-2022, 540I XDRIVE 2017-2022, M550I XDRIVE 2018-2022) . - Apply sealant D1 to cavity sealing.CONSUMABLE - SEALANT DESCRIPTION
Sealant D1 (seam sealing) 310 ml 83422409985 - Apply adhesive K5 to the bonding surfaces on the vehicle.ADHESIVE DESCRIPTION
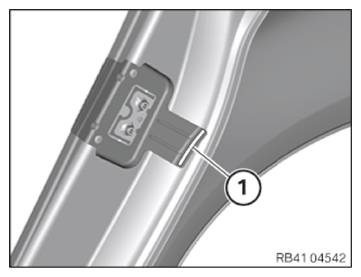
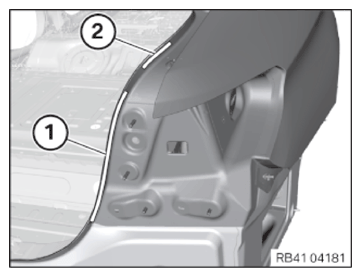
Body adhesive K5 50 ml 83192158654 ADHESIVE DESCRIPTIONBody adhesive K5 195 ml 83195A59935 - Apply additional adhesive K5 in area (1) of the lock striker reinforcement.
- Apply adhesive K5 to new part in the area of the wheel arch (2).
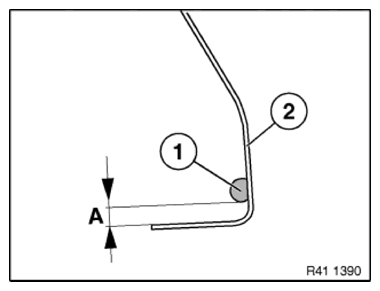
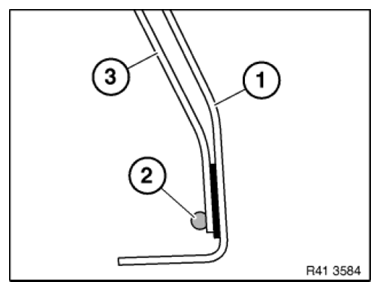
- Apply adhesive (1) on the inside of the side panel at a distance (A).
Dimension (A) = approx. 5 mm
- Install the side wall with the help from another person.
- During installation, ensure that sufficient adhesive has been applied to all bonding surfaces.
- Align the side wall in the areas of the separating cuts and secure it with locking pliers.
- Tighten the nuts on the reinforcement plate.CONSUMABLE - PLASTIC NUT DESCRIPTION
Plastic nut 018 mm 51161943122 CONSUMABLE - PLASTIC NUT DESCRIPTIONPlastic nut 022 mm 07147169847 - Rivet the side panel completely according to the new part preparation process with blind rivets N3.CONSUMABLE - BLIND RIVET DESCRIPTION
Blind rivet N3
Ø 4 mm; clamping area 1-3 mm83190301421 - Rivet the side panel in the areas (1) to (3) with punch rivets N4.
Area Number 1 13 2 5 3 3 CONSUMABLE - BLIND RIVET DESCRIPTIONPunch rivet N4
Ø 3 mm; 4 mm long83192457307 - In the area (4) of the lock striker reinforcement, fix the side panel using locking pliers until the adhesive has hardened.
- Rivet the side panel in the areas (1) and (2) with punch rivets N4.
Area Number 1 1 2 6 CONSUMABLE - BLIND RIVET DESCRIPTIONPunch rivet N4
Ø 3 mm; 4 mm long83192457307 - Rivet the side panel in the areas (1) and (2) with punch rivets N4 and N5.
Area Number Blind rivet 1 5 N4 2 3 N5 CONSUMABLE - BLIND RIVET DESCRIPTIONPunch rivet N4
Ø 3 mm; 4 mm long83192457307 CONSUMABLE - BLIND RIVET DESCRIPTIONPunch rivet N5
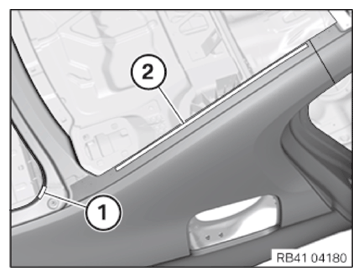
Ø 5 mm; 5 mm long83192158079 - Also apply K5 adhesive (2) to the outer wheel arch section (3).
- (1) = rear quarter panel.
- Flange the edge of wheel arch (3) of the side panel flush to the outer wheel arch section.
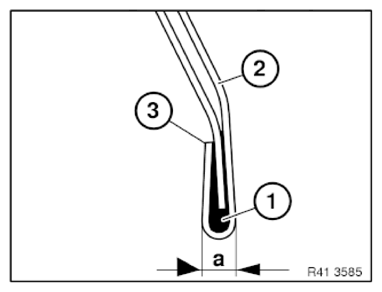
- Do not create sharp edges when flanging because the crimping edge may otherwise begin to tear.
- Fill crimping edge fully with adhesive. Dimension (a) = 5 mm
- (1) = adhesive.
- (2) = rear quarter panel.
- Seal the new part with sealant D1 in the same way as for standard production.
Seal with sealant D1 in the area (3) according to the standard.
CONSUMABLE - SEALANT DESCRIPTIONSealant D1 (seam sealing) 310 ml 83422409985 Installing the EMC screw
- Drill the hole with a diameter of 4.2 mm after the adhesive completely hardens.
- Screw in the EMC screw.
- Seal the EMC screw with the sealant.CONSUMABLE - SEALANT DESCRIPTION
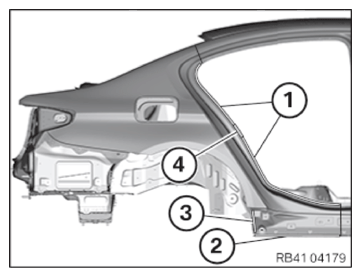
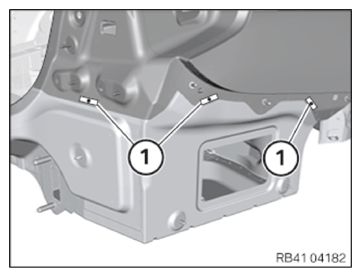
Sealant D1 (seam sealing) 310ml 83422409985 - After the adhesive has hardened, install 3 EMC screws in the areas (1).
- Install 1 additional EMC screw in the area of the door sill.CONSUMABLE - SCREW DESCRIPTION
screw
EMC screw, SF Plus, M5x1583190301639
Follow-up work
- Refer to ACTIVATE HIGH-VOLTAGE SYSTEM .
- Refer to INSTALL FLAP IN RIGHT LUGGAGE COMPARTMENT TRIM PANEL .