Preparing New Part
Further information is available.
NOTE:
TECHNICAL INFORMATION
For additional information see: SPOT-WELD BONDING STEEL COMPONENTS - (530I 2017-2022, 530I XDRIVE 2017-2022, 530E PHEV 2018-2022, 530E XDRIVE PHEV 2018-2022, 540I 2017-2022, 540I XDRIVE 2017-2022, M550I XDRIVE 2018-2022) .
For additional information see: SPOT-WELD BONDING STEEL COMPONENTS - (530I 2017-2022, 530I XDRIVE 2017-2022, 530E PHEV 2018-2022, 530E XDRIVE PHEV 2018-2022, 540I 2017-2022, 540I XDRIVE 2017-2022, M550I XDRIVE 2018-2022) .
- Remove adhesive residue on the joining surfaces on the vehicle.
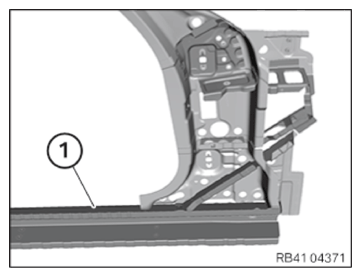
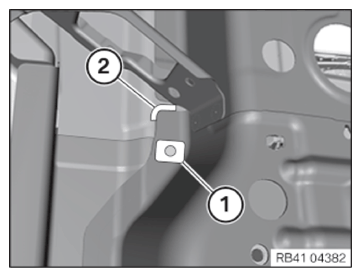
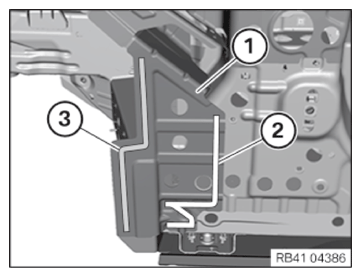
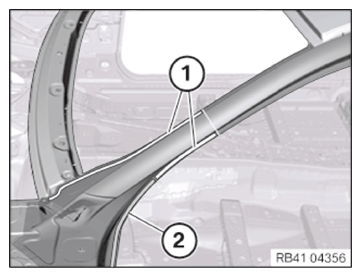
- Release the welded connections and remove the rocker panel boost (1).
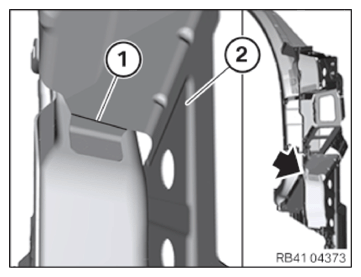
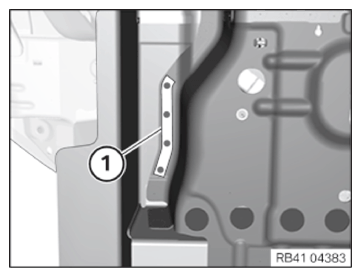
- Detach the welded connections (1).
Crash reinforcement (2) is reused.
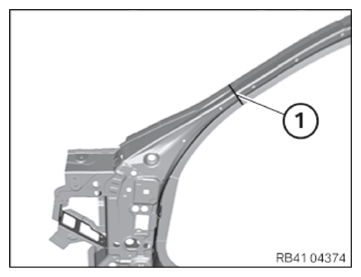
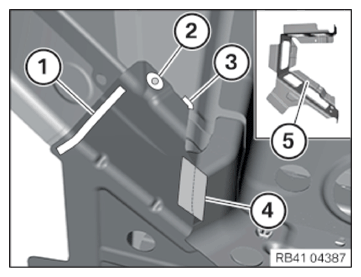
- Make separating cut (1) as shown and remove crash reinforcement (2).NOTE: TECHNICAL INFORMATION
For additional information see: 41 00... Welding in reinforcement plates (sheet steel) - Make a reinforcement plate for separating cut (1).
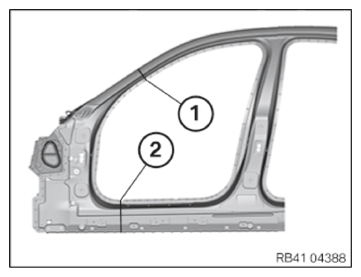
- Mark the separating cut (1) on the new part according to the separating cut on the vehicle and cut.
- Adjust the new part using an alignment bracket or a universal fixture and secure it.NOTE: TECHNICAL INFORMATION
For additional information see: WELDING IN REINFORCEMENT PLATE (SHEET STEEL) - (530I 2017-2022, 530I XDRIVE 2017-2022, 530E PHEV 2018-2022, 530E XDRIVE PHEV 2018-2022, 540I 2017-2022, 540I XDRIVE 2017-2022, M550I XDRIVE 2018-2022) . - Make a reinforcement plate for separating cut (1).
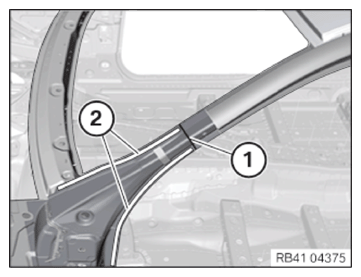
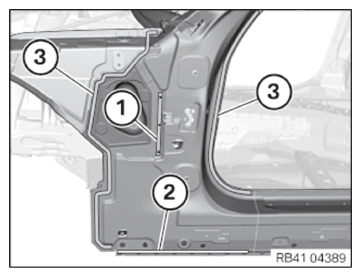
- Prepare area (2) for joining by welding.
- Prepare areas from (1) to (3) for joining by welding.NOTE: TECHNICAL INFORMATION
For additional information see: SPOT-WELD BONDING STEEL COMPONENTS - (530I 2017-2022, 530I XDRIVE 2017-2022, 530E PHEV 2018-2022, 530E XDRIVE PHEV 2018-2022, 540I 2017-2022, 540I XDRIVE 2017-2022, M550I XDRIVE 2018-2022) . - In areas (3), follow the procedure for the replacement of the spot-welded adhesive joints for the series.
- Prepare areas (1) and (2) for joining by welding.
To do this, remove the cavity foam in the cowl cross-member on the inside.
- Prepare area (1) for spot-welding.
- Prepare area (2) for plug-welding (MAG weld) from the inside.
- Prepare area (1) for joining by welding.
- In the area (1), prepare a 15 mm long MAG weld seam.NOTE: To provide a better overview: Schematic diagram with partially hidden components.
- Prepare areas from (1) to (3) for joining by welding.
For better clarity, the joint plate (4) is not shown.
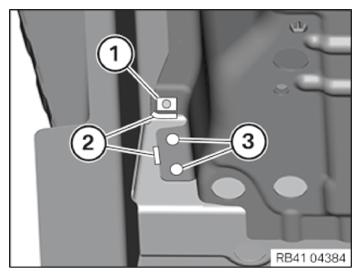
- Prepare the joining area (1) so that the repair spot-weld (spot-welding) can be placed on the production spot-weld on the vehicle.
- Prepare joining areas (2) for spot-welding.
- Prepare joining area (3) for plug-welding (inside).
- Prepare area (1) for joining by welding.
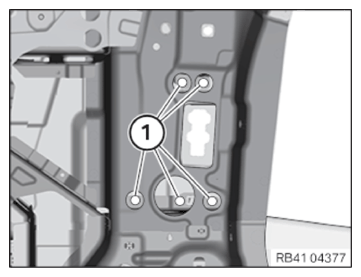
- In areas (1), prepare spot-welding 6 times as shown.
- Prepare areas (1) and (2) for joining using spot-welding.
- Prepare joining areas (2) so that the 4 repair spot-welds (spot-welding) can be set on the production spot-welds on the vehicle.
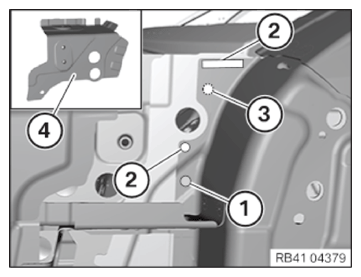
- Prepare areas (1) and (2) for joining by welding.
- Prepare the joining area (1) so that the repair spot-weld (spot-welding) can be placed on the production spot-weld on the vehicle.
- In the area (2), prepare a 15 mm long MAG weld seam.
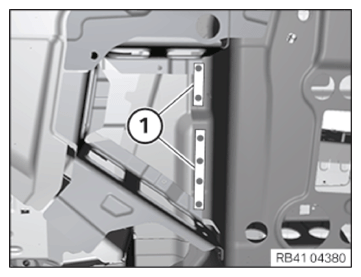
- Prepare 4 spot-welds in area (1).
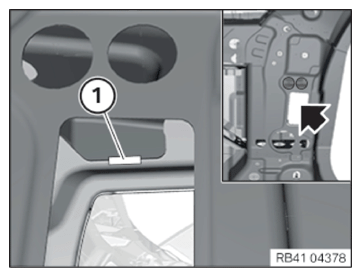
- Prepare joining area (1) for spot-welding.
The repair spot-weld must be set to the production spot-weld.
- In areas (2), prepare a 15 mm-long MAG weld seam twice.
- In areas (3), prepare the plug-welds.NOTE: To provide a better overview: Schematic diagram with partially hidden components.
- In areas (1), prepare the plug-welds.
Reinforcement plate (4) not shown for better reference.
- In the area (2), prepare a 10 mm long MAG weld seam.
- Prepare joining area (3) for spot-welding.
The repair spot-weld must be set to the production spot-weld.
- Adjust the new part of crash reinforcement (1) and, in areas (2) and (3), prepare for joining by welding.
- In area (3), follow the procedure for the replacement of the spot-welded adhesive joints for the series.NOTE: To provide a better overview: Schematic diagram with partially hidden components.
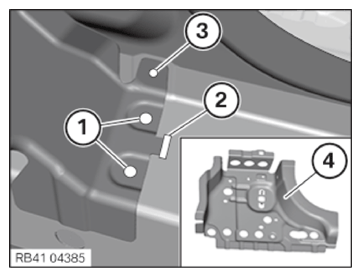
- In areas from (1) to (3), prepare for joining by welding.
For better clarity, the bulkhead (5) is not shown.
- Prepare the joining area (2) so that the repair spot-weld (spot-welding) can be placed on the production spot-weld on the vehicle.
- In the area (3), prepare a 10 mm long MAG weld seam. For this purpose, slightly adjust the new part in the area (3).
- Adjust reinforcement plate (4) for the separating cut.
- Mark the separating cuts (1) and (2) on the new part according to the separating cuts on the vehicle and cut.NOTE: TECHNICAL INFORMATION
For additional information see: WELDING IN REINFORCEMENT PLATE (SHEET STEEL) - (530I 2017-2022, 530I XDRIVE 2017-2022, 530E PHEV 2018-2022, 530E XDRIVE PHEV 2018-2022, 540I 2017-2022, 540I XDRIVE 2017-2022, M550I XDRIVE 2018-2022) . - Prepare reinforcement plates for separating cuts (1) and (2).
- Fit in new part.NOTE: TECHNICAL INFORMATION
Structural adhesive bonding.
Observe preparation of bonding surfaces.
For additional information see: BMW/MINI BONDING INSTRUCTIONS (530I 2017-2022, 530I XDRIVE 2017-2022, 530E PHEV 2018-2022, 530E XDRIVE PHEV 2018-2022, 540I 2017-2022, 540I XDRIVE 2017-2022, M550I XDRIVE 2018-2022) . - Prepare area (1) for the structural adhesive bonding of steel on steel.
- In area (1), make 3 bores of Ø 6.8 mm for the blind rivets.
- Prepare areas (2) and (3) for joining by welding.
- In areas (3), follow the procedure for the replacement of the spot-welded adhesive joints for the series.
- Prepare areas (1) and (2) for joining by welding.
- In area (2), follow the procedure for the replacement of the spot-welded adhesive joints for the series.
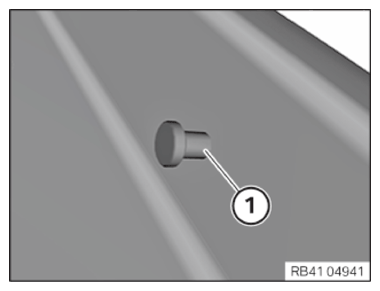
Renew T-bolt
NOTE: Schematic diagram is for example purposes. Some parts may differ in certain details. - Take the quantity and position from the component to be renewed.
- Renew T-bolts (1).
Parts: T-bolt
- Weld the T-bolt (1) onto the new part.