Removing windows with a "Spider" (530i 2017-2022, 530i xDrive 2017-2022, 530e PHEV 2018-2022, 530e xDrive PHEV 2018-2022, 540i 2017-2022, 540i xDrive 2017-2022, M550i xDrive 2018-2022)
Windscreen removal system "Spider"
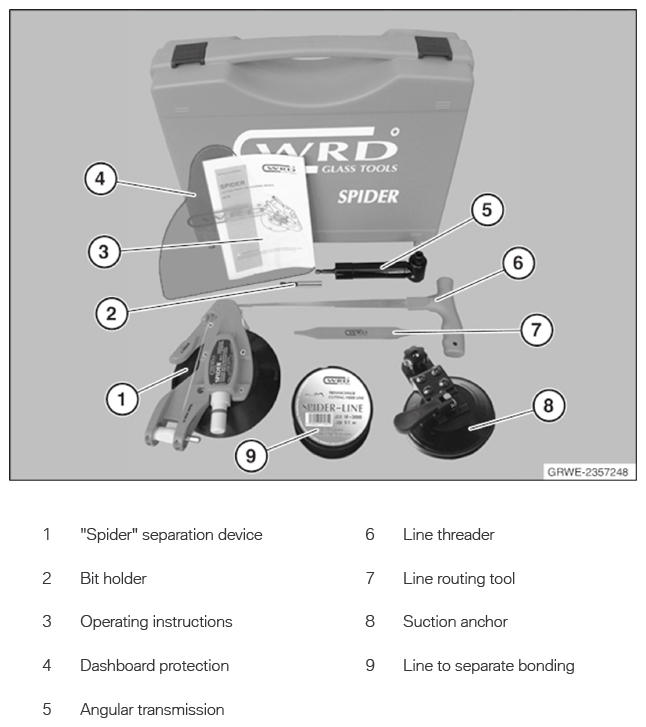
Accessories required for operation (not included):
Cordless screwdriver/drill with at least a 10.8 V Li-ion battery or a 18 V Ni-Cd battery and variable speed.
Always use a low gear setting.
Suction cup may not be applied at the damaged point (crack in window glass).
The bearing bushes of the shaft (spindle) must always be lubricated.
Always wear safety goggles and protective gloves for your own safety.
The procedure for disassembly of the windscreen is described below as an example.
Deviations in the work procedure can be found in the vehicle-specific repair instructions.
General information
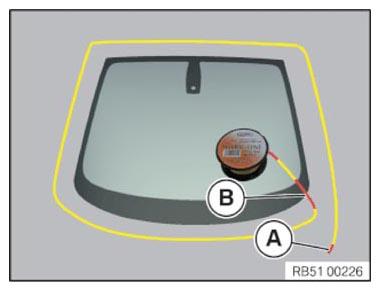
A cord approx. 6.8 m long is used to cut through the adhesive bead.
The cord length to be used is identified by a short red mark (A) approx. 5 cm.
The part of the cord laid outside around the window glass (approx. 5 m) is identified with a long red mark (B) (approx. 18 cm).
The marks are applied so that the cord has to be pulled from the inside to the outside.
Preparation
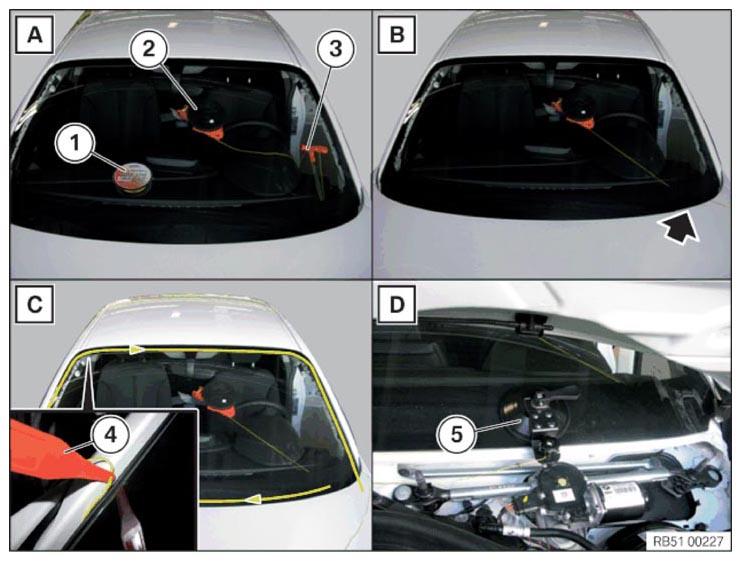
- Pierce cord from the roller (1) or separation device (2) with cord threader (3) through the adhesive bead from the inside, protect the area from the inside as required.
- Pull out cord up to the first red mark (approx. 18 cm long).
- Lay cord around the window glass, use pulling aid (4) if required.
- Secure suction anchor (5) outside on window glass, secure cord to suction anchor (5).
If required, unwind cord from roller (1) up to the second red mark (approx. 5 cm long) and cut off.
Make sure the cord lies below the window glass at all four corners.
Check that the cord is not caught on clamps or body.
Secure window glass on outside with adhesive tape against sliding.
Feeding in the cord on the separation device
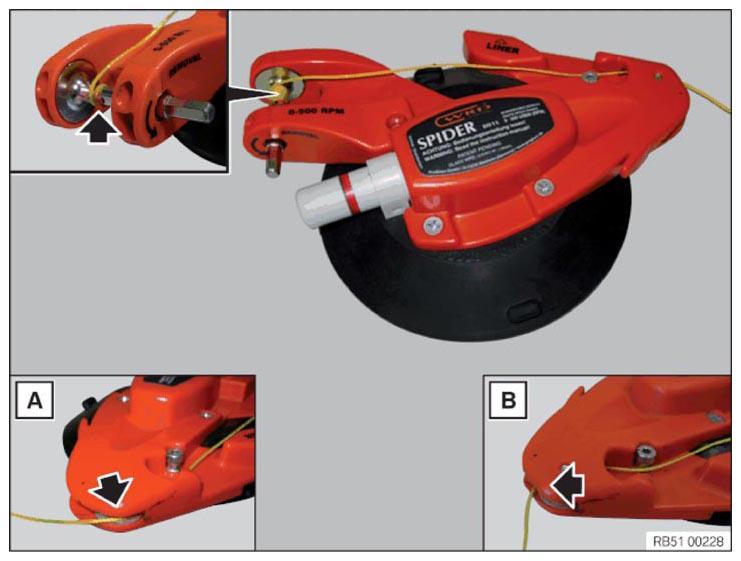
Normally, the adhesive bead is cut through couterclockwise seen from the passenger compartment.
- This means the cord must be fed into the separation device as shown in graphic (A).
When accessibility is not optimal, the opposite cutting direction may be required (comply with vehicle specific repair instructions).
- This means the cord must be fed into the separation device as shown in graphic (B).
Feed cord into coil and wind it on, at the same time trapping the end of the cord.
When winding the cord, the correct direction of rotation on the separation device must be observed.
Cutting out procedure
Optimum cutting is guaranteed when the cord is at an acute angle to the adhesive bead. There is a risk of the cord ripping if the angle is too obtuse.
The separation device must be positioned correspondingly to achieve the appropriate angle.
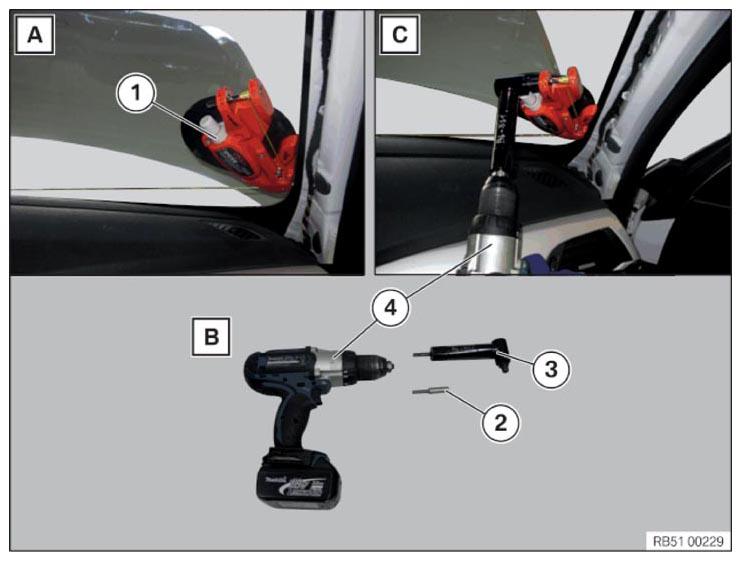
- Fix separation device (1) on window glass at bottom right.
- Depending on accessibility, attach bit holder (2) or angle gear (3) to cordless screwdriver (4).
- Place cordless screwdriver (4) on separation device (1) and start winding cord, observe direction of rotation on separation device.
If required, over trim panel components with plastic protection.
Guide cord with plastic protection around sharp-edged positions.
Cut through adhesive bead up to bottom area of A-pillar.
Turn back cordless screwdriver (4) approx. 2 rotations and remove.
Cutting out procedure
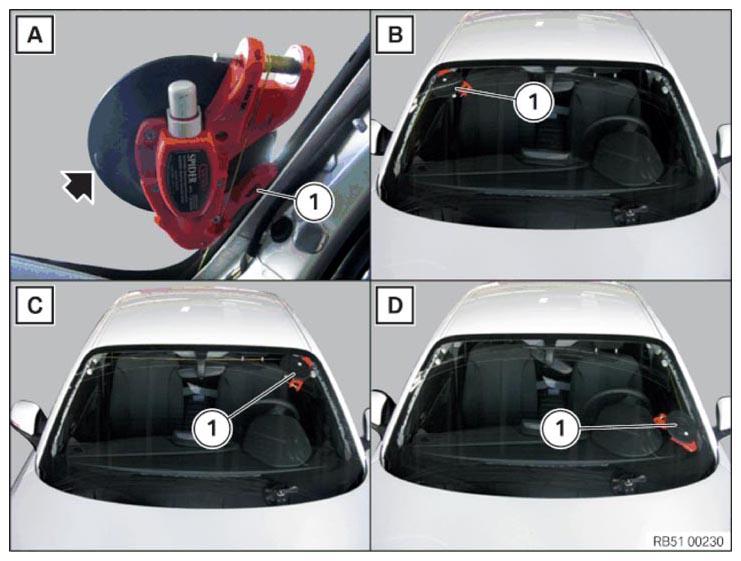
- Discharge vacuum on windscreen removal tool (1) by pressing the tab, remove windscreen removal tool (1) from window glass.
- Reset removal tool (1) at illustrated and wind up cord up to the position of windscreen removal tool (1).
- C./D. Repeat further resetting, work sequence as given at B.
Additional resetting may be required for very curved window glass.
It is possible to reuse the cord. When a cord is used many times the risk of ripping increases.
Dirt contamination must be avoided when a cord is reused.