Install windscreen
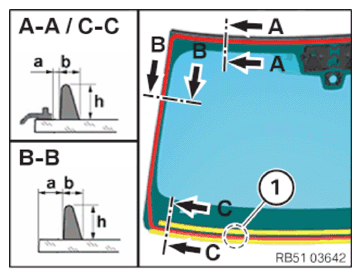
- Prepare the glue cartridge with the standard nozzle C.
- Apply bead joint in area (1).
- Apply adhesive bead within the mark on the windscreen.
Cut A - A B - B C - C (a) = Position of the adhesive bead 2 ±2 mm 3 ±2 mm 2 ±2 mm (b) = Width of adhesive bead 8 ±1 mm 8 ±1 mm 8 ±1 mm (h) = Height of adhesive bead 12 ±1 mm 12 ±1 mm 12 ±1 mm - Adhere to the geometry of the adhesive bead to make sure that one glue cartridge is sufficient for the complete windscreen.
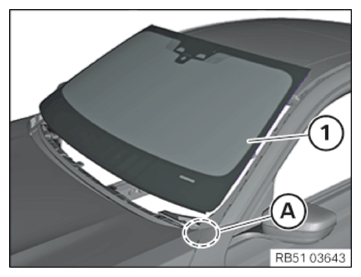
- Carefully perform the following operations on the windscreen (1) with suction lifter:
- Running it in parallel to the A-pillar
- Feed it in the area (A) on left and right below the side panel
- Position at top
- Align sides evenly
- Press upwards until sealing rests evenly on roof
- Press evenly all around
- Fix with adhesive tape on the roof
- Measure short length (A) of the windscreen (1) to the roof outer skin (2) with special tool 0 495 259 (51 0 010).
- Adjust short length (A).
TECHNICAL DATA - GAP DIMENSION SPECIFICATION
| Gap dimension windscreen to roof outer skin | ||
| 1 windscreen; 2 roof outer skin | a | 4.9 +1-1 mm |
| b | 3.1 +1.5-1 mm | |
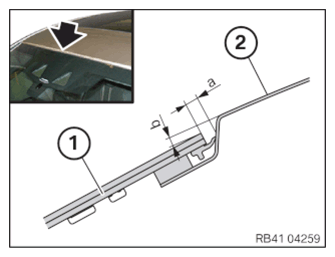

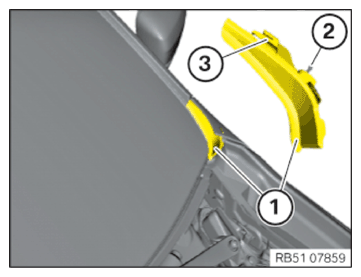
- Position the windscreen (1) in such a way that the rubber frame (3) lies even and parallel to the roof outer skin (2).
NOTE:
Perform the operations on the left and right side.
- Mount the cover (1) and attach it to the guide (3).
- Engage the cover (1) at the clip (2).
Follow-up Work
- Secure front HEADLINING .
- Install the KAFAS camera with the integrated CONTROL UNIT .
- Install the interior MIRROR .
- Install the interior mirror COVERS .
- Install roof FUNCTION CENTER (FZD).
- Install left and right sun visor counter SUPPORTS .
- Install the left and right a-pillar TRIM PANEL .
- Install the left and right roof TRIM STRIP .
- Install cowl panel COVER .
- Install left and right WIPER ARM .
- Install the rear right engine compartment COVER .
- Install the rear left engine compartment COVER .
- Calibrate KAFAS CAMERA .