Overhauling brake caliper, front
WARNING:
Vehicle may slip off the vehicle hoist if the vehicle hoist is handled incorrectly.
Danger! Immobilization period-threatening injuries!
Danger! Immobilization period-threatening injuries!
- Observe safety instructions on raising the vehicle using a vehicle hoist.
- For additional information see: 00... Raise the vehicle using a VEHICLE LIFT .
Preliminary work
- Remove the front left and right WHEELS .
- Remove the front brake pad WEAR SENSOR .
- Remove front BRAKE PADS (brake high).
- Measure (front brake) minimum brake DISC THICKNESS .
- Remove the front BRAKE CALIPER (braking system remains closed).
NOTE:
TECHNICAL INFORMATION
General information on changing the brake pads:
For vehicles older than 48 months it is recommended to replace the retaining spring or expanding spring.
The brake pad wear sensor must be replaced once it has been removed because the brake pad wear sensor loses its retention capability in the brake pad.
A CBS reset must be done after every brake pad exchange:
A CBS reset in the vehicle is possible in the event of a partially ground down brake pad wear sensor. The CBS display in the Central Information Display (CID) is active.
In the event of a brake pad wear sensor that is not partially ground down, a CBS reset is only possible with the diagnostic system using an appropriate scan tool. No CBS display in the Central Information Display (CID).
If adhesive bonded brake pads are installed, the brake pads must be replaced after releasing the adhesive bond!
NOTE:
TECHNICAL INFORMATION
To prevent damage to the surface coating: With floating calipers on the brake caliper mounting bracket or with fixed calipers in the brake caliper housing, do not clean the contact surfaces for the brake pads to the extent that it is possible.
Clean the contact surfaces with brake cleaner (BMW part number 83 19 2 154 780). Next, APPLY a thin coat of brake pad paste (BMW part number 83 19 2 158 851 for 3 g) or 83 19 2 158 852 fr 100 g).
Spread brake PAD PASTE on the marked surfaces with a brush.
- Do not grip brake piston (2) with fingers - pinch hazard!
- Push out all brake pistons (1) where dimension (A)= 20 mm.
- To protect the brake piston, set a protective plate (1) (for example made of hardwood or rubber) in the brake caliper housing.NOTE: The description is for one component only. The procedure is identical for all further components.
- Press the dust boot (1) shut.
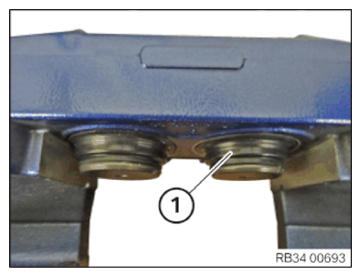
- Clean the brake pistons (1) and dry with compressed air.
- Check the brake piston (1) and flange surfaces for damage and replace the brake caliper if applicable.
Work on cylinders and brake pistons that removes material is not permitted.
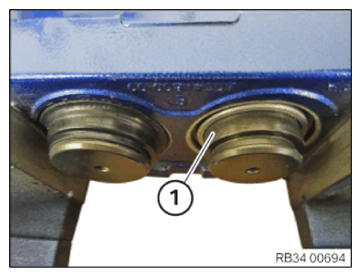
- Place the dust boot (1) on the brake piston (3).
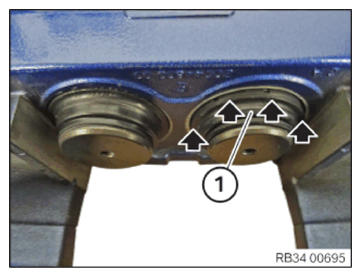
- Evenly press the dust boot (1) in into the brake caliper housing in arrow direction.
- To ensure that the dust boot fits perfectly: keep the area between the dust boot and brake caliper housing dry.
The area between the dust boot and the brake caliper housing may not come into contact with lubricating grease or brake fluid.
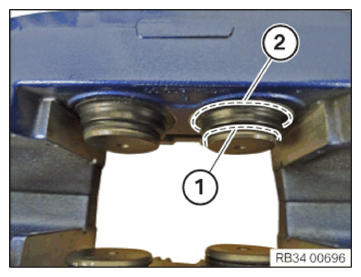
- Make sure the dust boot is correctly inserted in the annular groove (1) and in the brake caliper housing (2).

Follow-up work
- Install the front BRAKE CALIPER (braking system remains closed).
- Grease BRAKE PADS , brake anchor plate and brake caliper with brake pad paste (brake high).
- Install FRONT PADS (high brake).
- Adhesion of brake pads to BRAKE PISTONS .
- Install the front brake pad WEAR SENSOR .
- Install the front left and right WHEELS .
- COMMISSION OR BEDD IN new brake pads and discs (high brake).