Install Rear Quarter Panel On Right
Further information is available .
- Preclean all bonding surfaces with solvent cleaner R2.CONSUMABLE - CLEANING AGENT DESCRIPTION
Cleaning agent R2 500 ml 83190417324 - Clean all bonding surfaces with solvent cleaner R1.CONSUMABLE - CLEANING AGENT DESCRIPTION
Cleaning agent R1 100 ml, Bottle 83192211217 - Apply adhesive K5 to the reinforcement plates.ADHESIVE DESCRIPTION
Body adhesive K5 50 ml 83192158654 ADHESIVE DESCRIPTIONBody Adhesive K5 195 ml 83195A59935 - Install reinforcement plates.
NOTE:
TECHNICAL INFORMATION
For additional information see: INSTALLING CAVITY SEALING (EXPANDED) - (530I 2017-2022, 530I XDRIVE 2017-2022, 530E PHEV 2018-2022, 530E XDRIVE PHEV 2018-2022, 540I 2017-2022, 540I XDRIVE 2017-2022, M550I XDRIVE 2018-2022) .
For additional information see: INSTALLING CAVITY SEALING (EXPANDED) - (530I 2017-2022, 530I XDRIVE 2017-2022, 530E PHEV 2018-2022, 530E XDRIVE PHEV 2018-2022, 540I 2017-2022, 540I XDRIVE 2017-2022, M550I XDRIVE 2018-2022) .
- Apply sealant D1 to cavity sealing.CONSUMABLE - SEALANT DESCRIPTION
Sealant D1 (seam sealing) 310 ml 83422409985 - Apply adhesive K5 to the bonding surfaces on the vehicle.ADHESIVE DESCRIPTION
Body adhesive K5 50 ml 83192158654 ADHESIVE DESCRIPTIONBody Adhesive K5 195 ml 83195A59935 - Apply additional adhesive K5 in area (1) of the lock striker reinforcement.
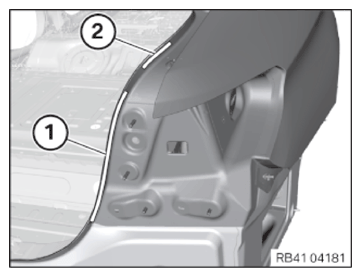
- Apply adhesive K5 to new part in the area of the wheel arch (2).
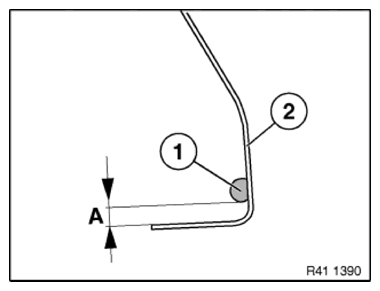
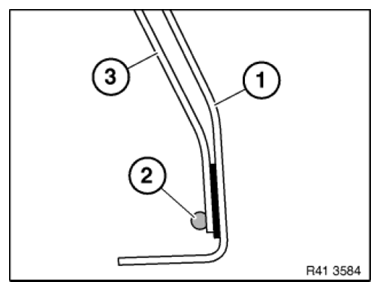
- Apply adhesive (1) on the inside of the side panel at a distance (A).
Dimension (A) = approx. 5 mm
- Install the side wall with the help from another person.
- During installation, ensure that sufficient adhesive has been applied to all bonding surfaces.
- Align the side wall in the areas of the separating cuts and secure it with locking pliers.
- Tighten the nuts on the reinforcement plate.CONSUMABLE - PLASTIC NUT DESCRIPTION
Plastic nut Ø18 mm 51161943122 CONSUMABLE - PLASTIC NUT DESCRIPTIONPlastic nut Ø22 mm 07147169847 - Rivet the side panel completely according to the new part preparation process with blind rivets N3.CONSUMABLE - BLIND RIVET DESCRIPTION
Blind rivet N3
Ø 4 mm; clamping area 1-3 mm83190301421 - Rivet the side panel in the areas (1) to (3) with punch rivets N4.
Area Number 1 13 2 5 3 3 CONSUMABLE - PUNCH RIVET DESCRIPTIONPunch rivet N4
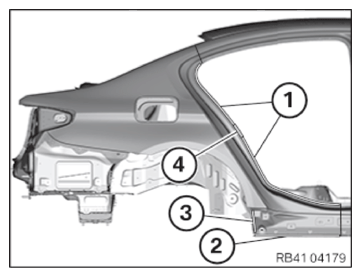
Ø 3 mm; 4 mm long83192457307 - In the area (4) of the lock striker reinforcement, fix the side panel using locking pliers until the adhesive has hardened.
- Rivet the side panel in the areas (1) and (2) with punch rivets N4.
Area Number 1 1 2 6 CONSUMABLE - PUNCH RIVET DESCRIPTIONPunch rivet N4
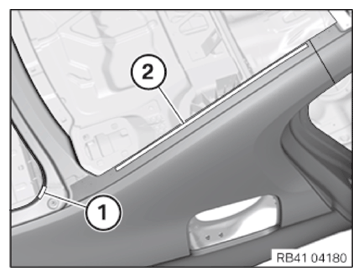
Ø 3 mm; 4 mm long83192457307 - Rivet the side panel in the areas (1) and (2) with punch rivets N4 and N5.
Area Number Blind rivet 1 5 N4 2 3 N5 CONSUMABLE - PUNCH RIVET DESCRIPTIONPunch rivet N4
Ø 3 mm; 4 mm long83192457307 CONSUMABLE - PUNCH RIVET DESCRIPTIONPunch rivet N5
Ø 5 mm; 5 mm long83192158079 - Also apply K5 adhesive (2) to the outer wheel arch section (3).
- Rear quarter panel.
- Flange the edge of wheel arch (3) of the side panel flush to the outer wheel arch section.
- Do not create sharp edges when flanging because the crimping edge may otherwise begin to tear.
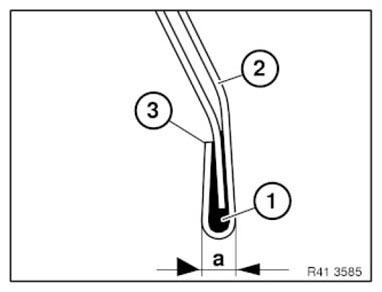
- Fill crimping edge fully with adhesive.
Dimension (a) = 5 mm
- Adhesive.
- Rear quarter panel.
- Seal the new part with sealant D1 in the same way as for standard production.
Seal with sealant D1 in the area (3) according to the standard.
Consumable
Sealant D1 (seam sealing) 310 ml 83422409985 Install EMC screw
- Drill a 4.2 mm diameter hole after the adhesive has fully cured.
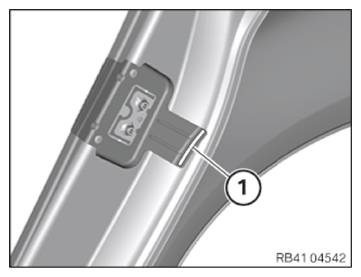
- Screw in the EMC screw.
- Seal the EMC screw with sealing compound. CONSUMABLE - SEALANT DESCRIPTION
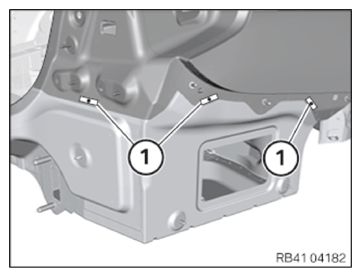
Sealant D1 (seam sealing) 310 ml 83422409985 - After the adhesive has hardened, install 3 EMC screws in the areas (1).
- Install 1 additional EMC screw in the area of the door sill.CONSUMABLE - SCREW DESCRIPTION
screw
EMC screw, SF Plus, M5x1583190301639