REINFORCEMENT PLATE WITH STUD BOLT (BONDED OR WELDED) - (530i 2017-2022, 530i xDrive 2017-2022, 530e PHEV 2018-2022, 530e xDrive PHEV 2018-2022, 540i 2017-2022, 540i xDrive 2017-2022, M550i xDrive 2018-2022)
When replacing the rear side panel, reinforcement plates are glued or welded in at the separation points.
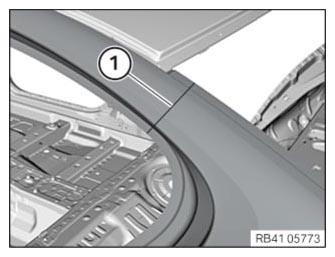
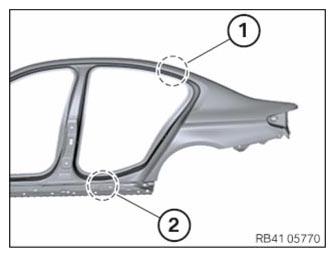
Valid for Sedan, Hatchback, Coupe.
Welding is carried out in area (1) (incl. water channel).
Bonding is carried out in area (2).
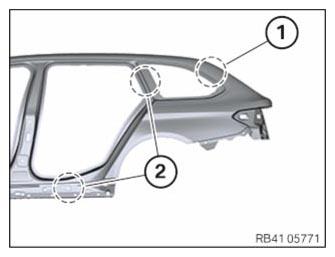
Valid for Sports Wagon, X model, Gran Coupe, Gran Turismo.
Welding is carried out in area (1) (incl. water channel).
Release the sealant in these areas (2).
Temperature sensor
The following illustrations serve as general illustrations of reinforcement plate repair work. They apply to the sectional repairs on the outer skin which are produced using the adhesive joining method.
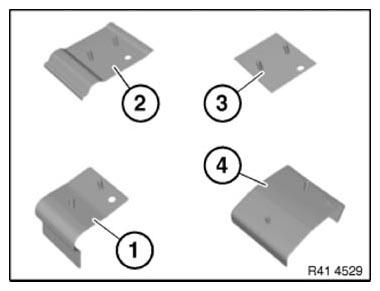
Overview of reinforcement plates (sourcing reference, see Electronic Parts Catalog):
- Reinforcement plate, sill
- Reinforcement plate, C-pillar
- Reinforcement plate, universal
- Reinforcement plate, C- or D-pillar
- Nuts (not shown)
- Plastic nut dia. 18 mm, part number 07 14 1 943 122
- Plastic nut dia. 22 mm, part number 07 14 7 169 847
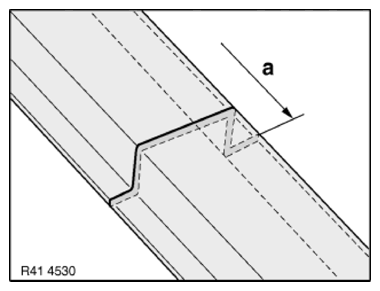
Mark the side panel in accordance with the specified dimension "a" and cut.
Preparation of the reinforcement plate (bonded or welded)
Some of the reinforcement plates are oversized.
If applicable, it is necessary to rework reinforcement plates at the edges or cut them to size until the reinforcement plates are in tension-free contact with the outer skin.
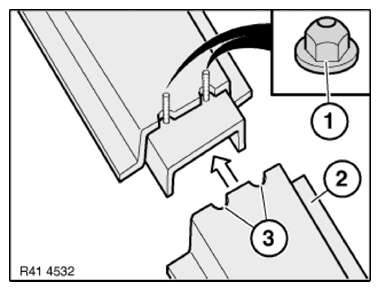
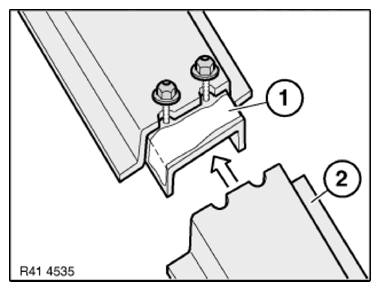
Adjust reinforcement plate (1) to fit in component (2) on vehicle.
Make semicircular recesses (3) for the stud bolts (4).
Diameter of recesses: about 10 - 12 mm.

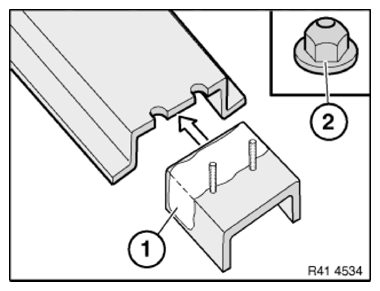
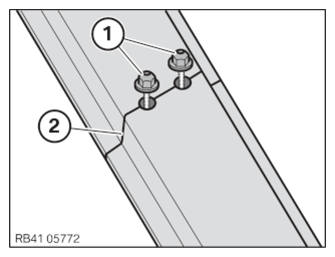
Secure the reinforcement plate with the plastic nuts (1).
Fit new part (2).
Make recesses (3) in the new part in a semicircular shape.
Diameter of recesses: about 10-12 mm.
Remove the reinforcement plate.
Temperature sensor
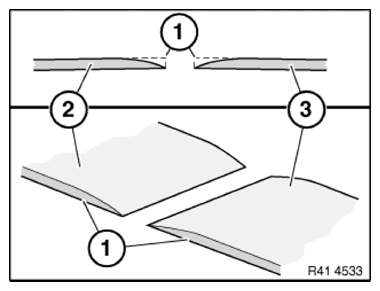
Boded reinforcement plates:
Width of joint between new part and component on vehicle about 5 - 8 mm (at least 30 mm flange width per side).
Welded reinforcement plates:
Width of the joint between the new part and the component at the vehicle: about 2 - 3 mm.
Grind bare metal in the area of the joint.
Carry out the following step only with bonded reinforcement plates.
Chamfer cutting edges (1) on joint by grinding.
(2) Component on vehicle
(3) New part
If the cutting edges have not been sufficiently chamfered, there may be voids in the paintwork after painting.
Installation of the bonded reinforcement plate
Clean all bonding surfaces.
Apply adhesive to the reinforcement plate in area (1).
Apply more adhesive in the radii to avoid air pockets.
Apply additional adhesive to the outer skin around radii.
Carefully slide reinforcement plate into component on vehicle and secure by plastic nuts (2).
Only screw the nuts a few turns.
Apply adhesive to the reinforcement plate bonding surface (1).
Apply more adhesive in the radii to avoid air pockets.
Apply additional adhesive to the outer skin around radii.
Fit new part (2).
Align new part to adjoining component and secure with gripping pliers.
First tighten the plastic nuts at the radii.
Only then tighten all plastic nuts in the flat areas.
Tightening torque COLLISION - BODY TIGHTENING TORQUES (G30) .
After adhesive has hardened:
Grind off stud bolts and surplus adhesive flush.
Paint area as specified in BMW Painting Handbook.
Installation of the welded reinforcement plate
Protect adjacent components from heat and flying sparks.
Align new part to adjoining component and secure with gripping pliers.
First tighten the plastic nuts at the radii.
Only then tighten all plastic nuts in the flat areas.
Tightening torque; See COLLISION - BODY TIGHTENING TORQUES (G30) .
Weld the joints (2) between the plastic nuts (1).
Release plastic nuts (1).
Grind off the stud bolts so they are flush.
Weld the joints (2) in the remaining areas.
Grind the weld seam (1) so that it is flush.
Set up area (1) and fill with multi-functional filler.
Paint area as specified in BMW Painting Handbook.