Removing the DME control unit for cylinders 1 to 4
WARNING:
Working on 12 V electrical system.
Risk of short circuits! Risk of fire!
Risk of short circuits! Risk of fire!
- Make sure that there is no charger connected to the jump start terminal in the engine compartment.
- Detach battery ground lead from battery.
- For auxiliary batteries: Detach battery minus cables from all auxiliary batteries.
NOTE:
TECHNICAL INFORMATION
Follow instructions for removing and installing control units.
For additional information see: INSTRUCTIONS FOR REMOVAL AND REPLACEMENT OF CONTROL UNITS .
Follow instructions for removing and installing control units.
For additional information see: INSTRUCTIONS FOR REMOVAL AND REPLACEMENT OF CONTROL UNITS .
NOTE:
TECHNICAL INFORMATION
In a warranty case, you must always provide a fault memory printout with the defective part, even if the fault memory does not contain an entry.
In a warranty case, you must always provide a fault memory printout with the defective part, even if the fault memory does not contain an entry.
NOTE:
TECHNICAL INFORMATION
Disconnecting control units may cause fault code entries and functional limitations. Fault code entries must be read out and deleted if necessary.
Disconnecting control units may cause fault code entries and functional limitations. Fault code entries must be read out and deleted if necessary.
Preliminary work
- Refer to DISCONNECTING ALL BATTERY GROUND LEADS .
- Refer to REMOVING COVER FOR THE RIGHT DME CONTROL UNIT .
WARNING:
Working on 12 V electrical system.
Risk of short circuits! Risk of fire!
Risk of short circuits! Risk of fire!
- Make sure that there is no charger connected to the jump start terminal in the engine compartment.
- Detach battery ground lead from battery.
- For auxiliary batteries: Detach battery minus cables from all auxiliary batteries.
NOTE:
TECHNICAL INFORMATION
Follow instructions for removing and installing control units.
For additional information see: INSTRUCTIONS FOR REMOVAL AND REPLACEMENT OF CONTROL UNITS .
Follow instructions for removing and installing control units.
For additional information see: INSTRUCTIONS FOR REMOVAL AND REPLACEMENT OF CONTROL UNITS .
NOTE:
TECHNICAL INFORMATION
In a warranty case, you must always provide a fault memory printout with the defective part, even if the fault memory does not contain an entry.
In a warranty case, you must always provide a fault memory printout with the defective part, even if the fault memory does not contain an entry.
NOTE:
TECHNICAL INFORMATION
Disconnecting control units may cause fault code entries and functional limitations. Fault code entries must be read out and deleted if necessary.
Disconnecting control units may cause fault code entries and functional limitations. Fault code entries must be read out and deleted if necessary.
NOTE:
TECHNICAL INFORMATION
Collect and dispose of emerging fluids. Observe country-specific waste disposal regulations.
Collect and dispose of emerging fluids. Observe country-specific waste disposal regulations.
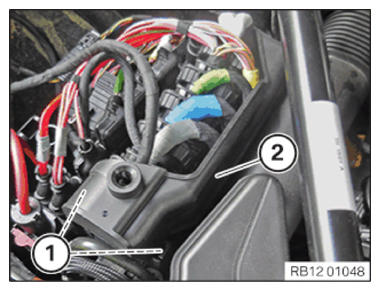
- Unlock the locks (1).
- Remove cover (2).
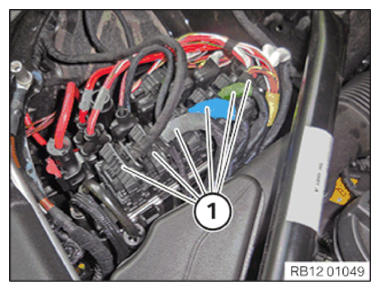
- Unlock all connectors (1) and detach from the DME control unit.
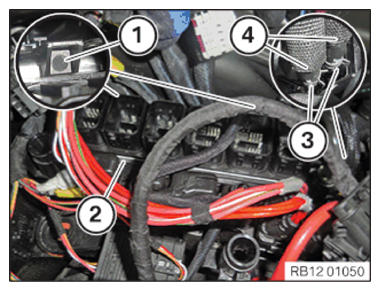
- Unlock the locks (1).
- Slightly pull the Digital Motor Electronics control unit (2) upwards until the coolant lines (4) are accessible.
- Release clamps (3) and detach coolant lines (4) from DME control unit (2).
- Make sure coolant does not penetrate the plug connections.
If necessary, clean the plug connections from the residual coolant.
- Remove the Digital Motor Electronics control unit (2) towards the top.