Removing the drive belt for the starter motor generator
Preliminary work
- Refer to REMOVING THE ACOUSTIC COVER .
- Refer to REMOVING THE COVER ON LEFT AND RIGHT IN THE ENGINE COMPARTMENT AT THE TOP .
- Refer to REMOVING BOTH FRONT-END STRUTS .
- Refer to REMOVING FRONT CROSS CONNECTION .
- Refer to REMOVING THE REAR TOP CROSS CONNECTION .
- Refer to REMOVING THE FAN COWL .
- Refer to REMOVING THE INTAKE FILTER HOUSING (TENSION STRUT ON SHOCK TOWER REMOVED) .
- Refer to REMOVING TOP CLEAN AIR PIPE .
- Refer to REMOVING BOTTOM CLEAN AIR PIPE .
- Refer to REMOVING CHARGE AIR LINE .
CAUTION:
Spring preload.
Injury hazard!
Injury hazard!
- The use of the specified special tool (tool) is mandatory.
- Carry out the described steps properly.
CAUTION:
Component with preload.
Injury hazard!
Injury hazard!
- Reduce preload as far as possible before disassembly. Relieve component.
NOTE:
TECHNICAL INFORMATION
If the drive belt is reused: Mark the direction of rotation and reinstall the drive belt in same direction of rotation.
If the drive belt is reused: Mark the direction of rotation and reinstall the drive belt in same direction of rotation.
NOTE:
TECHNICAL INFORMATION
Replace drive belt if it is contaminated with coolant and oil residue.
Replace drive belt if it is contaminated with coolant and oil residue.
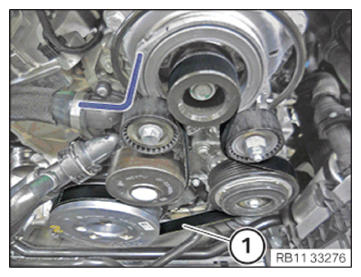
- Increase the preload on the belt tensioner using the conventional tools (1) in the arrow direction.
- Secure the belt tensioner with the special tool 0 496 268 (11 0 390) .

- Guide out and remove the drive belt for the starter motor generator (1).