Remove oil-to-water heat exchanger
Prerequisite
- Heat exchanger for the automatic transmission is removed
WARNING:
Hot fluids.
Risk of scalding!
Risk of scalding!
- Conduct all work in the vehicle wearing appropriate personal protective equipment only.
WARNING:
Hot surfaces.
Risk of burning!
Risk of burning!
- Perform all work only on components that have cooled down.
NOTE:
Collect and dispose of emerging fluids. Observe country-specific waste disposal regulations.
Preliminary work
- Refer to REMOVING THE COVER ON LEFT AND RIGHT IN THE ENGINE COMPARTMENT AT THE TOP .
- Refer to REMOVING THE LEFT AND RIGHT FRONT-END STRUT .
- Refer to REMOVING FRONT CROSS CONNECTION .
- Refer to REMOVING THE REAR TOP CROSS CONNECTION .
- Refer to REMOVING THE FAN COWL .
- Refer to REMOVING THE ACOUSTIC COVER .
- Refer to REMOVING THE OIL FILLER CAP .
- Refer to RELEASING THE OIL FILTER COVER .
- Refer to REMOVING THE FRONT UNDERBODY PROTECTION OR FRONT THRUST FIELD .
- Refer to REMOVING REAR UNDERBODY PROTECTION .
- Refer to REMOVING THE STIFFENING PLATE .
- Refer to DRAINING THE COOLANT FROM THE HIGH-TEMPERATURE COOLING SYSTEM .
- Refer to REMOVING TRANSMISSION OIL COOLER .
- Refer to RELEASING THE OIL DRAIN PLUG .
NOTE:
Collect and dispose of emerging fluids. Observe country-specific waste disposal regulations.
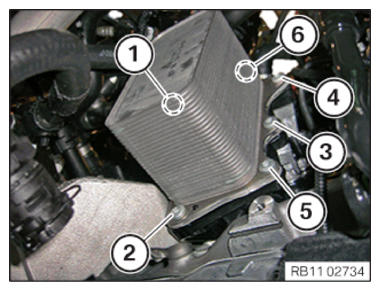
- Loosen the screws (1), (2), (3), (4), (5) and (6).NOTE: Loosen the lid on the full-flow oil filter so the oil flows back into the oil sump.
- Remove the oil coolant heat exchanger from the full-flow oil filter.