Adjusting the timing of the camshafts
NOTE:
RISK OF DAMAGE
Damage to the engine.
If the engine is manually rotated in the wrong direction of rotation, the engine can be damaged.
Damage to the engine.
If the engine is manually rotated in the wrong direction of rotation, the engine can be damaged.
- Only rotate the engine manually in the correct direction of rotation: a) clockwise when looking at the damper, or b) counterclockwise when looking at the chain drive. b) applies only if the timing chain is installed in the rear.
Preliminary work
- Refer to REMOVING CHAIN TENSIONER .
NOTE:
TECHNICAL INFORMATION
Assemble the tools for releasing and tightening of the VANOS central valves according to their accessibility.
Assemble the tools for releasing and tightening of the VANOS central valves according to their accessibility.
Install a new chain tensioner
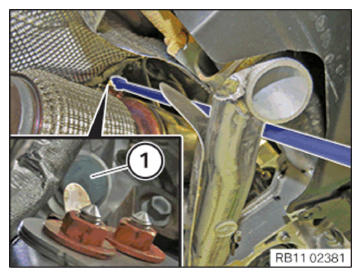
- Replace sealing ring (1).
Parts: Sealing ring
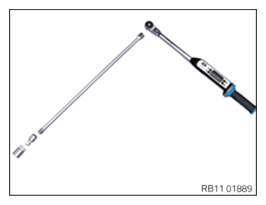
- Tighten chain tensioner using the illustrated tool.
- Tighten chain tensioner (1) from below.TIGHTENING TORQUES SPECIFICATION
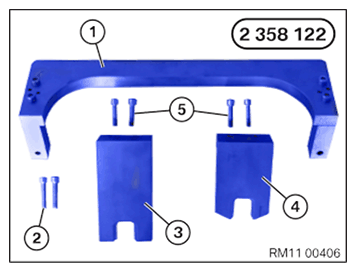
Chain tensioner to cylinder head Chain tensioner piston M22x1.5 Joining torque 20 Nm Angle of rotation 30° - Keep set of special tools 2 358 122
at hand:
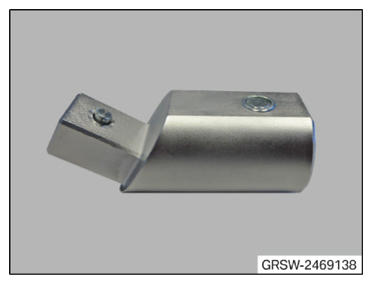
Number Description 1 Basic carrier 2 Basic carrier screws on cylinder head 3 Gauge to fix exhaust camshaft 4 Gauge to fix intake camshaft 5 Screw gauge on basic carrier - Have the special tool 2 469 138
ready.
- Prepare all special tools and commercially available tools.
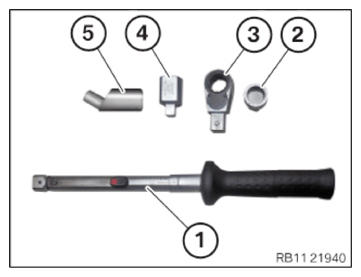
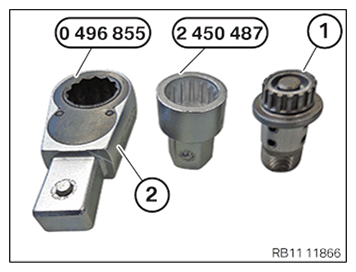
Number Description 1 Standard torque wrench 2 Wrench socket set 2 450 487 3 Reversible ratchet 0 496 855 4 Commercially available reduction 5 adapter 2 469 138 - Assemble all the special tools and commercially available tools as shown.
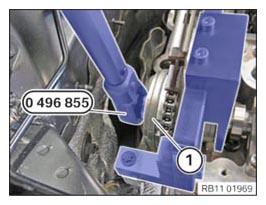
- To release the central valve (1) use the reversible ratchet (2) from the special tool 0 496 855
with the special tool 2 450 487.
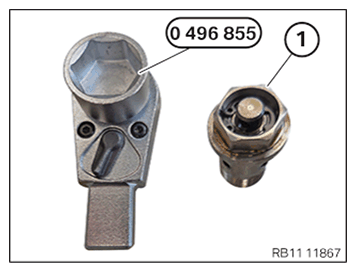
- To release the central valve (1), use special tool 0 496 855.
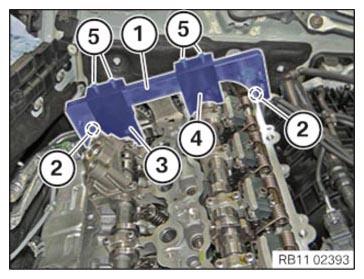
- Position the basic carrier from the set of special tools 2 358 122 on the cylinder head.
- If necessary, crank the engine at the crankshaft using special tool 0 493 380 (11 6 480).
- Position the gauge to secure the intake camshaft on the intake camshaft and secure it to the basic carrier using the screws.
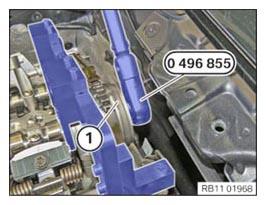
- Release the VANOS central valve of the intake adjuster (1) with special tool 0 496 855
or 2 450 487.
- If necessary, crank the engine at the crankshaft using special tool 0 493 380 (11 6 480).
- Position the gauge to secure the exhaust camshaft on the exhaust camshaft and secure it to the basic carrier using the screws.
- Release VANOS central valve of the exhaust camshaft adjuster (1) with the special tool 0 496 855
or 2 450 487.
- Rotate both camshafts to the correct position so that the marking (1) of the exhaust camshaft and the marking (2) of the intake camshaft can be read from the top.
- The center of the three flat areas (1) must point up on both camshafts.
- Position gauge (3) with the recess on the exhaust camshaft and fix with the screws (5) on the basic carrier (1).
- Position gauge (4) with the recess on the intake camshaft and fix with the screws (5) on the basic carrier (1).
- Have the special tool 2 469 138
ready.
- Prepare all special tools and commercially available tools.
Number Description 1 Commercial available torque wrench 2 Socket attachment 2 450 487 3 Reversible ratchet 0 496 855 4 Commercially available reduction 5 adapter 2 469 138 - Assemble all special tools and commercially available tools as shown.
- To tighten the central valve (1), use the reversible ratchet (2) from the special tool 0 496 855
with special tool 2 450 487.
- To tighten the central valve (1), use special tool 0 496 855.
- Tighten the VANOS central valve of the intake adjuster (1) with special tool 0 496 855
or 2 450 487. TIGHTENING TORQUES SPECIFICATION
VANOS central valve to camshaft M12 x 1 1. Joining torque
2. Joining torque
3. Angle of rotation30 Nm
50 Nm
65°M21
VANOS central valve on the thread and on the contact surface must be coated with engine oil.1. Joining torque
2. tightening torque50 Nm
140 NmM22
VANOS central valve on the thread and on the contact surface must be coated with engine oil.1. Joining torque
2. tightening torque50 Nm
140 Nm - Tighten the VANOS central valve of the exhaust camshaft adjuster (1) with special tool 0 496 855 or 2 450 487.


TIGHTENING TORQUES SPECIFICATION
| VANOS central valve to camshaft | ||
|---|---|---|
| M12 x 1 | 1. Joining torque 2. Joining torque 3. Angle of rotation |
30 Nm 50 Nm 65° |
| M21 VANOS central valve on the thread and on the contact surface must be coated with engine oil. |
1. Joining torque 2. tightening torque |
50 Nm 140 Nm |
| M22 VANOS central valve on the thread and on the contact surface must be coated with engine oil. |
1. Joining torque 2. tightening torque |
50 Nm 140 Nm |
Follow-up work
- Refer to DISASSEMBLING ALL SPECIAL TOOLS
- Refer to CHECKING CAMSHAFT TIMING (AT) .