Installing the vibration damper
NOTE:
RISK OF DAMAGE
Radial shaft seal damage.
When fitting the vibration damper, the radial shaft seal may be damaged.
Radial shaft seal damage.
When fitting the vibration damper, the radial shaft seal may be damaged.
- It is imperative to use the special tool when fitting the vibration damper.
NOTE:
TECHNICAL INFORMATION
When removing/refitting or replacing the vibration damper, the radial shaft seal must also be replaceed.
When removing/refitting or replacing the vibration damper, the radial shaft seal must also be replaceed.
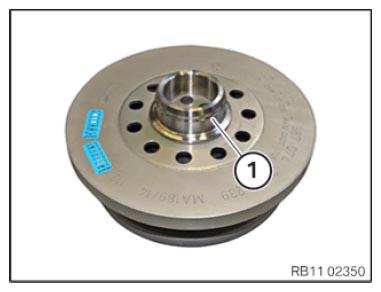
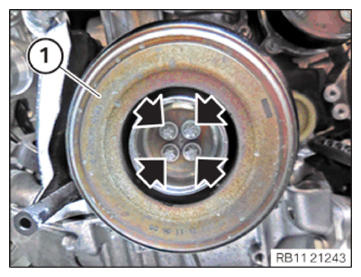
- Clean the sealing surface (1) from oil and contamination.
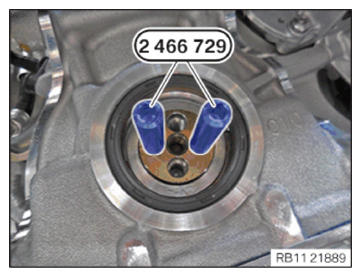
- Screw in the special tool 2 466 729 and hand-tighten it on the crankshaft.
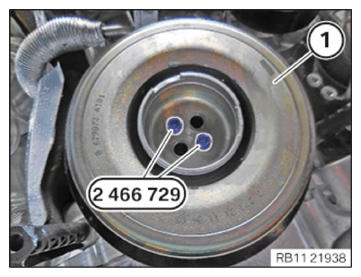
- Insert and install the vibration damper (1) on the special tool 2 466 729.
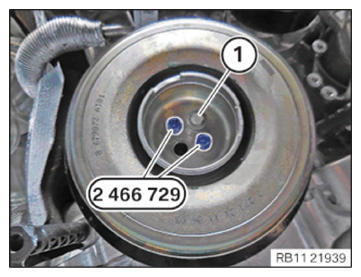
- Replace screws (1).
Parts: Screws
- Hand-tighten the bolt (1).
- Guide the special tool 2 466 729 out and remove.
- Version A (without mild hybrid technology):
Replace all remaining screws (1).
Position vibration damper (1).
Tighten the bolts (arrows) on the vibration damper (1).
TIGHTENING TORQUES SPECIFICATIONVibration damper with belt pulley to crankshaft M 10x65
Replace screws.
Tighten screws crosswise.1. Joining torque
2. Angle of rotation
3. Angle of rotation40 Nm
60°
60° - Version B (with mild hybrid technology):
Replace all remaining screws (1).
Parts: Screws
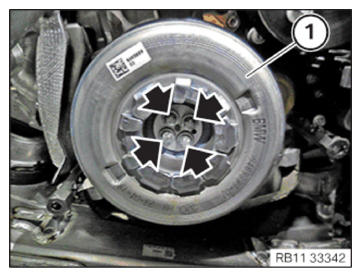
Position vibration damper (1).
Tighten the bolts (arrows) on the vibration damper (1).
TIGHTENING TORQUES SPECIFICATIONVibration damper with belt pulley to crankshaft M 10x65
Replace screws.
Tighten screws crosswise.1. Joining torque
2. Angle of rotation
3. Angle of rotation40 Nm
60°
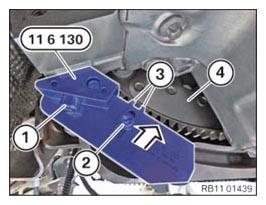
60° - Loosen screw (2).
- Slide the counter support with the bolt (2) down until the teeth (3) are no longer engaged in the gearing of the flywheel (4).
- Release the screw (1) and feed out and remove special tool 0 496 595 (11 6130).
Follow-up work
- Refer to INSTALLING THE DRIVE BELT FOR THE COOLANT PUMP .
- Refer to INSTALL THE ACOUSTIC COVER FOR THE ENGINE AT THE FRONT .
- Refer to INSTALL CHARGE AIR LINE .
- Refer to INSTALL RESONATOR .
- Refer to INSTALLING ACOUSTIC COVER .
- Refer to INSTALLING STARTER MOTOR .
- Refer to INSTALLING THE ACOUSTIC COVER FOR THE OIL SUMP .
- Refer to CONNECTING NEGATIVE BATTERY CABLE .
- Refer to INSTALLING THE REAR THRUST FIELD .
- Refer to INSTALLING THE UNDERBODY PROTECTION OF THE STEERING GEAR OR THE FRONT THRUST FIELD .
- Refer to INSTALL THE FRONT UNDERBODY PROTECTION OR FRONT THRUST FIELD .