Overview - Muffler, AUDI A4/A5, With Catalytic Converter And Particulate Filter
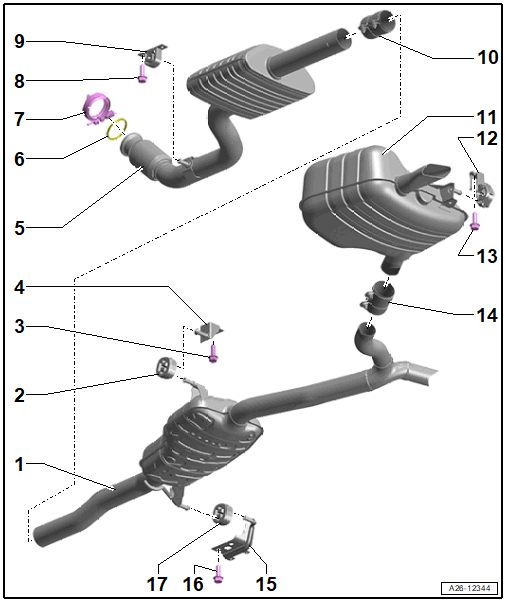
Fig 1: Exploded View Of Overview - Muffler, Audi A4/A5, With Catalytic Converter And Particulate Filter
 Courtesy of AUDI OF AMERICA, LLC
- Center Muffler
- Original equipment as one unit with rear mufflers. If a repair is required replace each separately
- Separating point. Refer to EXHAUST PIPES/MUFFLERS, DISCONNECTING .
- Exhaust System, Installing without Tension. Refer to EXHAUST SYSTEM, INSTALLING WITHOUT TENSION .
- Retaining Loop
- Replace if damaged
- Exhaust System, Installing without Tension. Refer to EXHAUST SYSTEM, INSTALLING WITHOUT TENSION .
- Bolt
- 23 Nm
- Bracket
- Front Muffler
- With a coupling
- Do not bend more than 10°
- Do not load on cable
- Do not damage wire mesh at decoupling element
- Removing and Installing. Refer to FRONT MUFFLER, REMOVING AND INSTALLING, CATALYTIC CONVERTER WITH PARTICULATE FILTER .
- Exhaust System, Installing without Tension. Refer to EXHAUST SYSTEM, INSTALLING WITHOUT TENSION .
- With a coupling
- Seal
- Replace after removing
- Screw-Type Clamp
- 7 Nm
- Replace after removing
- Bolt
- 23 Nm
- Mount
- Replace if damaged
- Check the pretension. Refer to EXHAUST SYSTEM, INSTALLING WITHOUT TENSION .
- Front Clamping Sleeve
- Tighten the threaded connections equally to 23 Nm.
- Before tightening, align the exhaust system without tension. Refer to EXHAUST SYSTEM, INSTALLING WITHOUT TENSION .
- Installation position. Refer to Fig 2.
- Rear Muffler
- Original equipment one unit with the center muffler. If a repair is required replace each separately
- Separating point. Refer to EXHAUST PIPES/MUFFLERS, DISCONNECTING .
- Exhaust System, Installing without Tension. Refer to EXHAUST SYSTEM, INSTALLING WITHOUT TENSION .
- Mount
- Replace if damaged
- Check the pretension. Refer to EXHAUST SYSTEM, INSTALLING WITHOUT TENSION .
- Bolt
- 23 Nm
- Rear Clamping Sleeve
- Tighten the threaded connections equally to 23 Nm.
- Before tightening, align the exhaust system without tension. Refer to EXHAUST SYSTEM, INSTALLING WITHOUT TENSION .
- Installation position. Refer to Fig 3.
- Bracket
- Bolt
- 23 Nm
- Retaining Loop
- Replace if damaged
- Exhaust System, Installing without Tension. Refer to EXHAUST SYSTEM, INSTALLING WITHOUT TENSION .
Front Clamping Sleeve - Installation Position
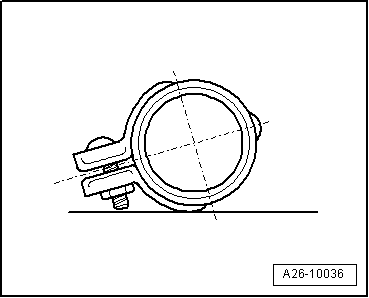
-- Install the clamping sleeve in the position shown.
- Threaded connections are to the left.
- Nuts downward.
- Bolt ends must not protrude over the lower edge of the clamping sleeve.
Rear Clamping Sleeves - Installation Position
-- Install the clamping sleeve in the position shown.
- Threaded connections to the outer side of the vehicle
- Nuts downward.
- Bolt ends must not protrude over the lower edge of the clamping sleeve.