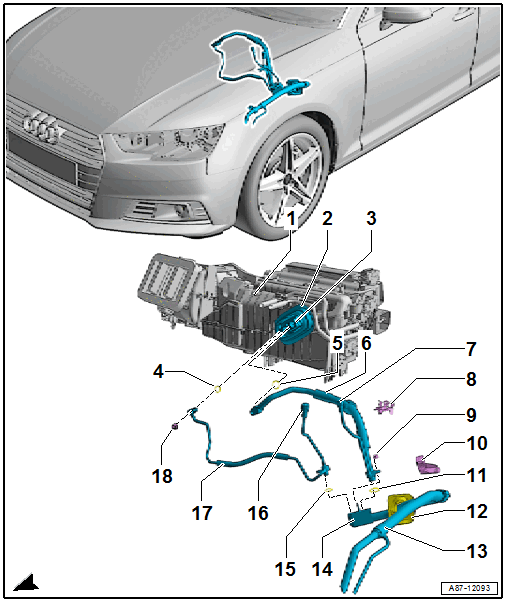
Overview - Components Under Fender And In Plenum Chamber
 Courtesy of AUDI OF AMERICA, LLC
- Heater and A/C Unit
- Overview. Refer to OVERVIEW - HEATER AND A/C UNIT .
- Removing and Installing. Refer to HEATER AND A/C UNIT, REMOVING AND INSTALLING .
- There are different versions. Refer to the Parts Information.
- Grommet on the Refrigerant Lines Pass-Through in the Vehicle Interior
- Front Expansion Valve
- There are different versions. Refer to the Parts Information.
- Refrigerant Line, Disconnecting and Connecting. Refer to REFRIGERANT LINES, DISCONNECTING FROM FRONT EXPANSION VALVE AND RECONNECTING .
- Removing and Installing. Refer to FRONT EXPANSION VALVE, REMOVING AND INSTALLING .
- With threaded pin on the expansion valve. Refer to the Parts Information.
- On an expansion valve without a threaded pin the refrigerant lines can also be secured with a bolt.
- O-Ring
- Replace after removing. Refer to the Parts Information for the version.
- Coat with refrigerant oil before installing. Refer to REFRIGERANT CIRCUIT SEALS .
- O-Ring
- Replace after removing. Refer to the Parts Information for the version.
- Coat with refrigerant oil before installing. Refer to REFRIGERANT CIRCUIT SEALS .
- Refrigerant Line - Low Pressure Side
- With low pressure side service connection
- From the expansion valve to the pass-through for the refrigerant lines (in the area under the left fender)
- Removing and Installing. Refer to REFRIGERANT LINES IN PLENUM CHAMBER, REMOVING AND INSTALLING .
- Service Connection - Low Pressure Side
- For measuring and discharging
- Cap with seal, always install
- Evacuating and charging valve, removing and installing. Refer to EVACUATING AND CHARGING VALVE, REMOVING AND INSTALLING, LOW AND HIGH PRESSURE SIDE .
- There are different versions. Refer to the Parts Information.
- Bracket for Refrigerant Lines
- There are different versions. Refer to the Parts Information.
- Nut
- 9 Nm
- Instead of a nut on an expansion valve without a threaded pin, a bolt can also be installed on the expansion valve. Refer to the Parts Information.
- Inner Heat Exchanger Bracket
- There are different versions. Refer to the Parts Information.
- O-Ring
- Replace after removing. Refer to the Parts Information for the version.
- Coat with refrigerant oil before installing. Refer to REFRIGERANT CIRCUIT SEALS .
- Pass-Through for Refrigerant Lines in the Plenum Chamber
- There are different versions. Refer to the Parts Information.
- Removing and Installing. Refer to REFRIGERANT LINES WITH INNER HEAT EXCHANGER, REMOVING AND INSTALLING .
- Refrigerant Line with Inner Heat Exchanger
- Overview. Refer to OVERVIEW - COMPONENTS UNDER FENDER AND IN PLENUM CHAMBER .
- In this refrigerant line, the liquid warm refrigerant flowing on the high pressure side releases energy into the vaporous cold refrigerant flowing on the low pressure side. This increases the efficiency of the A/C system.
- Removing and Installing. Refer to REFRIGERANT LINES WITH INNER HEAT EXCHANGER, REMOVING AND INSTALLING .
- Connection on the Refrigerant Line with Inner Heat Exchanger
- Overview. Refer to OVERVIEW - COMPONENTS UNDER FENDER AND IN PLENUM CHAMBER .
- Removing and Installing. Refer to REFRIGERANT LINES WITH INNER HEAT EXCHANGER, REMOVING AND INSTALLING .
- O-Ring
- Replace after removing. Refer to the Parts Information for the version.
- Coat with refrigerant oil before installing. Refer to REFRIGERANT CIRCUIT SEALS .
- High Pressure Side Service Connection
- For measuring, discharging and charging
- Cap with seal, always install
- Evacuating and charging valve, removing and installing. Refer to EVACUATING AND CHARGING VALVE, REMOVING AND INSTALLING, LOW AND HIGH PRESSURE SIDE .
- There are different versions. Refer to the Parts Information.
- Refrigerant Line - High Pressure Side
- With high pressure side service connection
- To the expansion valve from the openings for the refrigerant lines (from the area under the left fender)
- Removing and Installing. Refer to REFRIGERANT LINES IN PLENUM CHAMBER, REMOVING AND INSTALLING .
- Nut
- 9 Nm
- Instead of a nut on an inner heat exchanger without a threaded pin, a bolt can also be installed. Refer to the Parts Information.