Overview - Heating And A/C System Fresh Air Intake
Depending on the vehicle version, there are different fresh air intake versions. Refer to the Parts Information.
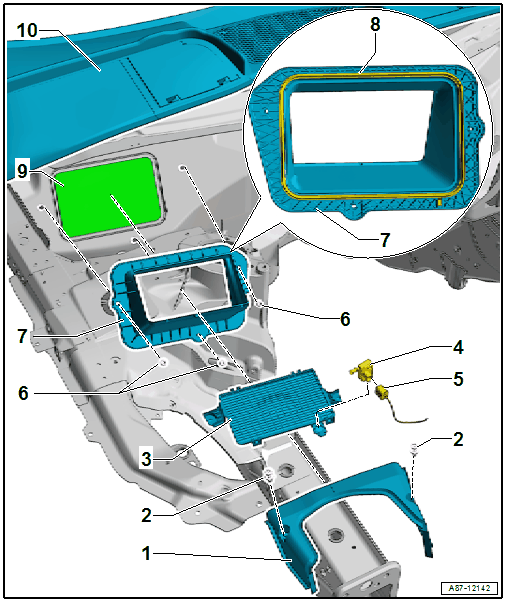
- Outer Cover for the Fresh Air Intake Box (Rain Water Drain Channel)
- Before installing, check the outer cover for damage. If the cover is damaged, water can enter the air intake shroud for the fresh air intake and thus the heater and A/C unit.
- When installing, ensure it is seated correctly in the fresh air intake. If the fresh air intake is not installed correctly, water can run into the heater and A/C unit air intake shroud.
Installing
-- Push the outer cover under the rain water drain channel of the window crossmember and secure with the expanding clips on the intake box.
- Expanding Clip
- Fresh Air Intake Grille
- Depending on the version, for some countries with high dust levels (for example China), a dust filter is installed in the filter mount instead of the grille. This dust filter prevents pollen and sand from getting sucked into the Fresh Air Blower -V2-. Refer to the Parts Information for the allocation.
- Humidity Sensor in Fresh Air Intake Duct -G657- /Air Quality Sensor -G238-
- Different versions (with or without Air Quality Sensor -G238-) depending on the version of the A/C system. Refer to the Parts Information.
- Removing and Installing. Refer to Humidity Sensor in Fresh Air Intake Duct -G657- /Air Quality Sensor -G238-, REMOVING AND INSTALLING .
- Connector to the Humidity Sensor in Fresh Air Intake Duct -G657- /Air Quality Sensor -G238-
- Nut
- Tightening specification 3.5 Nm
- Tighten the nuts in multiple steps to the specified tightening specification
- If the tightening sequence is not followed, water can enter via the sealing surface in the opening for the fresh air intake and then in the air intake shroud of the heater and A/C unit.
- Intake Box
- With debris grille
- With seal to the plenum chamber rear panel
- Check the intake box, debris grille, and corresponding seal for damage and correct assembly before installing
- Check the air intake box and seals before installing for damage, completely replace a damaged seal or the air intake box. Refer to the Parts Information.
- Seal on the Intake Box
- Before installing, check the intake box seal for damage. In the case of an incorrectly installed or damaged cover, water can enter fresh air intake duct and thus the heater and A/C unit.
- Fresh Air Intake Opening in the Plenum Chamber Rear Panel
- Plenum Chamber Cover
- Removing and installing. Refer to PLENUM CHAMBER COVER, REMOVING AND INSTALLING .