Preliminary Work
-- Switch the ignition on.
-- Open all instrument panel vents.
-- Switch on the heating and A/C system.
-- Check by switching from fresh air to recirculating air mode to see whether the odor is actually originating from the front heater and A/C unit evaporator. Refer to ODORS IN VEHICLES WITH A/C SYSTEM INFORMATION .
- The cause or the location of the odor must be determined before cleaning the evaporator.
- Even if the odor is not caused by the evaporator (for example, the dust and pollen filter is dirty), it is advisable to clean the evaporator after eliminating the cause (the evaporator absorbs odors via the air flowing by).
-- Set the heating and A/C system to recirculating air mode.
-- Switch off the ignition (the A/C system and Fresh Air Blower -V2- switches off with it).
-- Remove the glove compartment. Refer to GLOVE COMPARTMENT, REMOVING AND INSTALLING .
-- Remove and check the dust and pollen filter. Replace it if necessary after cleaning the evaporator. Refer to DUST AND POLLEN FILTER, REMOVING AND INSTALLING .
TIP
Replacing a dirty dust and pollen filter is recommended after each cleaning.
-- When removing the dust and pollen filter check the area of the dust and pollen filter (to the air intake shroud for the air in the fresh and recirculating air mode) and clean if necessary. Refer to DUST AND POLLEN FILTER, REMOVING AND INSTALLING .
-- Check the plenum chamber and the plenum chamber water drain and clean them if necessary. Refer to PLENUM CHAMBER WATER DRAIN, CHECKING .
-- Place a drip tray under the vehicle to collect the cleaning fluid that is draining out via the condensation water drain (for the outlet opening layout for the condensation water drain. Refer to CONDENSATION WATER DRAIN, REMOVING AND INSTALLING ).
-- Cover the carpet in the right front footwell with liquid-tight foil and absorbent paper.
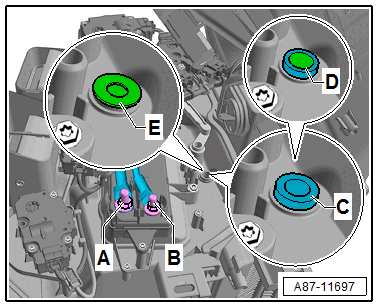
-- On vehicles with Auxiliary Heater Control Module -J604-, cover the connections -A- and -B-.
TIP
- On RHD vehicles, position the driver seat all the way back and remove the driver side instrument panel cover, and cover the driver and front passenger footwell carpet with waterproof foil and absorbent paper. Refer to DRIVER SIDE INSTRUMENT PANEL COVER, REMOVING AND INSTALLING .
On a vehicle with an evaporator which has been cleaned with a spray lance.
-- Remove the plug -C-.
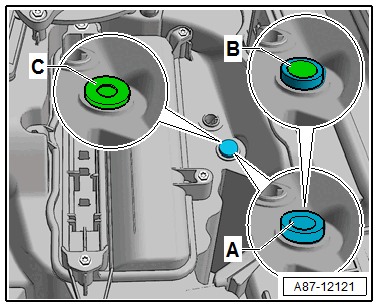
On a vehicle with an evaporator which has not been cleaned with a spray lance.
There is a risk of damaging the heater and A/C unit or the doors in the heater and A/C unit with the drill.
- Route the connecting lines on the heater and A/C unit so that they do not come in contact with the turning parts of the drill or the drill bit.
- Only drill carefully and with low speed.
- Do not let the drill enter deeper than maximum 10 mm in the heater and A/C unit.
-- Using a commercially available angle drill and a short drill bit (9 mm diameter) carefully drill a hole -B- in the evaporator to be cleaned installed pin -A- on the heater and A/C unit.
-- Remove any burrs from the hole -B-.
Evaporator, Cleaning
The cleaning solution and its vapors introduce a health risk.
- Wear protective eyewear, safety gloves and protective work clothing.
- Only work with the cleaning solution in well-ventilated areas.
- Do not inhale cleaning solution vapors.
Risk of the cleaning fluid causing damage to the vehicle.
- Avoid getting any fluid on the electronic components.
- Do not spray the cleaning fluid into the air ducts leading to or in the vehicle interior.
- If vehicle interior components have come in contact with the cleaning fluid, they must be thoroughly cleaned.
Possible contamination of the heater and A/C unit by other substances
- Use a suction feed spray gun and spray lance, which have not been used with other fluids yet.
- The ignition (along with the A/C system) is switched off.
-- Fill the Suction Feed Spray Gun :VAG1538 with the attached spray lance with one liter of cleaning solution for the A/C system evaporator.
-- Set a pressure of approximately 7.5 bar (109 PSI) on the compressed air supply for the suction feed spray gun (minimum pressure: 5 bar (73 PSI)/maximum pressure: 10 bar (145 PSI)).
- This compressed air supply pressure results in a working pressure of 3.5 bar (51 PSI) to 4.5 bar (65 PSI) at the spray lance.
-- Connect the Suction Feed Spray Gun :VAS1538 to the compressed air supply.
-- Guide the spray lance -A- via the opening -B- in the heater and A/C unit (in the evaporator housing) spray direction toward the evaporator.
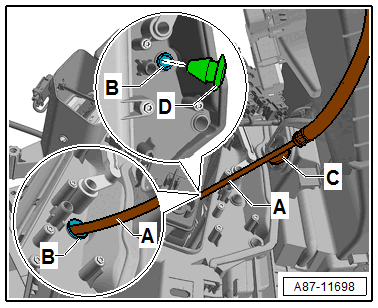
TIP
The guide washer -C- is attached opposite of the spray lance holes. This also allows the spray direction to be detected and fixed when the spray lance is inserted.
- The drainage of the cleaning fluid via the condensation water drain must be monitored during the cleaning procedure.
-- Clean and flush the evaporator and the surrounding housing with 0.1 - 0.2 liters of cleaning solution by operating the metering lever on the suction feed spray gun and moving the spray lance -A- back and forth.
-- Check if actual fluid flows over the condensation water drain in the drip tray under the vehicle.
- The condensation water drain must be cleaned before continuing the cleaning procedure if the fluid is only dripping out. Refer to CONDENSATION WATER DRAIN, REMOVING AND INSTALLING .
-- Spray the entire contents of the suction feed spray gun for cleaning the evaporator.
-- Remove the drip tray and dispose of the collected cleaning solution.
Allow the cleaning solution to work for at least 30 minutes. The vehicle can be completed at this time.
-- Insert the plugs -D- in the hole -B- and check for secure fit.
-- Reinstall all of the removed components.
-- Open all of the doors or windows.
-- Open all of the air vents on the instrument panel and in the vehicle.
-- Switch on the ignition after the cleaning solution activation time.
-- Adjust the airflow direction of the air to all vents on the Front A/C Display Control Head -E87-.
-- Set the maximum speed for the Fresh Air Blower -V2- on the Front A/C Display Control Head -E87-.
-- Then start the engine and turn on the A/C system (the A/C compressor) (the indicator lamp in the A/C or A/C Max button turns on).
-- Allow the A/C system to run at this setting for approximately 10 minutes (the A/C compressor is switched on). At the same time, switch the selected vent temperature back and forth between cold and warm several times on the Front A/C Display Control Head -E87-.