Overview - Rear Lid Tail Lamps, AVANT
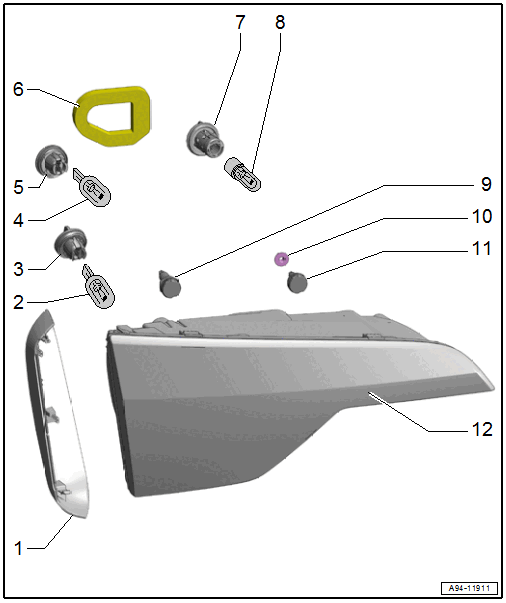
- Cover
- For the tail lamp
- Removing and installing. Refer to REAR LID TAIL LAMPS, REMOVING AND INSTALLING, AVANT .
- Back-Up Lamp Bulb
- Left Back-Up Lamp Bulb -M16-
- Right Back-Up Lamp Bulb -M17-
- Bulb, replacing. Refer to REAR LID TAIL LAMP BULB, REMOVING AND INSTALLING, AVANT .
- Bulb Socket
- Removing and installing. Refer to REAR LID TAIL LAMP BULB, REMOVING AND INSTALLING, AVANT .
- Tail Lamp Bulb 2
- Left Tail Lamp Bulb 2 -M49-
- Right Tail Lamp Bulb 2 -M50-
- Bulb, replacing. Refer to REAR LID TAIL LAMP BULB, REMOVING AND INSTALLING, AVANT .
- Bulb Socket
- Removing and installing. Refer to REAR LID TAIL LAMP BULB, REMOVING AND INSTALLING, AVANT .
- Seal
- Replace if damaged
- Bulb Socket
- Removing and installing. Refer to REAR LID TAIL LAMP BULB, REMOVING AND INSTALLING, AVANT .
- Rear Fog Lamp Bulb
- Left Rear Fog Lamp Bulb -L46-
- Right Rear Fog Lamp Bulb -L47-
- Bulb, replacing. Refer to REAR LID TAIL LAMP BULB, REMOVING AND INSTALLING, AVANT .
- Adjusting Screw
- To align the tail lamps to the body contours. Refer to TAIL LAMP, CORRECTING INSTALLED POSITION .
- Nut
- Tightening specifications. Refer to Fig 2.
- Quantity: 3
- Adjusting Screw
- To align the tail lamps to the body contours. Refer to TAIL LAMP, CORRECTING INSTALLED POSITION .
- Tail Lamp
- Left Tail Lamp 2 -MX5-
- Right Tail Lamp 2 -MX6-
- LED version: If an LED is malfunctioning, the tail lamp must be completely replaced
- Removing and installing. Refer to TAIL LAMP, REMOVING AND INSTALLING, AVANT .
- Adjusting. Refer to TAIL LAMP, CORRECTING INSTALLED POSITION .
Tightening Specification and Sequence for the Tail Lamps
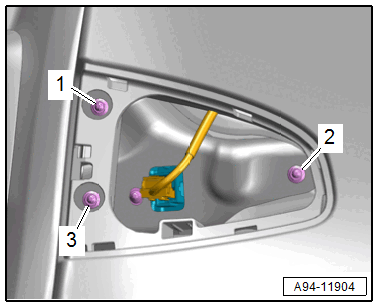
-- Tighten the nuts for the tail lamps to 4 Nm and in the sequence -1, 2 and 3-.