Overview - Drive Axle: Notes
 Courtesy of AUDI OF AMERICA, LLC
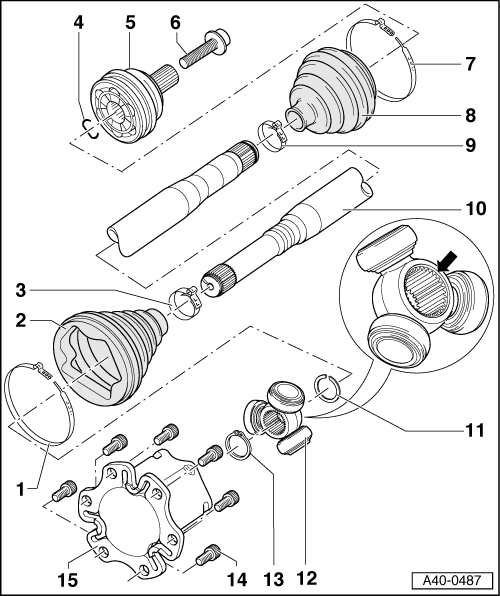
- Clamp
- CV Boot
- If the drive axle has a peened triple roller joint, then the triple roller joint has an adapter installed.
- The CV boot must fit in the groove and on the joint contour.
- Clamp
- Circlip
- Always replace after removing
- Insert into ring groove of shaft before installation (not visible on installed joint).
- Before installing CV joint, align the circlip in the center with opening facing upward.
- Outer CV Joint
- Bolt
- Clamp
- CV Boot
- Check for tears and scuffing
- Clamp
- Drive Axle
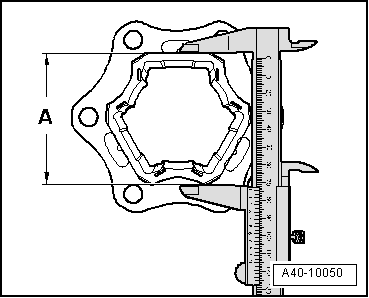
- Different versions:
- Triple roller joint AAR 2600 i with an outer CV joint with 85.2 mm diameter.
- Triple roller joint AAR 3300 i with an outer CV joint with 94 mm or 98.9 mm diameter.
- Triple roller joint AAR 3700 i with an outer CV joint with 102.7 mm diameter.
- Allocation. Refer to the Parts information.
- Removing and installing. Refer to DRIVE AXLE, REMOVING AND INSTALLING .
- Triple roller joint allocation. Refer to Figure.
- Drive axle, disassembling and assembling. Refer to DRIVE AXLE, DISASSEMBLING AND ASSEMBLING .
- Circlip
- Always replace after removing
- Insert in shaft groove
- Triple Roller Star
- Mark the installed position for reinstallation.
- Disassembling and assembling. Refer to DRIVE AXLE, DISASSEMBLING AND ASSEMBLING .
- Before installing the triple roller star, thinly coat the profile shaft splines with the grease used in the joint.
- Circlip
- Always replace after removing
- Insert in shaft groove
- Bolt
- M10: 50 Nm + 90°
- M12: 90 Nm + 90°
- Always replace after removing
- Joint