HYDRAULIC CONTROL UNIT, REMOVING AND INSTALLING, 0D3 "quattro sport" AND 0BX "quattro sport": Removing
- The ignition is off.
-- Place the vehicle on a hoist.
-- Slightly lower the rear section of the exhaust system and secure. Refer to OVERVIEW - MUFFLER - 2.0L (DMSA) , OVERVIEW - MUFFLER - 2.0L (DPAA) or OVERVIEW - MUFFLER - 3.0L .
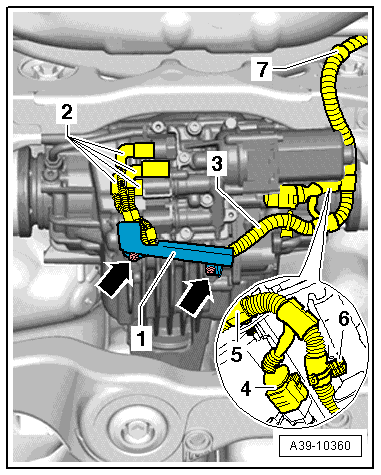
-- If equipped, remove the screws -arrows- and remove the wiring harness bracket -1- from the rear final drive.
Risk of interchanging the connector on the hydraulic control unit
Risk of damaging the electronic components and rear final drive
- Mark the Oil Pressure/Temperature Sensor -- and the Clutch Valves -- connectors -2-.
-- Disconnect the connectors -2- from the Oil Pressure/Temperature Sensor -- and the Clutch Valves --.
-- Disconnect the connector -4- from the All-Wheel Drive Pump -V415-.
-- Unclip the wiring harness -3- from the final drive and the subframe and tie it up -items 5 through 7-.
-- Place the Drip Tray under the rear final drive.
-- Drain the ATF from the rear final drive. Refer to ATF, DRAINING AND FILLING .
-- Drain the gear oil from the rear final drive. Refer to GEAR OIL, DRAINING, 0D3 "quattro sport" AND 0BX "quattro sport" .
-- Remove the All-Wheel Drive Pump -V415-. Refer to All-Wheel Drive Pump -V415-, REMOVING AND INSTALLING, 0D3 AND 0BX .
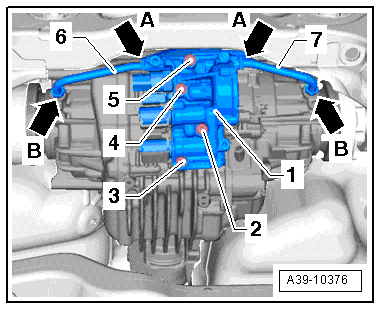
-- Loosen the nuts for the left pipe -6- and right pipe -7- on the hydraulic control unit -A arrows- one turn.
-- Remove the nuts on the chamber -B arrows-.
-- Remove the screws -2 through 5- and remove the hydraulic control unit -1- with the seal.
Tip
- Follow all safety precautions exactly when replacing the hydraulic control unit. Install the "old" sensors again if possible. Refer to SAFETY PRECAUTIONS AND TEST PROCEDURES, REAR FINAL DRIVE 0D3 "quattro sport" AND 0BX "quattro sport" .