Overview - Electric Drive Motor
WARNING: This page is about a different variant/trim than selected.
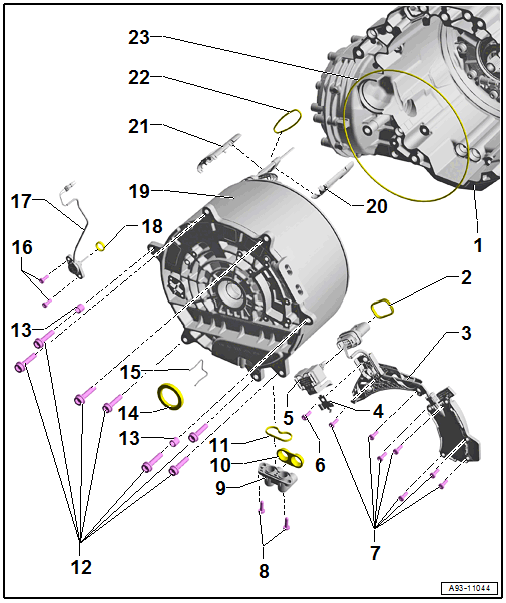
- Transmission
- Removing and installing. Refer to TRANSMISSION, REMOVING .
- Seal
- If damaged replace the connector housing
- Drive Motor Rotor Position Sensor 1 -G713-
- Removing and Installing. Refer to Drive Motor Rotor Position Sensor 1 -G713-, REMOVING AND INSTALLING: .
- Clamp
- Cap
- For the connector housing
- Bolt
- 4 Nm +45°
- Replace after removing
- Bolt
- 4 Nm +45°
- Replace after removing
- Quantity: 7
- Bolt
- 8 Nm +45°
- Replace after removing
- Quantity: 2
- Oil Return Flange
- Removing and Installing. Refer to OIL RETURN CONNECTION, REMOVING AND INSTALLING .
- Seal
- After removal, replace the Three-Phase Current Drive -VX54-
- Seal
- Replace after removing
- Bolt
- 16 Nm + 90°
- Replace after removing
- Quantity: 7
- Alignment Sleeve
- Quantity: 2
- Seal
- For the input shaft
- Removing and Installing. Refer to INPUT SHAFT SEAL, REPLACING .
- Spring
- Remove using the T-Handle Hook: 3438
- Bolt
- 4 Nm +45°
- Replace after removing
- Quantity: 2
- Drive Motor Temperature Sensor -G712-
- Removing and Installing. Refer to Drive Motor Temperature Sensor -G712-, REMOVING AND INSTALLING .
- O-Ring
- Replace after removing
- Three-Phase Current Drive -VX54-
- For the transport or servicing it may be necessary to turn the Three-Phase Current Drive -VX54- using the Hybrid Module Turning Tool: T40410/1 .
- Removing and Installing. Refer to Three-Phase Current Drive -VX54-, REMOVING AND INSTALLING .CAUTION:
Risk of damaging the engine after replacing the, or the dual clutch.
- Adjust the Three-Phase Current Drive -VX54- decoupler and calibrate it. Refer to [For transmission(s) 0CJA] Clutch .
- Lower Mount
- Upper Mount
- O-Ring
- After removal, replace the Three-Phase Current Drive -VX54-
- O-Ring
- After removal, replace the Three-Phase Current Drive -VX54-