Overview - Filter At The Valve Body

- Valve Body
- Removing and installing. Refer to Transmission Control Module -J217-, REMOVING AND INSTALLING .
- Seal
- Replace after removing
- Low Pressure Filter
- Replace after removing
- Seal
- Replace after removing
- Filter Cover
- Replace after removing
- Bolts
- M6 x 20
- Replace after removing
- Tightening specification and sequence. Refer to Fig 2.
- Seal
- Replace after removing
- Suction Filter
- Replace after removing
- Bolts
- M5 x 18
- Replace after removing
- 3 Nm +45°
- Bolts
- M6 x 20
- Replace after removing
- Tightening specification and sequence. Refer to Fig 2.
- Filter Cover
- Replace after removing
- Pay attention to the assembly instructions. Refer to Fig 2.
- Seal
- Replace after removing
- High Pressure Filter
- Replace after removing
- Seal
- Replace after removing
- Check before the repair, if the necessary replacement parts are available. Refer to the Parts Information.
CAUTION:
Contamination damages the Mechatronic.
- Pay attention to absolute cleanliness when working on hydraulic control.
- Even a small amount of debris can lead to system malfunctions.
- Remove the replacement parts from their packaging just prior to installing them.
- Protect open oil channels from debris.
Dual Filter Cover - Tightening Specification and Sequence
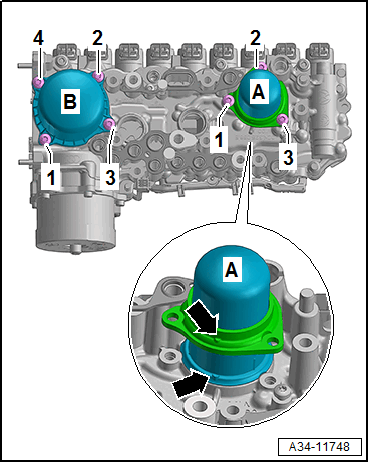
High Pressure Filter Cover -A-
- Both markings -arrows- must be above each other.
| Step | Bolts | Tightening Specification/Additional Turn |
|---|---|---|
| 1 | -1 to 3- | Install all the way by hand |
| 2 | -1 to 3- | 8 Nm |
| 3 | -1 to 3- | 90° additional turn |
Low pressure filter cap -B-
| Step | Bolts | Tightening Specification/Additional Turn |
|---|---|---|
| 1 | -1 to 4- | Install all the way by hand |
| 2 | -1 to 4- | 8 Nm |
| 3 | -1 to 4- | 60° additional turn |