Vibration Damper, Removing And Installing, Version 1, Vehicle With Starter Generator: Installing
Install in the reverse order of removal while noting the following:
- Replace the bolt with the O-ring after removing.
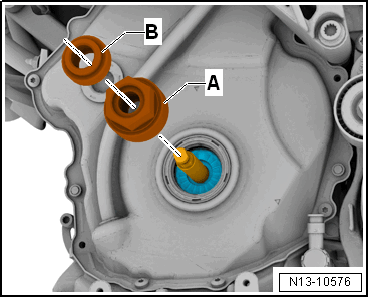
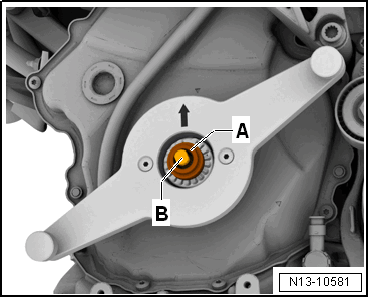
-- If necessary, remove the Vibration Damper Assembly Tool - Knurled Nut: T10531/4 -item B- and Vibration Damper Assembly Tool - Turning Over Tool: T10531/3 -item A- from the Vibration Damper Assembly Tool - Tensioning Pin: T10531/6 .
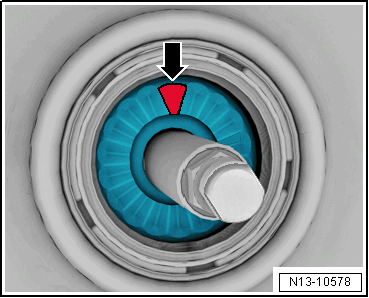
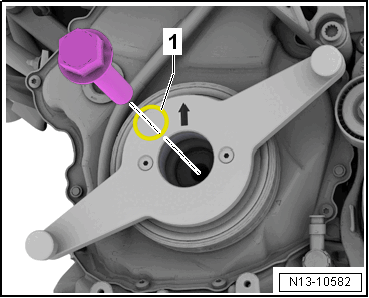
-- Attach the vibration damper. At the same time, pay attention to the tooth contour of the chain sprocket -arrow-.
-- Place the Vibration Damper Assembly Tool - Turning Over Tool: T10531/3 -item A- on the Vibration Damper Assembly Tool - Tensioning Pin: T10531/6 .
- At the same time the hex fitting points to the vibration damper.
-- Install the Vibration Damper Assembly Tool - Knurled Nut: T10531/4 -item B-. While doing so, move the vibration damper back and forth slightly to check if the vibration damper is seated correctly in the tooth contour.
-- Tighten the knurled nut until the vibration damper can no longer be turned.
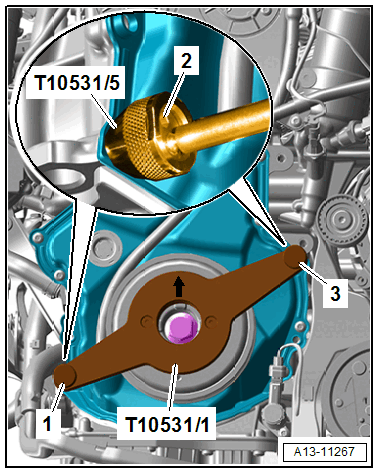
-- Place the Assembly Tool - Mount: T10531/1 as shown on the vibration damper and tighten the knurled bolt -1 and 3- in the adapter hand-tight.
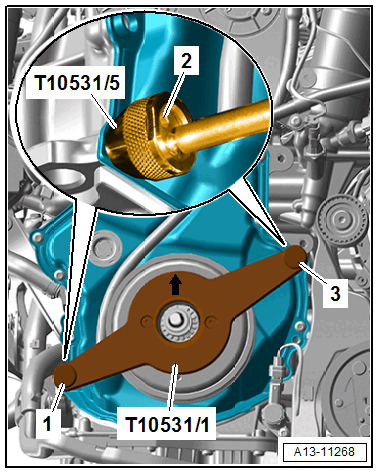
-- If necessary, align the adapter on the inner hex socket -2- with a 4 mm hex socket wrench and counterhold.
- The arrow marking on the Vibration Damper Assembly Tool - Counterhold Tool: T10531/1 must point upward.
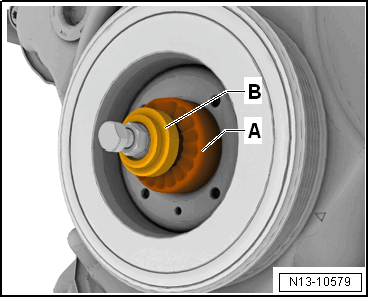
-- Remove the Vibration Damper Assembly Tool - Knurled Nut: T10531/4 -item A- and loosen the tensioning pin -B-.
-- Unscrew the Vibration Damper Assembly Tool - Tensioning Pin: T10531/6 and remove it with the Vibration Damper Assembly Tool - Turning Over Tool: T10531/3 .
-- Install a new vibration damper bolt hand-tight with an oiled O-ring -1-.
-- Remove the knurled bolts -1 and 3- and remove the Vibration Damper Assembly Tool - Counterhold Tool: T10531/1 .
-- Remove the Vibration Damper Assembly Tool - Adapter: T10531/5 .
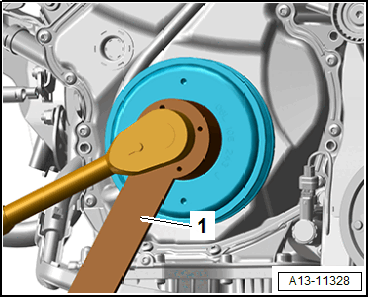
-- tighten the vibration damper bolt, to do so, use the Counterholder: T40378 -1-.
Install in reverse order of removal. Note the following:
- Replace the timing chain cover bolts after removing.
-- Install the ribbed belt. Refer to RIBBED BELT, REMOVING AND INSTALLING .
-- Install the fan shroud. Refer to FAN SHROUD, REMOVING AND INSTALLING .