Instrument Panel, Removing And Installing: Removing
-- Remove the center console. Refer to CENTER CONSOLE, REMOVING AND INSTALLING .
-- Move the steering wheel as far to the rear and down as possible. Use the full steering column adjustment range for this.
-- Move the front seats all the way back and tilt backrests 45°.
Risk of injury due to involuntary deployment.
- Pay attention to the safety precautions when working with pyrotechnic components. Refer to SAFETY PRECAUTIONS WHEN WORKING WITH PYROTECHNIC COMPONENTS .
-- Disconnect the battery ground cable with the ignition turned on. Refer to BATTERY, DISCONNECTING AND CONNECTING .
-- Remove the driver side airbag unit. Refer to AIRBAG UNIT WITH IGNITER, REMOVING AND INSTALLING .
-- Remove the steering wheel. Refer to STEERING WHEEL, REMOVING AND INSTALLING .
-- Remove the upper steering column trim panel. Refer to UPPER STEERING COLUMN TRIM PANEL, REMOVING AND INSTALLING .
-- Remove the Switch Module in Instrument Panel, Center -EX22- . Refer to COMPONENT LOCATION OVERVIEW - INSTRUMENT PANEL CONTROLS .
-- Remove the instrument panel side cover. Refer to INSTRUMENT PANEL SIDE COVER, REMOVING AND INSTALLING .
-- Remove the instrument panel cover on the driver side. Refer to DRIVER SIDE INSTRUMENT PANEL COVER, REMOVING AND INSTALLING .
-- Remove the light switch trim. Refer to LIGHT SWITCH TRIM, REMOVING AND INSTALLING .
-- Remove the glove compartment. Refer to GLOVE COMPARTMENT, REMOVING AND INSTALLING .
-- Remove the A/C display control head trim. Refer to DISPLAY CONTROL HEAD TRIM, REMOVING AND INSTALLING .
-- Remove the MMI screen cover. Refer to MMI SCREEN COVER, REMOVING AND INSTALLING .
-- Remove the center vent / outer front passenger side instrument panel vent. Refer to CENTER VENT, REMOVING AND INSTALLING .
-- Remove the instrument cluster trim. Refer to INSTRUMENT CLUSTER TRIM, REMOVING AND INSTALLING .
-- Remove the instrument cluster. Refer to OVERVIEW - INSTRUMENT CLUSTER .
-- Remove the Infotainment system display. Refer to INFOTAINMENT SYSTEM DISPLAY, REMOVING AND INSTALLING .
-- Remove the center front defroster vent. Refer to FRONT CENTER DEFROSTER VENT, REMOVING AND INSTALLING .
-- Remove the center speaker in the instrument panel. Refer to COMPONENT LOCATION OVERVIEW - SOUND SYSTEM .
-- Remove the A-pillar upper trim panels. Refer to A-PILLAR TRIM PANEL, REMOVING AND INSTALLING .
-- Remove the mount for the Information Electronics Control Module 1 -J794- and let it hang on the connected wires. Refer to COMPONENT LOCATION OVERVIEW - INFOTAINMENT SYSTEM .
-- Equipped on some models: remove the expanding clips -arrows- for the air duct to the right instrument panel vent and to the wide vent.

Risk of injury due to involuntary deployment.
- Before handling pyrotechnic components (for example, disconnecting the connector), the person handling it must "discharge static electricity" . For example, this can be done by briefly touching the door striker.
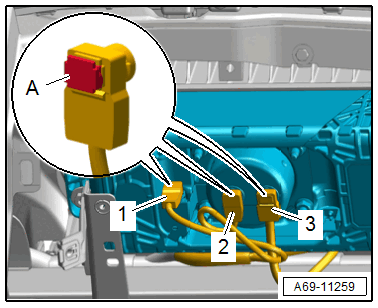
-- Disconnect the connectors -1 and 3- and if equipped -2- for the front passenger side airbag unit.
-- Release the connector lock -A- using a small screwdriver.
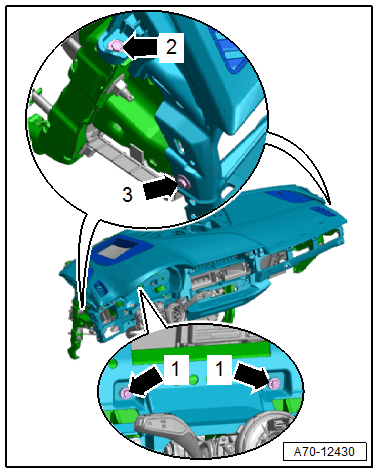
-- Remove the instrument panel bolts -arrows 1, 2 and 3- from the crossmember.
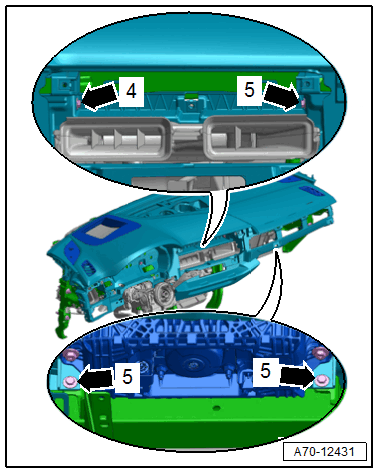
-- Remove the instrument panel bolts -arrows 4 and 5- from the crossmember.
-- Unclip and free up the wiring harnesses from the instrument panel.
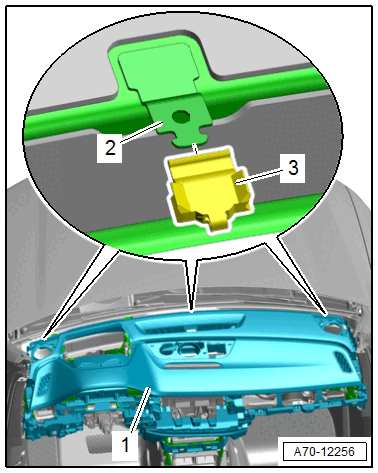
-- Lift up the instrument panel -1- slightly and carefully remove it from the mount -2- toward the rear and from the crossmember.
-- Lift the instrument panel slightly and disconnect the connectors for the side speakers.
-- Remove the instrument panel carefully toward the rear while guiding the connectors out.
-- Remove the instrument panel from the vehicle interior and lay it on a soft surface.