Headliner, Removing And Installing, AVANT: Removing
Risk of injury due to involuntary deployment.
- Pay attention to the safety precautions when working with pyrotechnic components. Refer to SAFETY PRECAUTIONS WHEN WORKING WITH PYROTECHNIC COMPONENTS .
-- Remove the front passenger seat. Refer to FRONT SEAT, REMOVING AND INSTALLING .
-- Remove the A-pillar upper trim panels. Refer to A-PILLAR TRIM PANEL, REMOVING AND INSTALLING .
-- Remove the B-pillar upper trim panel on the front passenger side. Refer to B-PILLAR UPPER TRIM PANEL, REMOVING AND INSTALLING .
-- Remove the C-pillar trim panel on the front passenger side. Refer to C-PILLAR TRIM PANEL, REMOVING AND INSTALLING, AVANT .
-- Remove the luggage compartment side trim panels. Refer to LUGGAGE COMPARTMENT SIDE TRIM PANEL, REMOVING AND INSTALLING, AVANT .
-- Remove the roof end strip. Refer to ROOF END STRIP, REMOVING AND INSTALLING .
-- Remove the D-pillar trim panels. Refer to D-PILLAR TRIM PANEL, REMOVING AND INSTALLING, AVANT .
-- Remove the front roof module. Refer to FRONT INTERIOR LAMP/READING LAMP, REMOVING AND INSTALLING .
-- Equipped on some models: remove the front camera cover. Refer to INTERIOR REARVIEW MIRROR WITH OPTIONAL EQUIPMENT: .
-- Remove the sun visors. Refer to SUN VISOR, REMOVING AND INSTALLING .
-- Remove the vanity mirror illumination. Refer to DRIVER AND FRONT PASSENGER VANITY MIRROR LAMP -W20- / -W14- , REMOVING AND INSTALLING .
-- Remove the roof grab handle. Refer to ROOF GRAB HANDLE, REMOVING AND INSTALLING .
Versions Equipped with a Sliding Sunroof:
-- Open the sun shade.
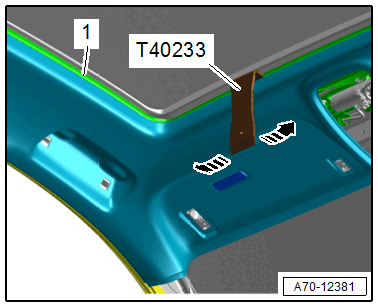
-- To avoid dirtying the headliner, clean the :T40233 .
-- Push the :T40233 between the frame -1- for the sliding sunroof and the headliner.
-- Loosen the headliner using the :T40233 from the sliding sunroof frame all the way around in direction of -arrows- , as shown.
Continuation for All Vehicles:
-- Move the front seat all the way forward in the lowest setting and move the backrest as far forward as it will go.
-- Fold the rear seat backrests forward.
-- Free up the headliner in the area near the inner door seals.
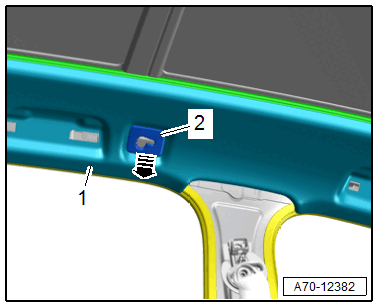
-- Unclip the headliner -1- with the trim -2- and bracket from the screen separator mounting eye in direction of -arrow- .
-- Repeat the procedure on the opposite side.
- The headliner bends easily.
- Replace the headliner if it is bent.
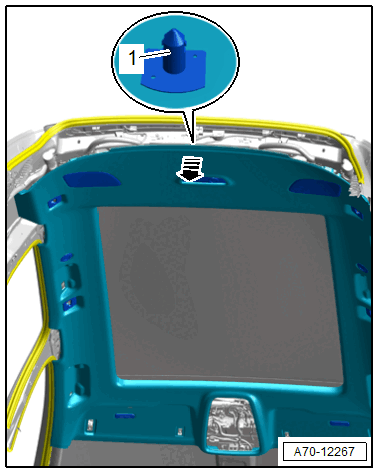
-- Grip under the headliner by hand and unclip from the body at the rear of the centering pin -1- -arrow- .
The headliner is removed through the rear lid opening.
-- Remove the sun visor center support. Refer to SUN VISOR CENTER SUPPORT, REMOVING AND INSTALLING .
-- Lower the headliner -1- on the right side of the vehicle as shown.
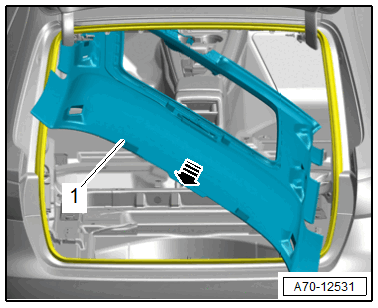
-- Remove the headliner carefully through the lid opening in direction of -arrow- as shown.
-- To do this carefully guide the headliner at the edges through the rear lid opening.