Overview - Rear Lid, A5 SPORTBACK
CAUTION:
There is a risk of explosions and fatal injuries due to damaged natural gas tanks.
- The natural gas tank must be checked for damage if components in the rear side or rear area are removed due to damage, such as the bumper cover, rear lid, underbody trim panels, longitudinal members, rear lid end piece, etc.
- Check for damage on fuel tanks. Refer to the appropriate information in FUEL TANK .
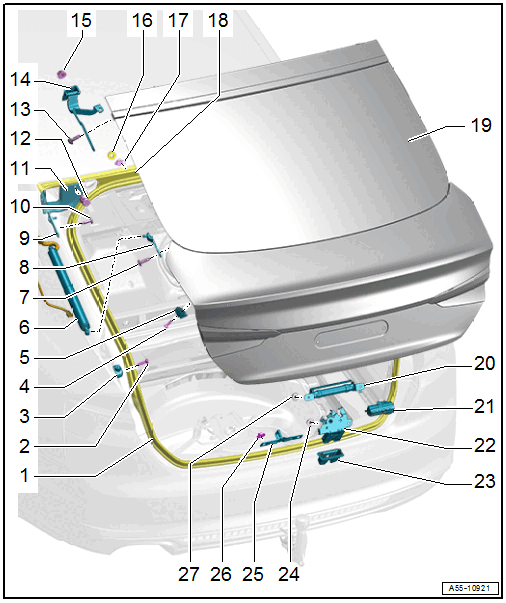
- Rear Lid Seal
- Removing and Installing. Refer to REAR LID SEAL, REMOVING AND INSTALLING .
- Bolt
- 8 Nm
- Quantity: 2
- Adjusting Buffer
- Removing and Installing. Refer to ADJUSTING BUFFER, REMOVING AND INSTALLING, A4 AVANT AND A5 SPORTBACK .
- Adjusting. Refer to HEIGHT, ADJUSTING USING ADJUSTING BUFFER .
- Bolt
- 8 Nm
- Stop
- For the adjusting buffer
- Removing and Installing. Refer to ADJUSTING BUFFER STOP, REMOVING AND INSTALLING, A4 AVANT AND A5 SPORTBACK .
- Rear Lid Motor
- Overview. Refer to OVERVIEW - ELECTRIC REAR LID RELEASE, A5 SPORTBACK .
- Bolt
- 30 Nm
- Quantity: 2
- Mount
- With ball pin
- Mount
- With ball pin
- Bolt
- 30 Nm
- Quantity: 2
- Side Roof Frame Cover
- Removing and Installing. Refer to ROOF FRAME COVER, REMOVING AND INSTALLING, A5 SPORTBACK .
- Clip
- Quantity: 2
- Bolt
- 21 Nm
- Quantity: 3
- Hinge
- Removing and Installing. Refer to HINGE, REMOVING AND INSTALLING, A5 SPORTBACK .
- Nut
- 21 Nm
- Quantity: 2
- Foam Seal
- Replace if damaged
- Quantity: 8
- Clip
- Replace after removing.
- Quantity: 8
- Roof Frame Cover
- Replace after removing.
- Removing and Installing. Refer to ROOF FRAME COVER, REMOVING AND INSTALLING, A5 SPORTBACK .
- Rear Lid
- Removing and Installing. Refer to REAR LID, REMOVING AND INSTALLING, A5 SPORTBACK .
- Adjusting. Refer to REAR LID, ADJUSTING .
- Balance Weight
- Equipped on some models
- Release Button In Rear Lid Handle -E234-
- Component Location Overview. Refer to COMPONENT LOCATION OVERVIEW - CONTROLS IN LUGGAGE COMPARTMENT
- Latch
- Rear Lid Lock Unit -VX25-
- With Rear Lid Central Locking System Motor -V53-, Lock Pawl Contact Switch -F443-, equipped on some models: Rear Lid Contact Switch -F111-
- Removing and Installing. Refer to LATCH, REMOVING AND INSTALLING .
- Rear Lid Latch Trim Panel
- Removing and Installing. Refer to REAR LID LOWER TRIM PANEL, REMOVING AND INSTALLING .
- Nut
- 21 Nm
- Quantity: 2
- Striker
- Removing and Installing. Refer to STRIKER, REMOVING AND INSTALLING .
- Adjusting. Refer to HEIGHT ADJUSTMENT AT STRIKER .
- Nut
- 21 Nm
- Quantity: 2
- Nut
- 8 Nm
- Quantity: 2