Refrigerant Lines, Disconnecting And Connecting
Special tools and workshop equipment required
- Engine Bung Set :VAS6122
- The procedure for loosening applies to all connection points in the refrigerant circuit and for the branching point of refrigerant lines to rear heater and A/C unit. There are differences in the line connection diameter, O-ring versions and mounting bolts.
- Depending on component location, various components in vicinity of connection points must be loosened or removed to be able to disconnect the connection point.
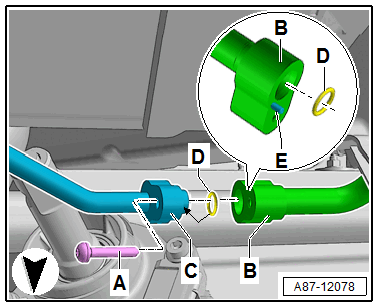
- The following illustration shows as an example the connection points between the refrigerant lines from the inner heat exchanger to the A/C compressor and to the condenser as well as the connection points on the opening in the perform to the refrigerant lines to the evaporator in the rear heater and A/C unit. These connection points are installed in the area under the left front fender.
Loosening
- For all the following work, close the open lines and connections with clean plugs from the Engine Bung Set :VAS6122 .
Loosening
-- Switch off the ignition.
-- Depending on the connection point, remove the components that hinder accessibility.
-- Discharge the refrigerant circuit. Refer to Refrigerant Circuit or Working with A/C Service Station (1 Of 2) / Working with A/C Service Station (2 Of 2) .
Danger or frostbite due to refrigerant coming out under pressure.
Frostbite on the skin and other parts of the body is possible.
- Wear safety gloves.
- Wear protective eyewear.
- Evacuate or drain refrigerant and open the refrigerant circuit immediately.
- If more than 10 minutes elapse after extracting or draining the refrigerant and the refrigerant circuit was not opened, extract or drain the refrigerant again. Pressure develops in the refrigerant circuit due to evaporation.
-- Remove the bolt -A-.
-- Disconnect the connection points for refrigerant lines -B, C-.
Assembling
Install in reverse order of removal and note the following:
-- Thoroughly clean the refrigerant lines around the connection area and check for damage.
-- Replace the O-rings -D-. Refer to the Parts Information for the different versions.
-- Coat the O-ring seals -D- lightly with refrigerant oil before installing. Refer to REFRIGERANT CIRCUIT SEALS .
-- If equipped, check the alignment pins for damage and correct seating.
-- Pay attention to the different bolt tightening specifications -A-.
-- Check the routing of the refrigerant lines after attachment. They must be inserted in the provided brackets in a tension-free manner and must not come in contact with other components.
-- Reinstall the removed components in the reverse order and reattach detached components.
-- Evacuate and charge the refrigerant circuit. Refer to Refrigerant Circuit or Working with A/C Service Station (1 Of 2) / Working with A/C Service Station (2 Of 2) .
-- Start the A/C system after charging the refrigerant circuit. Refer to A/C SYSTEM, STARTING AFTER CHARGING REFRIGERANT CIRCUIT .
Tightening Specifications
- Refer to OVERVIEW - REFRIGERANT LINES