General Information And Procedures - Actuators, Removing And Installing
- At the start of production for this vehicle, only the heater and A/C unit manufactured by Mahle "version 1" was installed. In the future, Mahle "version 2" heater and A/C units may also be installed in this vehicle (introduction date TBD). Refer to Parts Information.
- Depending on the production date, there can be different versions of the levers and fasteners on the heater and A/C unit. Refer to the Parts Information.
- The illustrations show removal and installation on an actuator with an open shaft.
- Actuators are equipped with electronics on this vehicle; a new actuator first learns its position on the heater and A/C unit during the basic setting and can then be activated by the Vehicle Electrical System Control Module -J519- (currently all actuators are identical in construction) using the Vehicle Diagnostic Tester.
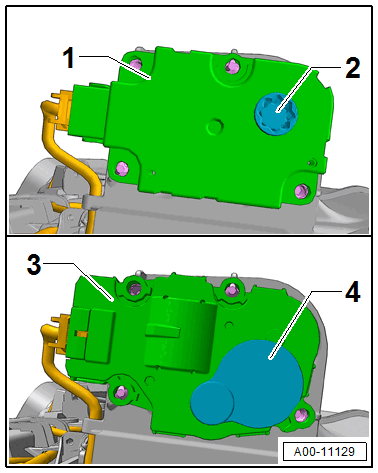
- Actuators -1- with an open shaft -2- on "Mahle" "version 1" heater and A/C unit.
- Mahle "version 2" manufacturer actuators -3- with closed shaft -4- on the heater and A/C unit.
- Before removing an actuator, label the position of the connector and the actuator on the heater and A/C unit.
- The actuator mount does not have a stop. It turns constantly if the actuator is activated. Therefore, it should not be activated when the actuator is removed.
- After installing an actuator, perform the basic setting for the actuators.
Front adjustment motors procedure
-- Connect the Vehicle Diagnostic Tester.
-- Select Diagnostic mode and start the diagnosis.
-- Select the Test plan tab.
-- Press the Select custom test button and select the following tree structure in order:
- Body
- Heating, Ventilation & Air Conditioning
- OBD-capable systems
- 08- A/C/Heater Electronics - E87
- 08- A/C/Heater Electronics - Functions
- 08 - Basic Setting
- → Basic setting 2, programming door end stops