Seat Pan Cover And Cushion, Removing And Installing, Standard/Sport Seat: Removing
Risk of injury due to involuntary deployment.
- Pay attention to the safety precautions when working with pyrotechnic components. Refer to SAFETY PRECAUTIONS WHEN WORKING WITH PYROTECHNIC COMPONENTS .
- Before handling pyrotechnic components (for example, disconnecting the connector), the person handling it must "discharge static electricity". For example, this can be done by briefly touching the door striker.
-- Remove the front seat. Refer to FRONT SEAT, REMOVING AND INSTALLING .
-- Fasten the front seat on the :VAS6136 . Refer to FRONT SEAT, MOUNTING ON FIXTURE FOR SEAT REPAIR .
-- Remove the tunnel-side seat side trim. Refer to SEAT SIDE TRIM ON TUNNEL SIDE, REMOVING AND INSTALLING .
-- Remove the seat side trim on the side sill side and remove the bracket. Refer to SEAT SIDE TRIM ON SIDE SILL SIDE, REMOVING AND INSTALLING .
-- Equipped on some models: remove the child seat anchor. Refer to FRONT CHILD SEAT ANCHOR, REMOVING AND INSTALLING .
-- Equipped on some models: remove the fire extinguisher bracket. Refer to FIRE EXTINGUISHER BRACKET, REMOVING AND INSTALLING .
-- Equipment versions with passenger occupant detection system: follow the instructions. Refer to PASSENGER OCCUPANT DETECTION SYSTEM, REMOVING AND INSTALLING .
-- Disconnect and free up the connectors. If necessary, disconnect the modular wiring routing. Refer to MODULAR WIRING ROUTING, DISCONNECTING AND CONNECTING .
Equipment versions with Seat Cushion Fan:
-- Remove the seat cushion fan. Refer to SEAT CUSHION FAN, REMOVING AND INSTALLING .
Equipment versions with Seat Depth Adjuster:
-- Remove the front seat trim. Refer to FRONT SEAT TRIM, REMOVING AND INSTALLING .
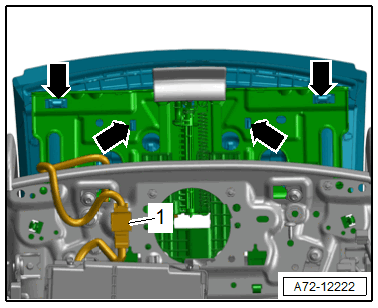
-- Disconnect the connector -1-.
-- Release the hooks -arrows-, and fold the retaining plate with cushion and cover toward the rear.
-- Disengage the contour wire on the left and right side from the hooks -A arrows-.
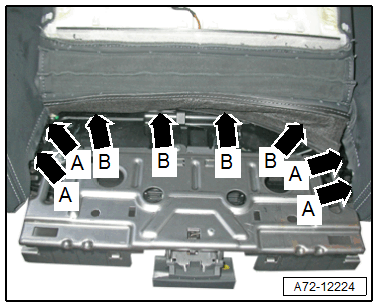
-- Using the :T40207 , disengage the cover clamping strip from the hooks -B arrows-.
Equipment Versions without Seat Depth Adjuster:
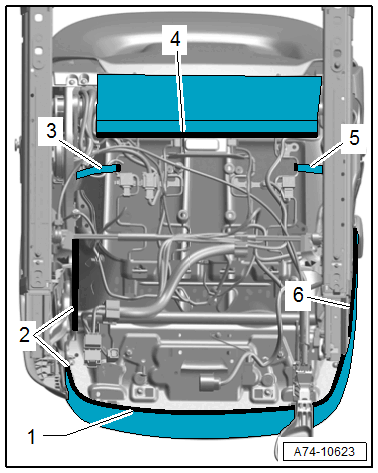
-- Disengage the cover molding -1- using the :3370 .
Continuation for All Seat Versions:
-- Disengage the cover molding -2, 4 and 6- in the front and side areas using the :3370 .
-- Disengage the left and right hooks -3 and 5-.
-- Remove the cover and cushion from the seat pan, while guiding the seat heating wiring harness out at the same time.