SUBFRAME, Securing
Special tools and workshop equipment required
- Torque Wrench 1331 5-50Nm :VAG1331
- Torque Wrench 1332 40-200Nm :VAG1332
- Engine and Gearbox Jack :VAS6931
- Gearbox Support :T40173
- Rear Axle Support :T10552
- Locating Pins :T40327
Tools, Preparing

-- Loosen the bolts -arrows-.
-- Adjust the dimension -a-.
- Dimension -a- = 250 mm
-- Tighten the bolts again.
Procedure
-- Equipped on some models: remove the left and right diagonal brace. Refer to DIAGONAL BRACES, REMOVING AND INSTALLING
-- Remove the muffler. Refer to MUFFLER, REMOVING AND INSTALLING .
-- Remove the left and right spring. Refer to SPRING, REMOVING AND INSTALLING .
AWD Equipment Versions with Rear Final Drive Installed
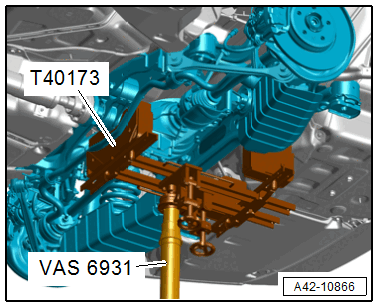
-- Support the subframe using the :VAS6931 and :T40173 as shown on the rear final drive and on the subframe.
FWD or AWD Equipment Versions with Rear Final Drive Removed
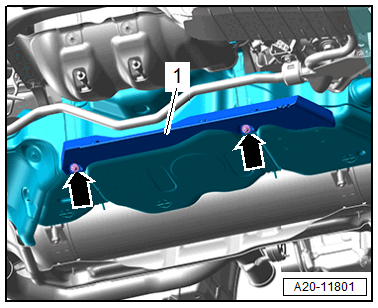
-- Equipment versions with gas fuel systems: remove the nuts -arrows-, and remove the wind deflector -1-.
-- If necessary, bring the stabilizer bar into the installation position and secure it with bolts.

-- Position the :T10552 with the :VAS6931 under the subframe and lift.
-- Bring the :T10552/2 all the way on the stabilizer bar.
-- Place the :T10552/1 all the way into the rear holes on the subframe by turning left and right at the threaded sleeve.
Continuation:
-- Secure the subframe with the tensioning strap from the engine and gearbox jack.
There is a risk of damaging the threads on the subframe threaded connection to the body.
- The subframe bolts on the body must not be loosened or tightened with an impact wrench.
- Always install all bolts by hand for the first few turns.
-- Remove the left and right bolt -2- from the rear subframe one after the other and install a locating pin from the :T40327 .
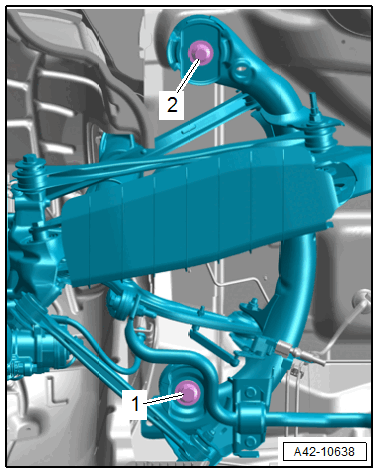
If the locating pin cannot be inserted, rework the stop plate in the subframe mount near the retaining tabs slightly with a file.
-- Tighten locating pin to 20 Nm.
- The subframe position is now secured.
-- Remove the left and right bolts -1- from the subframe.
Remove the :T40327
Removal is performed in the reverse order. Note the following:
There is a risk of damaging the threads on the subframe threaded connection to the body.
- The subframe bolts on the body must not be loosened or tightened with an impact wrench.
- Always install all bolts by hand for the first few turns.
Risk of accident!
- If the vehicle will be driving on the streets, all bolts and nuts must be tightened properly according to the guidelines.
-- Install the springs. Refer to SPRING, REMOVING AND INSTALLING .
-- A road test must be performed after completing repairs. If the steering wheel is crooked, the wheels must be aligned. Refer to AXLE ALIGNMENT .
Tightening Specifications
- Refer to OVERVIEW - SUBFRAME
- Refer to OVERVIEW - MUFFLER .
- Refer to OVERVIEW - UNDERBODY BRACING .
- Refer to OVERVIEW - UNDERBODY TRIM PANELS .
- Refer to WHEELS AND TIRES