If large quantities of metal shavings or abraded material are found in the engine oil while servicing the engine, the oil passages must be carefully cleaned to prevent subsequent damage. Replace the additional oil spray jet, engine oil cooler and oil filter.
WARNING: This page is about a different variant/trim than selected.

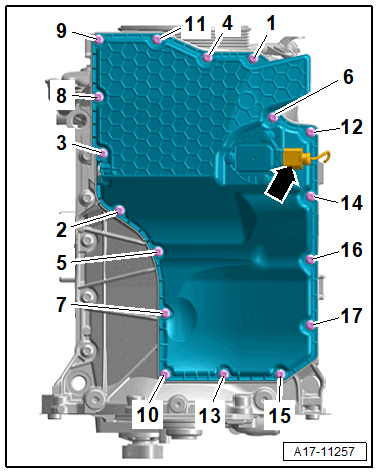
- Nut
- 9 Nm
- Oil Level Thermal Sensor -G266-
- Removing and Installing. Refer to Oil Level Thermal Sensor -G266-, REMOVING AND INSTALLING .
- Seal
- Replace after removing
- Bolt
- Tightening sequence. Refer to Fig 2.
- Replace after removing
- Oil Pan Lower Section
- Removing and Installing. Refer to OIL PAN LOWER SECTION, REMOVING AND INSTALLING .
- O-Ring
- Replace after removing
- Coat with engine oil
- Plugs
- Turn until it stops
- Seal
- Replace after removing
- Bolt
- 4 Nm +45°
- Replace after removing
- Suction Line
- Clean the screen if there are debris
- O-Ring
- Replace after removing
- Coat with engine oil
- Oil Pump
- Removing and Installing. Refer to OIL PUMP, REMOVING AND INSTALLING .
- Centering Bracket
- For the oil pump
- Quantity: 2
- O-Ring
- Replace after removing
- Coat with engine oil
- Bolt
- -item 2-
- Oil Pressure Regulation Valve -N428-
- -item 3-
- Chain Tensioner
- Guide Pin
- 9 Nm
- Oil Pump Drive Chain
- Mark the running direction before removal
- Cylinder Block
- Bolt
- 4 Nm +90°
- Replace after removing
- Oil Baffle
- Oil Pan Upper Section
- Removing and Installing. Refer to OIL PAN UPPER SECTION, REMOVING AND INSTALLING .
- Bolt
- Plug
- Quantity: 3
- Oil Screen
- Bolt
- 8 Nm +90°
- Replace after removing
- O-Ring
- Replace after removing
- Coat with engine oil
Oil Pan Lower Section - Tightening Specifications and Sequence
 Courtesy of AUDI OF AMERICA, LLC
- Replace bolts that were tightened with an additional turn after removing them.
-- Tighten the bolts -1 to 17- in steps in the sequence shown:
| Step | Tightening Specification/Additional Turn |
|---|---|
| 1. | Install all the way by hand |
| 2. | 8 Nm |
| 3. | 90° additional turn |
Oil Pan Upper Section Bolts M8x20 - Versions
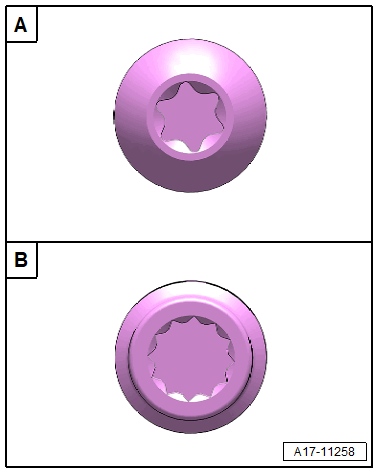
A - Version 1
- With TORX® bolt head
B - Version 2
- With multi-point bolt head
Oil Pan Upper Section - Tightening Specifications and Sequence
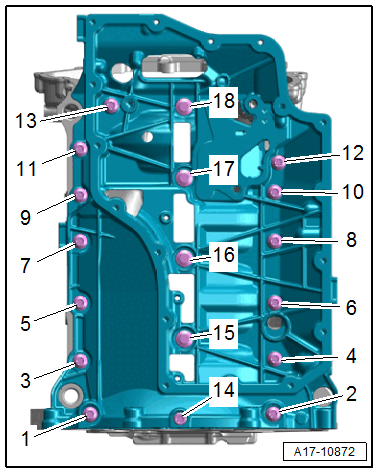
- Replace bolts that were tightened with an additional turn after removing them.
-- Tighten the version 1 bolts (refer to Fig 3) gradually in the sequence shown.
| Step | Bolts | Tightening Specification/Additional Turn |
|---|---|---|
| 1. | -1 through 18- | 8 Nm |
| 2. | -1 through 13- | 45° additional turn |
| 3. | -14 through 18- | 90° additional turn |
-- Tighten the version 2 bolts (refer to Fig 3) gradually in the sequence shown.
| Step | Bolts | Tightening Specification/Additional Turn |
|---|---|---|
| 1. | -1 through 13- | 15 Nm |
| 2. | -14 through 18- | 8 Nm |
| 3. | -1 through 18- | 90° additional turn |