Cylinder Head, Removing And Installing: Installing
There is a risk of damaging the sealing surfaces if handled incorrectly.
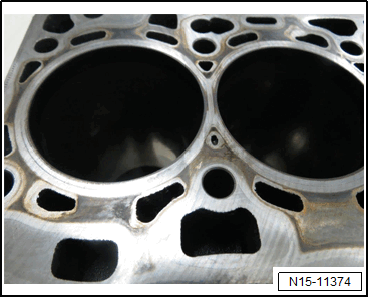
- Carefully remove the sealant residue from the cylinder head and cylinder block.
- Do not use any sanding materials (sandpaper, sand stone sanding pads, sanding strips, or abrasive cloths etc.).
- May not be applied on sealing surfaces.
- The dark discoloration does not need to be removed.
- When removing the sealant residue pay attention that no loosened sealant residue gets into the channel to the engine.
- Pay attention to the neighboring work stations cleanliness and that no there is no sanding from above.
- The use of unpermitted sanding materials can cause subsequent damage, such as turbocharger damage, connecting rod bearing, etc.
Risk of injuring the eyes from sealant residue.
- Wear protective eyewear.
-- Remove the sealing lip from the cylinder head and cylinder block using only a commercially available blade scraper (blade width minimum 40 mm).
-- Remove any loose residue with a lint-free cloth.
- Replace bolts that were tightened with an additional turn after removing them.
- Replace the self-locking nuts, gaskets, seals and O-rings after removal.
- Check the O-ring in the crankcase ventilation hose for damage. Refer to OVERVIEW - CRANKCASE VENTILATION .
- Secure all hose connections with hose clamps that match the ones used in series production. Refer to the Electronic Parts Information (ETKA).
- Only unpack the new cylinder head gasket immediately before installing.
- To prevent the cylinder head gasket silicone layer and recessed area from being damaged, always handle the gasket extremely carefully.
- If a replacement cylinder is installed, only remove the plastic base right before cylinder head is installed to protect open valves.
- When installing a replacement cylinder head, the contact surfaces between the roller rocker lever and cam running surface need to be oiled before the cylinder head cover can be installed.
- When replacing the cylinder head or cylinder head gasket, replace all of the coolant and engine oil.
-- Clean oil and coolant residue out of the blind holes for the cylinder head bolts in the cylinder block
-- Position the cylinder head gasket.
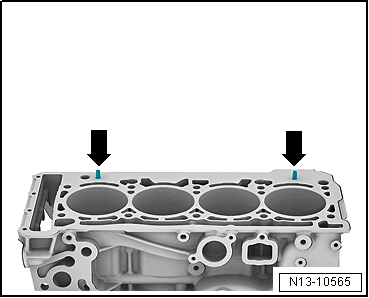
- Pay attention to alignment pins in cylinder block -arrows-.
- Pay attention to the cylinder head gasket installation position: the part number must be readable from the intake side.
-- If the crankshaft was turned in the meantime: bring the piston for cylinder 1 to TDC and then turn the crankshaft another 90° counter-clockwise out of "TDC".
-- Position the cylinder head.
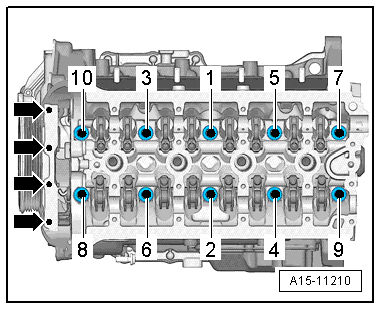
-- Insert the cylinder head bolts and tighten by hand.
-- Cylinder head tightening sequence. Refer to Figure.
TIP:
It is not required to retighten the cylinder head bolts after repairs.
-- Install the camshafts. Refer to CAMSHAFT, REMOVING AND INSTALLING .
-- Install the Throttle Valve Control Module -GX3-. Refer to Throttle Valve Control Module -GX3-, REMOVING AND INSTALLING .
-- Install the Secondary Air Injection Pump Motor -V101-. Refer to Secondary Air Injection Pump Motor -V101-, REMOVING AND INSTALLING .
-- Install the spark plugs. Refer to OVERVIEW - IGNITION SYSTEM .
-- Change the engine oil. Refer to ENGINE OIL .
-- Change the coolant. Refer to COOLANT, FILLING USING Cooling System Charge Kit: VAS6096 [DMTA, DPAA, DPUA, DPVA, DMTC, DRYA, DUVA] .
-- Install the front muffler. Refer to FRONT MUFFLER, REMOVING AND INSTALLING .
-- Install the engine cover. Refer to ENGINE COVER, REMOVING AND INSTALLING .