Left Engine Support, Removing And Installing, Vehicles With High-Voltage System: Removing
There is a risk of fatal injury due to high voltage.
Electrocution by direct contact or electric arc can cause severe bodily injury or fatal injury.
- Have an Audi high-voltage technician (HVT) or an Audi high-voltage expert (HVE) de-energize the high-voltage system.
-- De-energize the high-voltage system. Refer to HIGH-VOLTAGE SYSTEM, DE-ENERGIZING .
-- Disconnect the 12V battery. Refer to BATTERY, DISCONNECTING AND CONNECTING
-- Remove the engine cover. Refer to ENGINE COVER, REMOVING AND INSTALLING .
Audi A6/A7:
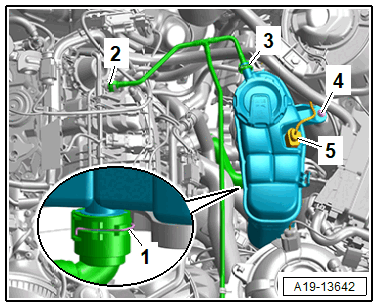
-- Free up the wiring harness.
-- Lift the clamp -3-, remove and free up the coolant hose.
-- Disconnect the connector -5- for the Engine Coolant Level Sensor -G32-.
-- Remove the bolt -4-, and push the coolant expansion tank to the side.
Audi Q5:
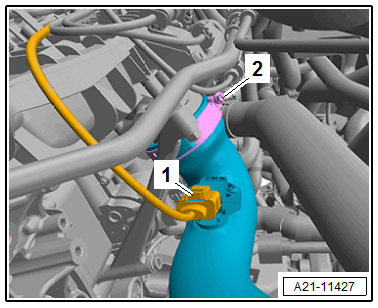
-- Disconnect the connector -1- for the Charge Air Pressure Sensor -G31-.
-- Loosen the hose clamp -2-, remove the air duct pipe from the Throttle Valve Control Module -GX3- and push it to the side (different versions).
-- Seal off any open lines and connections with plugs that are thoroughly cleaned from the Engine Bung Set: VAS6122 .
Continuation for All Vehicles:
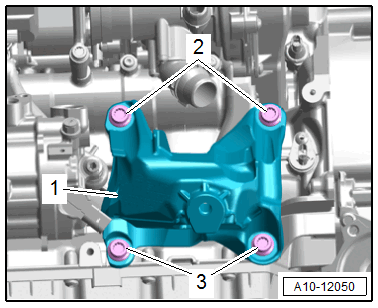
-- Remove the upper bolts -2- for the engine support -1-. (Shown with the engine removed.)
-- Remove the left support bearing. Refer to SUPPORT BEARING, REMOVING AND INSTALLING .
-- Remove the left engine mount. Refer to ENGINE MOUNT, REMOVING AND INSTALLING .
-- Remove the lower bolts -3- and the left engine support -1-. (Shown with the engine removed.)